python模拟哔哩哔哩滑块登入验证的实现
准备工具
pip3 install PIL pip3 install opencv-python pip3 install numpy 谷歌驱动建议指定清华源下载速度会更快点
使用方法 : pip3 install opencv-python -i https://pypi.tuna.tsinghua.edu.cn/simple/opencv-python/
谷歌驱动谷歌驱动下载链接 :http://npm.taobao.org/mirrors/chromedriver/
前言
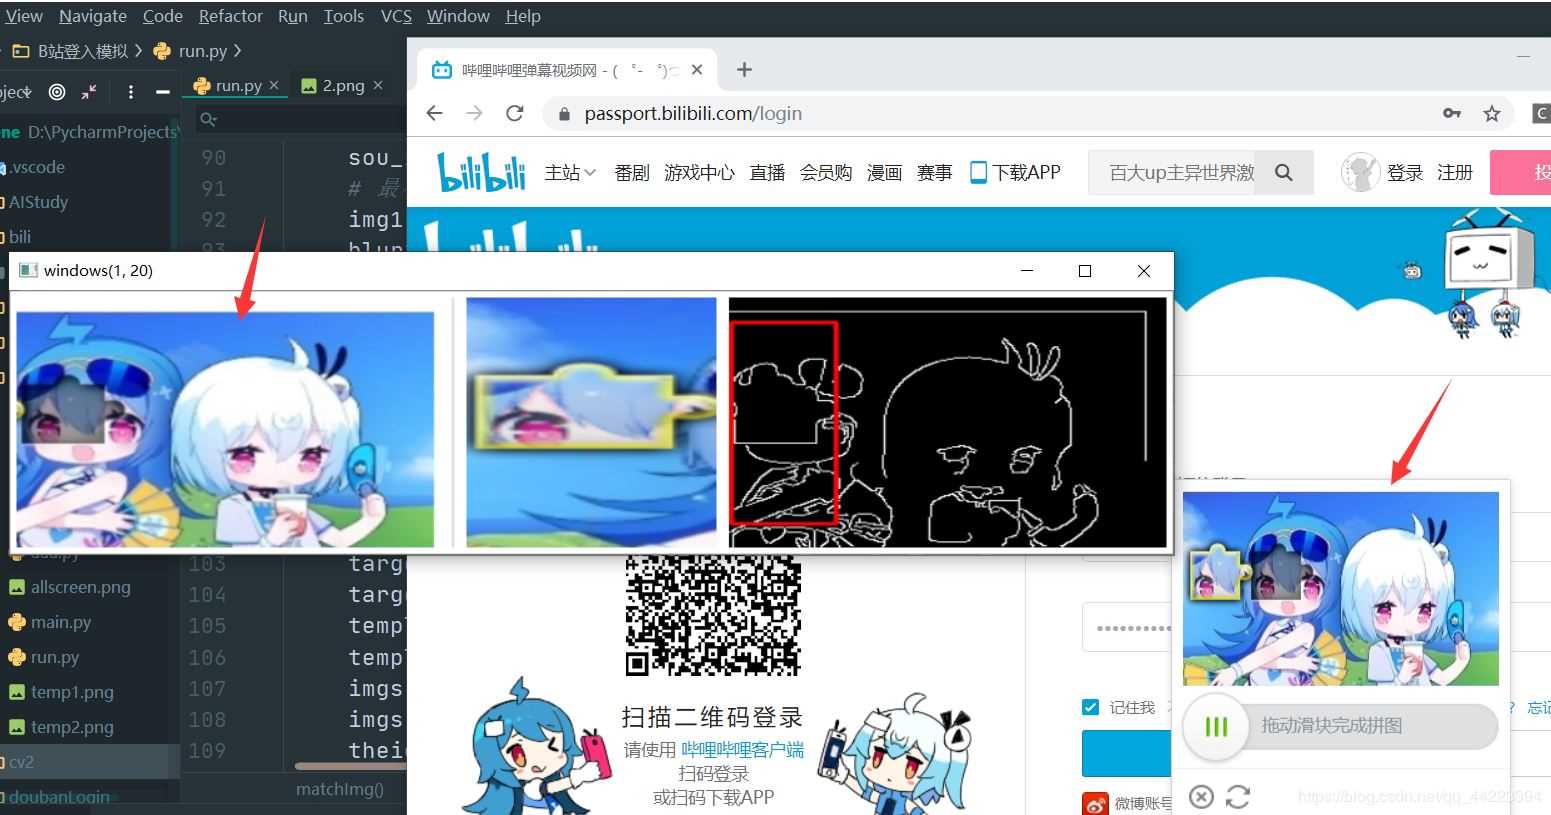
本篇文章采用的是cv2的Canny边缘检测算法进行图像识别匹配。
Canny边缘检测算法参考链接:https://www.jb51.net/article/185336.htm
具体使用的是Canny的matchTemplate方法进行模糊匹配,匹配方法用CV_TM_CCOEFF_NORMED归一化相关系数匹配。得出的max_loc就是匹配出来的位置信息。从而达到位置的距离。
难点
由于图像采用放大的效果匹配出的距离偏大,难以把真实距离,并存在误差。 由于哔哩哔哩滑块验证进一步采取做了措施,如果滑动时间过短,会导致验证登入失败。所以我这里采用变速的方法,在相同时间内滑动不同的距离。 误差的存在是必不可少的,有时会导致验证失败,这都是正常现象。流程
1.实例化谷歌浏览器 ,并打开哔哩哔哩登入页面。
2.点击登陆,弹出滑动验证框。
3.全屏截图、后按照尺寸裁剪各两张。
5.模糊匹配两张图片,从而获取匹配结果以及位置信息 。
6.将位置信息与页面上的位移距离转化,并尽可能少的减少误差 。
7.变速的拖动滑块到指定位置,从而达到模拟登入。
效果图
代码实例
库安装好后,然后填写配置区域后即可运行。
from PIL import Imagefrom time import sleepfrom selenium import webdriverfrom selenium.webdriver import ActionChainsfrom selenium.webdriver.common.by import Byfrom selenium.webdriver.support.ui import WebDriverWaitfrom selenium.webdriver.support import expected_conditions as ECimport cv2import numpy as npimport math############ 配置区域 #########zh=’’ #账号pwd=’’ #密码 # chromedriver的路径chromedriver_path = 'C:Program Files (x86)GoogleChromeApplicationchromedriver.exe'####### end #########options = webdriver.ChromeOptions()options.add_argument(’--no-sandbox’)options.add_argument(’--window-size=1020,720’)# options.add_argument(’--start-maximized’) # 浏览器窗口最大化options.add_argument(’--disable-gpu’)options.add_argument(’--hide-scrollbars’)options.add_argument(’test-type’)options.add_experimental_option('excludeSwitches', ['ignore-certificate-errors', 'enable-automation']) # 设置为开发者模式driver = webdriver.Chrome(options=options, executable_path=chromedriver_path)driver.get(’https://passport.bilibili.com/login’)# 登入def login(): driver.find_element_by_id('login-username').send_keys(zh) driver.find_element_by_id('login-passwd').send_keys(pwd) driver.find_element_by_css_selector('#geetest-wrap > div > div.btn-box > a.btn.btn-login').click() print('点击登入')# 整个图,跟滑块整个图def screen(screenXpath): img = WebDriverWait(driver, 20).until( EC.visibility_of_element_located((By.XPATH, screenXpath)) ) driver.save_screenshot('allscreen.png') # 对整个浏览器页面进行截图 left = img.location[’x’]+160 #往右 top = img.location[’y’]+60 # 往下 right = img.location[’x’] + img.size[’width’]+230 # 往左 bottom = img.location[’y’] + img.size[’height’]+110 # 往上 im = Image.open(’allscreen.png’) im = im.crop((left, top, right, bottom)) # 对浏览器截图进行裁剪 im.save(’1.png’) print('截图完成1') screen_two(screenXpath) screen_th(screenXpath) matchImg(’3.png’,’2.png’)# 滑块部分图def screen_two(screenXpath): img = WebDriverWait(driver, 20).until( EC.visibility_of_element_located((By.XPATH, screenXpath)) ) left = img.location[’x’] + 160 top = img.location[’y’] + 80 right = img.location[’x’] + img.size[’width’]-30 bottom = img.location[’y’] + img.size[’height’] + 90 im = Image.open(’allscreen.png’) im = im.crop((left, top, right, bottom)) # 对浏览器截图进行裁剪 im.save(’2.png’) print('截图完成2')# 滑块剩余部分图def screen_th(screenXpath): img = WebDriverWait(driver, 20).until( EC.visibility_of_element_located((By.XPATH, screenXpath)) ) left = img.location[’x’] + 220 top = img.location[’y’] + 60 right = img.location[’x’] + img.size[’width’]+230 bottom = img.location[’y’] + img.size[’height’] +110 im = Image.open(’allscreen.png’) im = im.crop((left, top, right, bottom)) # 对浏览器截图进行裁剪 im.save(’3.png’) print('截图完成3')#图形匹配def matchImg(imgPath1,imgPath2): imgs = [] #展示 sou_img1= cv2.imread(imgPath1) sou_img2 = cv2.imread(imgPath2) # 最小阈值100,最大阈值500 img1 = cv2.imread(imgPath1, 0) blur1 = cv2.GaussianBlur(img1, (3, 3), 0) canny1 = cv2.Canny(blur1, 100, 500) cv2.imwrite(’temp1.png’, canny1) img2 = cv2.imread(imgPath2, 0) blur2 = cv2.GaussianBlur(img2, (3, 3), 0) canny2 = cv2.Canny(blur2, 100, 500) cv2.imwrite(’temp2.png’, canny2) target = cv2.imread(’temp1.png’) template = cv2.imread(’temp2.png’) # 调整大小 target_temp = cv2.resize(sou_img1, (350, 200)) target_temp = cv2.copyMakeBorder(target_temp, 5, 5, 5, 5, cv2.BORDER_CONSTANT, value=[255, 255, 255]) template_temp = cv2.resize(sou_img2, (200, 200)) template_temp = cv2.copyMakeBorder(template_temp, 5, 5, 5, 5, cv2.BORDER_CONSTANT, value=[255, 255, 255]) imgs.append(target_temp) imgs.append(template_temp) theight, twidth = template.shape[:2] # 匹配跟拼图 result = cv2.matchTemplate(target, template, cv2.TM_CCOEFF_NORMED) cv2.normalize( result, result, 0, 1, cv2.NORM_MINMAX, -1 ) min_val, max_val, min_loc, max_loc = cv2.minMaxLoc(result) # 画圈 cv2.rectangle(target,max_loc,(max_loc[0]+twidth,max_loc[1]+theight),(0,0,255),2) target_temp_n = cv2.resize(target, (350, 200)) target_temp_n = cv2.copyMakeBorder(target_temp_n, 5, 5, 5, 5, cv2.BORDER_CONSTANT, value=[255, 255, 255]) imgs.append(target_temp_n) imstack = np.hstack(imgs) cv2.imshow(’windows’+str(max_loc), imstack) cv2.waitKey(0) cv2.destroyAllWindows() # 计算距离 print(max_loc) dis=str(max_loc).split()[0].split(’(’)[1].split(’,’)[0] x_dis=int(dis)+135 t(x_dis)#拖动滑块def t(distances): draggable = driver.find_element_by_css_selector(’div.geetest_slider.geetest_ready > div.geetest_slider_button’) ActionChains(driver).click_and_hold(draggable).perform() #抓住 print(driver.title) num=getNum(distances) sleep(3) for distance in range(1,int(num)): print(’移动的步数: ’,distance) ActionChains(driver).move_by_offset(xoffset=distance, yoffset=0).perform() sleep(0.25) ActionChains(driver).release().perform() #松开# 计算步数def getNum(distances): p = 1+4*distances x1 = (-1 + math.sqrt(p)) / 2 x2 = (-1 - math.sqrt(p)) / 2 print(x1,x2) if x1>=0 and x2<0: return x1+2 elif(x1<0 and x2>=0): return x2+2 else: return x1+2def main(): login() sleep(5) screenXpath = ’/html/body/div[2]/div[2]/div[6]/div/div[1]/div[1]/div/a/div[1]/div/canvas[2]’ screen(screenXpath) sleep(5)if __name__ == ’__main__’: main()
有能力的可以研究一下思路,然后写出更好的解决办法。
到此这篇关于python模拟哔哩哔哩滑块登入验证的实现的文章就介绍到这了,更多相关python 滑块登入验证内容请搜索好吧啦网以前的文章或继续浏览下面的相关文章希望大家以后多多支持好吧啦网!
相关文章:

 网公网安备
网公网安备