Python搭建Keras CNN模型破解网站验证码的实现
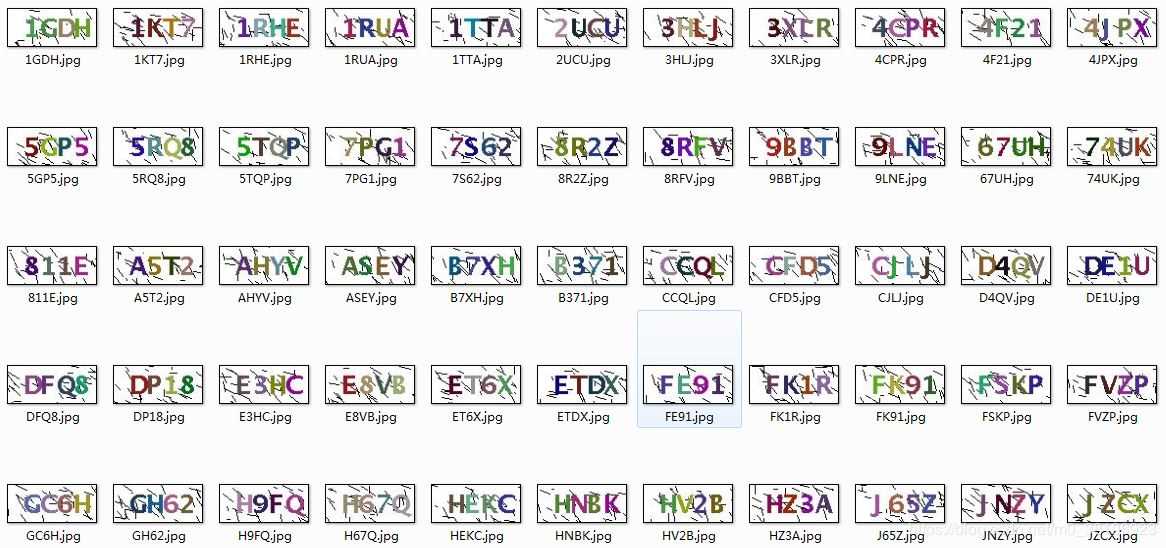
在本项目中,将会用Keras来搭建一个稍微复杂的CNN模型来破解以上的验证码。验证码如下:
利用Keras可以快速方便地搭建CNN模型,本项目搭建的CNN模型如下:

将数据集分为训练集和测试集,占比为8:2,该模型训练的代码如下:
# -*- coding: utf-8 -*-import numpy as npimport pandas as pdfrom sklearn.model_selection import train_test_splitfrom matplotlib import pyplot as plt from keras.utils import np_utils, plot_modelfrom keras.models import Sequentialfrom keras.layers.core import Dense, Dropout, Activation, Flattenfrom keras.callbacks import EarlyStoppingfrom keras.layers import Conv2D, MaxPooling2D # 读取数据df = pd.read_csv(’./data.csv’) # 标签值vals = range(31)keys = [’1’,’2’,’3’,’4’,’5’,’6’,’7’,’8’,’9’,’A’,’B’,’C’,’D’,’E’,’F’,’G’,’H’,’J’,’K’,’L’,’N’,’P’,’Q’,’R’,’S’,’T’,’U’,’V’,’X’,’Y’,’Z’]label_dict = dict(zip(keys, vals)) x_data = df[[’v’+str(i+1) for i in range(320)]]y_data = pd.DataFrame({’label’:df[’label’]})y_data[’class’] = y_data[’label’].apply(lambda x: label_dict[x]) # 将数据分为训练集和测试集X_train, X_test, Y_train, Y_test = train_test_split(x_data, y_data[’class’], test_size=0.3, random_state=42)x_train = np.array(X_train).reshape((1167, 20, 16, 1))x_test = np.array(X_test).reshape((501, 20, 16, 1)) # 对标签值进行one-hot encodingn_classes = 31y_train = np_utils.to_categorical(Y_train, n_classes)y_val = np_utils.to_categorical(Y_test, n_classes) input_shape = x_train[0].shape # CNN模型model = Sequential() # 卷积层和池化层model.add(Conv2D(32, kernel_size=(3, 3), input_shape=input_shape, padding=’same’))model.add(Activation(’relu’))model.add(Conv2D(32, kernel_size=(3, 3), padding=’same’))model.add(Activation(’relu’))model.add(MaxPooling2D(pool_size=(2, 2), padding=’same’)) # Dropout层model.add(Dropout(0.25)) model.add(Conv2D(64, kernel_size=(3, 3), padding=’same’))model.add(Activation(’relu’))model.add(Conv2D(64, kernel_size=(3, 3), padding=’same’))model.add(Activation(’relu’))model.add(MaxPooling2D(pool_size=(2, 2), padding=’same’)) model.add(Dropout(0.25)) model.add(Conv2D(128, kernel_size=(3, 3), padding=’same’))model.add(Activation(’relu’))model.add(Conv2D(128, kernel_size=(3, 3), padding=’same’))model.add(Activation(’relu’))model.add(MaxPooling2D(pool_size=(2, 2), padding=’same’)) model.add(Dropout(0.25)) model.add(Flatten()) # 全连接层model.add(Dense(256, activation=’relu’))model.add(Dropout(0.5))model.add(Dense(128, activation=’relu’))model.add(Dense(n_classes, activation=’softmax’)) model.compile(loss=’categorical_crossentropy’, optimizer=’adam’, metrics=[’accuracy’]) # plot model##plot_model(model, to_file=r’./model.png’, show_shapes=True) # 模型训练callbacks = [EarlyStopping(monitor=’val_acc’, patience=5, verbose=1)]batch_size = 64n_epochs = 100history = model.fit(x_train, y_train, batch_size=batch_size, epochs=n_epochs, verbose=1, validation_data=(x_test, y_val), callbacks=callbacks) mp = ’./verifycode_Keras.h5’model.save(mp) # 绘制验证集上的准确率曲线val_acc = history.history[’val_acc’]plt.plot(range(len(val_acc)), val_acc, label=’CNN model’)plt.title(’Validation accuracy on verifycode dataset’)plt.xlabel(’epochs’)plt.ylabel(’accuracy’)plt.legend()plt.show()
在上述代码中,训练模型的时候采用了early stopping技巧。early stopping是用于提前停止训练的callbacks。具体地,可以达到当训练集上的loss不在减小(即减小的程度小于某个阈值)的时候停止继续训练。
运行上述模型训练代码,输出的结果如下:
......(忽略之前的输出)Epoch 22/100 64/1167 [>.............................] - ETA: 3s - loss: 0.0399 - acc: 1.0000 128/1167 [==>...........................] - ETA: 3s - loss: 0.1195 - acc: 0.9844 192/1167 [===>..........................] - ETA: 2s - loss: 0.1085 - acc: 0.9792 256/1167 [=====>........................] - ETA: 2s - loss: 0.1132 - acc: 0.9727 320/1167 [=======>......................] - ETA: 2s - loss: 0.1045 - acc: 0.9750 384/1167 [========>.....................] - ETA: 2s - loss: 0.1006 - acc: 0.9740 448/1167 [==========>...................] - ETA: 2s - loss: 0.1522 - acc: 0.9643 512/1167 [============>.................] - ETA: 1s - loss: 0.1450 - acc: 0.9648 576/1167 [=============>................] - ETA: 1s - loss: 0.1368 - acc: 0.9653 640/1167 [===============>..............] - ETA: 1s - loss: 0.1353 - acc: 0.9641 704/1167 [=================>............] - ETA: 1s - loss: 0.1280 - acc: 0.9659 768/1167 [==================>...........] - ETA: 1s - loss: 0.1243 - acc: 0.9674 832/1167 [====================>.........] - ETA: 0s - loss: 0.1577 - acc: 0.9639 896/1167 [======================>.......] - ETA: 0s - loss: 0.1488 - acc: 0.9665 960/1167 [=======================>......] - ETA: 0s - loss: 0.1488 - acc: 0.96561024/1167 [=========================>....] - ETA: 0s - loss: 0.1427 - acc: 0.96681088/1167 [==========================>...] - ETA: 0s - loss: 0.1435 - acc: 0.96691152/1167 [============================>.] - ETA: 0s - loss: 0.1383 - acc: 0.96881167/1167 [==============================] - 4s 3ms/step - loss: 0.1380 - acc: 0.9683 - val_loss: 0.0835 - val_acc: 0.9760Epoch 00022: early stopping
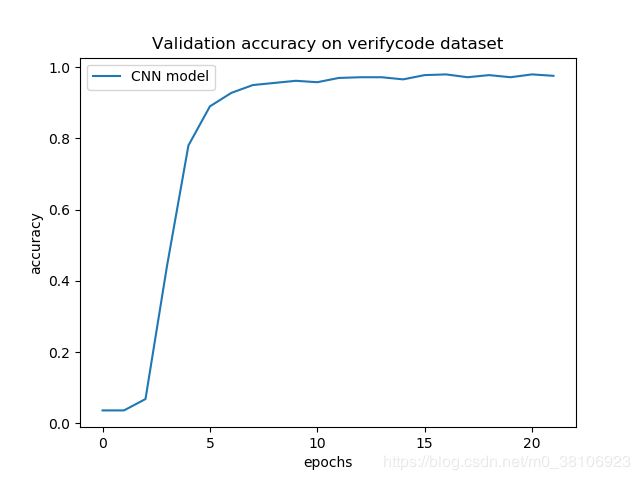
可以看到,花费几分钟,一共训练了21次,最近一次的训练后,在测试集上的准确率为96.83%。在测试集的准确率曲线如下图:
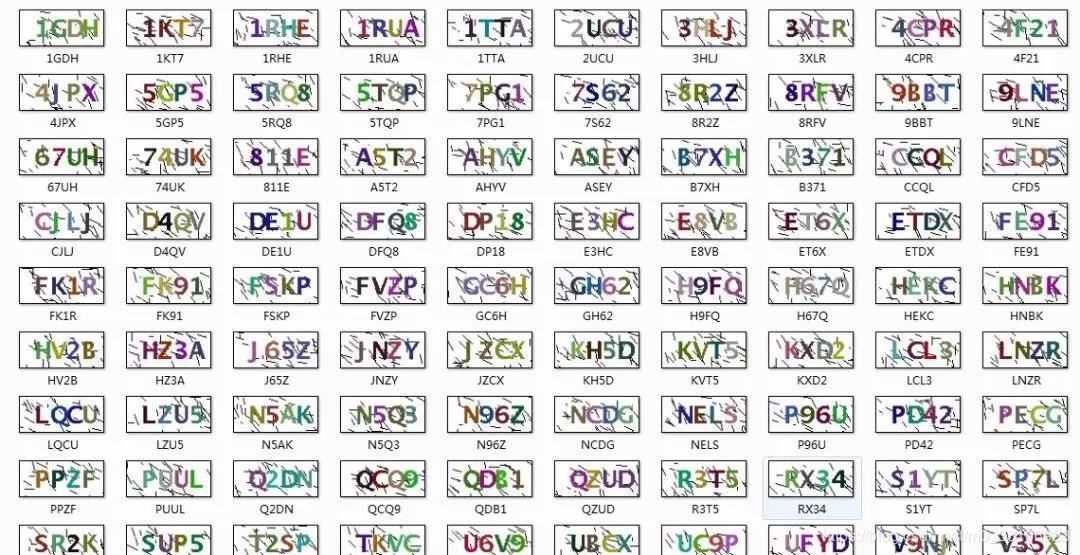
模型训练完后,我们对新的验证码进行预测。新的100张验证码如下图:
使用训练好的CNN模型,对这些新的验证码进行预测,预测的Python代码如下:
# -*- coding: utf-8 -*- import osimport cv2import numpy as np def split_picture(imagepath): # 以灰度模式读取图片 gray = cv2.imread(imagepath, 0) # 将图片的边缘变为白色 height, width = gray.shape for i in range(width): gray[0, i] = 255 gray[height-1, i] = 255 for j in range(height): gray[j, 0] = 255 gray[j, width-1] = 255 # 中值滤波 blur = cv2.medianBlur(gray, 3) #模板大小3*3 # 二值化 ret,thresh1 = cv2.threshold(blur, 200, 255, cv2.THRESH_BINARY) # 提取单个字符 chars_list = [] image, contours, hierarchy = cv2.findContours(thresh1, 2, 2) for cnt in contours: # 最小的外接矩形 x, y, w, h = cv2.boundingRect(cnt) if x != 0 and y != 0 and w*h >= 100: chars_list.append((x,y,w,h)) sorted_chars_list = sorted(chars_list, key=lambda x:x[0]) for i,item in enumerate(sorted_chars_list): x, y, w, h = item cv2.imwrite(’test_verifycode/%d.jpg’%(i+1), thresh1[y:y+h, x:x+w]) def remove_edge_picture(imagepath): image = cv2.imread(imagepath, 0) height, width = image.shape corner_list = [image[0,0] < 127, image[height-1, 0] < 127, image[0, width-1]<127, image[ height-1, width-1] < 127 ] if sum(corner_list) >= 3: os.remove(imagepath) def resplit_with_parts(imagepath, parts): image = cv2.imread(imagepath, 0) os.remove(imagepath) height, width = image.shape file_name = imagepath.split(’/’)[-1].split(r’.’)[0] # 将图片重新分裂成parts部分 step = width//parts # 步长 start = 0 # 起始位置 for i in range(parts): cv2.imwrite(’./test_verifycode/%s.jpg’%(file_name+’-’+str(i)), image[:, start:start+step]) start += step def resplit(imagepath): image = cv2.imread(imagepath, 0) height, width = image.shape if width >= 64: resplit_with_parts(imagepath, 4) elif width >= 48: resplit_with_parts(imagepath, 3) elif width >= 26: resplit_with_parts(imagepath, 2) # rename and convert to 16*20 sizedef convert(dir, file): imagepath = dir+’/’+file # 读取图片 image = cv2.imread(imagepath, 0) # 二值化 ret, thresh = cv2.threshold(image, 127, 255, cv2.THRESH_BINARY) img = cv2.resize(thresh, (16, 20), interpolation=cv2.INTER_AREA) # 保存图片 cv2.imwrite(’%s/%s’ % (dir, file), img) # 读取图片的数据,并转化为0-1值def Read_Data(dir, file): imagepath = dir+’/’+file # 读取图片 image = cv2.imread(imagepath, 0) # 二值化 ret, thresh = cv2.threshold(image, 127, 255, cv2.THRESH_BINARY) # 显示图片 bin_values = [1 if pixel==255 else 0 for pixel in thresh.ravel()] return bin_values def predict(VerifyCodePath): dir = ’./test_verifycode’ files = os.listdir(dir) # 清空原有的文件 if files: for file in files: os.remove(dir + ’/’ + file) split_picture(VerifyCodePath) files = os.listdir(dir) if not files: print(’查看的文件夹为空!’) else: # 去除噪声图片 for file in files: remove_edge_picture(dir + ’/’ + file) # 对黏连图片进行重分割 for file in os.listdir(dir): resplit(dir + ’/’ + file) # 将图片统一调整至16*20大小 for file in os.listdir(dir): convert(dir, file) # 图片中的字符代表的向量 files = sorted(os.listdir(dir), key=lambda x: x[0]) table = np.array([Read_Data(dir, file) for file in files]).reshape(-1,20,16,1) # 模型保存地址 mp = ’./verifycode_Keras.h5’ # 载入模型 from keras.models import load_model cnn = load_model(mp) # 模型预测 y_pred = cnn.predict(table) predictions = np.argmax(y_pred, axis=1) # 标签字典 keys = range(31) vals = [’1’, ’2’, ’3’, ’4’, ’5’, ’6’, ’7’, ’8’, ’9’, ’A’, ’B’, ’C’, ’D’, ’E’, ’F’, ’G’, ’H’, ’J’, ’K’, ’L’, ’N’,’P’, ’Q’, ’R’, ’S’, ’T’, ’U’, ’V’, ’X’, ’Y’, ’Z’] label_dict = dict(zip(keys, vals)) return ’’.join([label_dict[pred] for pred in predictions]) def main(): dir = ’./VerifyCode/’ correct = 0 for i, file in enumerate(os.listdir(dir)): true_label = file.split(’.’)[0] VerifyCodePath = dir+file pred = predict(VerifyCodePath) if true_label == pred: correct += 1 print(i+1, (true_label, pred), true_label == pred, correct) total = len(os.listdir(dir)) print(’n总共图片:%d张n识别正确:%d张n识别准确率:%.2f%%.’ %(total, correct, correct*100/total)) main()
以下是该CNN模型的预测结果:
Using TensorFlow backend.2018-10-25 15:13:50.390130: I C: f_jenkinsworkspaceel-winMwindowsPY35 ensorflowcoreplatformcpu_feature_guard.cc:140] Your CPU supports instructions that this TensorFlow binary was not compiled to use: AVX21 (’ZK6N’, ’ZK6N’) True 12 (’4JPX’, ’4JPX’) True 23 (’5GP5’, ’5GP5’) True 34 (’5RQ8’, ’5RQ8’) True 45 (’5TQP’, ’5TQP’) True 56 (’7S62’, ’7S62’) True 67 (’8R2Z’, ’8R2Z’) True 78 (’8RFV’, ’8RFV’) True 89 (’9BBT’, ’9BBT’) True 910 (’9LNE’, ’9LNE’) True 1011 (’67UH’, ’67UH’) True 1112 (’74UK’, ’74UK’) True 1213 (’A5T2’, ’A5T2’) True 1314 (’AHYV’, ’AHYV’) True 1415 (’ASEY’, ’ASEY’) True 1516 (’B371’, ’B371’) True 1617 (’CCQL’, ’CCQL’) True 1718 (’CFD5’, ’GFD5’) False 1719 (’CJLJ’, ’CJLJ’) True 1820 (’D4QV’, ’D4QV’) True 1921 (’DFQ8’, ’DFQ8’) True 2022 (’DP18’, ’DP18’) True 2123 (’E3HC’, ’E3HC’) True 2224 (’E8VB’, ’E8VB’) True 2325 (’DE1U’, ’DE1U’) True 2426 (’FK1R’, ’FK1R’) True 2527 (’FK91’, ’FK91’) True 2628 (’FSKP’, ’FSKP’) True 2729 (’FVZP’, ’FVZP’) True 2830 (’GC6H’, ’GC6H’) True 2931 (’GH62’, ’GH62’) True 3032 (’H9FQ’, ’H9FQ’) True 3133 (’H67Q’, ’H67Q’) True 3234 (’HEKC’, ’HEKC’) True 3335 (’HV2B’, ’HV2B’) True 3436 (’J65Z’, ’J65Z’) True 3537 (’JZCX’, ’JZCX’) True 3638 (’KH5D’, ’KH5D’) True 3739 (’KXD2’, ’KXD2’) True 3840 (’1GDH’, ’1GDH’) True 3941 (’LCL3’, ’LCL3’) True 4042 (’LNZR’, ’LNZR’) True 4143 (’LZU5’, ’LZU5’) True 4244 (’N5AK’, ’N5AK’) True 4345 (’N5Q3’, ’N5Q3’) True 4446 (’N96Z’, ’N96Z’) True 4547 (’NCDG’, ’NCDG’) True 4648 (’NELS’, ’NELS’) True 4749 (’P96U’, ’P96U’) True 4850 (’PD42’, ’PD42’) True 4951 (’PECG’, ’PEQG’) False 4952 (’PPZF’, ’PPZF’) True 5053 (’PUUL’, ’PUUL’) True 5154 (’Q2DN’, ’D2DN’) False 5155 (’QCQ9’, ’QCQ9’) True 5256 (’QDB1’, ’QDBJ’) False 5257 (’QZUD’, ’QZUD’) True 5358 (’R3T5’, ’R3T5’) True 5459 (’S1YT’, ’S1YT’) True 5560 (’SP7L’, ’SP7L’) True 5661 (’SR2K’, ’SR2K’) True 5762 (’SUP5’, ’SVP5’) False 5763 (’T2SP’, ’T2SP’) True 5864 (’U6V9’, ’U6V9’) True 5965 (’UC9P’, ’UC9P’) True 6066 (’UFYD’, ’UFYD’) True 6167 (’V9NJ’, ’V9NH’) False 6168 (’V35X’, ’V35X’) True 6269 (’V98F’, ’V98F’) True 6370 (’VD28’, ’VD28’) True 6471 (’YGHE’, ’YGHE’) True 6572 (’YNKD’, ’YNKD’) True 6673 (’YVXV’, ’YVXV’) True 6774 (’ZFBS’, ’ZFBS’) True 6875 (’ET6X’, ’ET6X’) True 6976 (’TKVC’, ’TKVC’) True 7077 (’2UCU’, ’2UCU’) True 7178 (’HNBK’, ’HNBK’) True 7279 (’X8FD’, ’X8FD’) True 7380 (’ZGNX’, ’ZGNX’) True 7481 (’LQCU’, ’LQCU’) True 7582 (’JNZY’, ’JNZVY’) False 7583 (’RX34’, ’RX34’) True 7684 (’811E’, ’811E’) True 7785 (’ETDX’, ’ETDX’) True 7886 (’4CPR’, ’4CPR’) True 7987 (’FE91’, ’FE91’) True 8088 (’B7XH’, ’B7XH’) True 8189 (’1RUA’, ’1RUA’) True 8290 (’UBCX’, ’UBCX’) True 8391 (’KVT5’, ’KVT5’) True 8492 (’HZ3A’, ’HZ3A’) True 8593 (’3XLR’, ’3XLR’) True 8694 (’VC7T’, ’VC7T’) True 8795 (’7PG1’, ’7PQ1’) False 8796 (’4F21’, ’4F21’) True 8897 (’3HLJ’, ’3HLJ’) True 8998 (’1KT7’, ’1KT7’) True 9099 (’1RHE’, ’1RHE’) True 91100 (’1TTA’, ’1TTA’) True 92总共图片:100张识别正确:92张识别准确率:92.00%.
可以看到,该训练后的CNN模型,其预测新验证的准确率在90%以上。
Demo及数据集下载网站:CNN_4_Verifycode_jb51.rar
到此这篇关于Python搭建Keras CNN模型破解网站验证码的实现的文章就介绍到这了,更多相关Python Keras CNN破解网站验证码内容请搜索好吧啦网以前的文章或继续浏览下面的相关文章希望大家以后多多支持好吧啦网!
相关文章:

 网公网安备
网公网安备