JavaSwing基础之Layout布局相关知识详解
首先,还是从ViewRootImpl说起,界面的绘制会触发performMeasure、performLayout方法,而在performLayout方法中就会调用mView的layout方法开始一层层View的布局工作。
private void performLayout(WindowManager.LayoutParams lp, int desiredWindowWidth, int desiredWindowHeight) { final View host = mView;host.layout(0, 0, host.getMeasuredWidth(), host.getMeasuredHeight()); }
mView我们都知道了,就是顶层View——DecorView,那么就进去看看DecorView的layout方法:
不好意思,DecorView中并没有layout方法...
所以,我们直接看看View的layout方法:
public void layout(int l, int t, int r, int b) { boolean changed = isLayoutModeOptical(mParent) ?setOpticalFrame(l, t, r, b) : setFrame(l, t, r, b); if (changed || (mPrivateFlags & PFLAG_LAYOUT_REQUIRED) == PFLAG_LAYOUT_REQUIRED) { onLayout(changed, l, t, r, b);} } protected void onLayout(boolean changed, int left, int top, int right, int bottom) { } 首先,方法传入了四个参数,分别代表view的左、上、下、右四个值。 然后通过setOpticalFrame方法或者setFrame方法判断布局参数是否改变。
具体判断过程就是通过老的上下左右值和新的上下左右值进行比较,逻辑就在setFrame方法中:
protected boolean setFrame(int left, int top, int right, int bottom) {boolean changed = false; if (mLeft != left || mRight != right || mTop != top || mBottom != bottom) { changed = true; // Remember our drawn bit int drawn = mPrivateFlags & PFLAG_DRAWN; int oldWidth = mRight - mLeft; int oldHeight = mBottom - mTop; int newWidth = right - left; int newHeight = bottom - top; boolean sizeChanged = (newWidth != oldWidth) || (newHeight != oldHeight); // Invalidate our old position invalidate(sizeChanged); mLeft = left; mTop = top; mRight = right; mBottom = bottom; mRenderNode.setLeftTopRightBottom(mLeft, mTop, mRight, mBottom);}return changed; }
如果上下左右有一个参数值发生了改变,就说明这个View的布局发生了改变,然后重新计算View的宽度高度(newWidth、newHeight),并赋值了View新的上下左右参数值。
在这个layout方法中主要涉及到了四个参数:mLeft、mTop、mBottom、mRight,分别代表了View的左坐标、上坐标、下坐标和右坐标,你可以把View理解为一个矩形,确定了这四个值,就能确定View矩形的四个顶点值,也就能确定View在画布中的具体位置。
所以,layout方法到底干了啥?
就是传入上下左右值、然后赋值上下左右值、完毕。
然后我们就可以根据这些值获取View的一系列参数,比如View宽度:
public final int getWidth() {return mRight - mLeft; }
至此,View的layout方法就结束了,主要就是通过对上下左右参数的赋值完成对View的布局,非常简单。
下面看看ViewGroup。
二、ViewGroup layout方法@Override public final void layout(int l, int t, int r, int b) {if (!mSuppressLayout && (mTransition == null || !mTransition.isChangingLayout())) { if (mTransition != null) {mTransition.layoutChange(this); } super.layout(l, t, r, b);} else { mLayoutCalledWhileSuppressed = true;} }
额,还是调用到View的layout方法,难道说ViewGroup和View的布局过程是一样的,就是确定了本身的位置?
那ViewGroup的子View怎么办呢?不急,我们刚才说layout方法的时候还漏了一个onLayout方法,只不过这个方法在View里面是空实现,而到了ViewGroup中变成了一个抽象方法:
@Override protected abstract void onLayout(boolean changed, int l, int t, int r, int b);
也就是任何ViewGroup都必须实现这个方法,来完成对子View的布局摆放。
具体的布局摆放逻辑就是在onLayout方法中一个个调用子View的layout方法,然后完成每个子View的布局,最终完成绘制工作。
接下来我们就来自己实现一个垂直线性布局(类似LinearLayout),正好复习下上一节的onMearsure和这一节的onLayout。
三、自定义垂直布局VerticalLayout首先,我们要确定我们这个自定义ViewGroup的作用,是类似垂直方向的LinearLayout功能,在该ViewGroup下的子View可以按垂直线性顺序依次往下排放。我们给它起个名字叫VerticalLayout~
继承ViewGroup
首先,我们这个布局肯定要继承自ViewGroup,并且实现相应的构造方法:
public class VerticalLayout : ViewGroup { constructor(context: Context, attrs: AttributeSet?, defStyleAttr: Int = 0) : super(context,attrs,defStyleAttr ) constructor(context: Context, attrs: AttributeSet?) : super(context, attrs) { }}
重写generateLayoutParams方法
自定义ViewGroup还需要重写的一个方法是generateLayoutParams,这一步是为了让我们的ViewGroup支持Margin,后续我们就可以通过MarginLayoutParams来获取子View的Margin值。
override fun generateLayoutParams(attrs: AttributeSet?): LayoutParams? {return MarginLayoutParams(context, attrs) }
重写测量方法onMeasure
然后,我们需要对我们的布局进行测量,也就是重写onMeasure方法。
在该方法中,我们需要对我们的布局进行测量,并且将测量好的宽高传入setMeasuredDimension方法,完成测量。
protected final void setMeasuredDimension(int measuredWidth, int measuredHeight)
之前我们说过,onMeasure方法会传进来两个参数,widthMeasureSpec和heightMeasureSpec。
里面包含了父View根据当前View的LayoutParams和父View的测量规格进行计算,得出的对当前View期望的测量模式和测量大小:
当测量模式为MeasureSpec.EXACTLY也就是当宽或者高为确定值时,那么当前布局View的宽高也就是设定为父View给我们设置好的测量大小即可。比如宽为400dp,那么我们无需重新测量直接调用setMeasuredDimension传入这个固定值即可。
当测量模式为MeasureSpec.AT_MOST 或者 UNSPECIFIED:这时候,说明父View对当前View的要求不固定,是可以为任意大小或者不超过最大值的情况,比如设置这个VerticalLayout的高度为wrap_content。那么我们就必须重新进行高度测量了,因为只有我们设计者知道这个自适应高度需要怎么计算。具体就是VerticalLayout是一个垂直线性布局,所以高度很自然就是所有子View的高度之和。
至此,onMeasure方法的逻辑也基本摸清了:
override fun onMeasure(widthMeasureSpec: Int, heightMeasureSpec: Int) {super.onMeasure(widthMeasureSpec, heightMeasureSpec)//获取宽高的测量模式和测量大小val widthMode = MeasureSpec.getMode(widthMeasureSpec)val heightMode = MeasureSpec.getMode(heightMeasureSpec)val sizeWidth = MeasureSpec.getSize(widthMeasureSpec)val sizeHeight = MeasureSpec.getSize(heightMeasureSpec) var mHeight = 0var mWidth = 0 //遍历子View,获取总高度for (i in 0 until childCount) { val childView = getChildAt(i) //测量子View的宽和高 measureChild(childView, widthMeasureSpec, heightMeasureSpec) val lp = childView.layoutParams as MarginLayoutParams val childWidth = childView.measuredWidth + lp.leftMargin + lp.rightMargin val childHeight = childView.measuredHeight + lp.topMargin + lp.bottomMargin //计算得出最大宽度 mWidth = Math.max(mWidth, childWidth) //累计计算高度 mHeight += childHeight} //设置宽高setMeasuredDimension( if (widthMode == MeasureSpec.EXACTLY) sizeWidth else mWidth, if (heightMode == MeasureSpec.EXACTLY) sizeHeight else mHeight) }
主要的逻辑就是遍历子View,得出VerticalLayout的实际宽高:
最终ViewGroup的高 = 所有子View的 (高 + margin值) 最终ViewGroup的宽 = 最大子View的 (宽 + margin值)最后调用setMeasuredDimension 根据测量模式 传入宽高。
重写布局方法onLayout
上文说过,作为一个ViewGroup,必须重写onLayout方法,来保证子View的正常布局摆放。
垂直线性布局VerticalLayout亦是如此,那么在这个布局中onLayout方法的关键逻辑又是什么呢?
还是那句话,确定位置,也就是确定左、上、右、下四个参数值,而在VerticalLayout中,最关键的参数就是这个上,也就是top值。
每个View的top值必须是上一个View的bottom值,也就是接着上一个View进行摆放,这样才会是垂直线性的效果,所以我们需要做的就是动态计算每个View的top值,其实也就是不断累加View的高度,作为下一个View的top值。
override fun onLayout(changed: Boolean, l: Int, t: Int, r: Int, b: Int) {var childWidth = 0var childHeight = 0var childTop = 0var lp: MarginLayoutParams //遍历子View,布局每个子Viewfor (i in 0 until childCount) { val childView = getChildAt(i) childHeight = childView.measuredHeight childWidth = childView.measuredWidth lp = childView.layoutParams as MarginLayoutParams //累计计算top值 childTop += lp.topMargin //布局子View childView.layout(lp.leftMargin,childTop,lp.leftMargin + childWidth,childTop + childHeight ); childTop += childHeight + lp.bottomMargin} }
逻辑还是挺简单的,
left是固定的子View的leftMargin。 top是累加计算的子View的高度 + Margin值。 right是left + 子View的宽度。 bottom是top + 子View的高度。最后调用子View的layout方法,对每个子View进行布局。
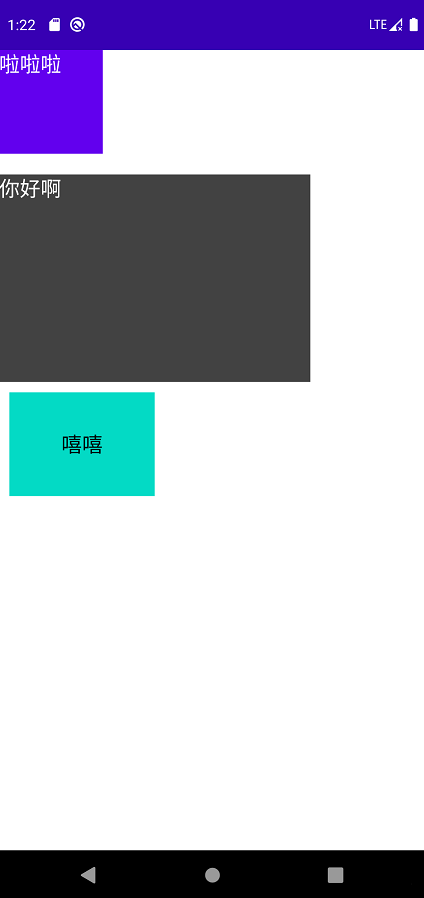
大功告成,最后看看我们这个自定义垂直线性布局的效果吧~
四、效果展示<com.panda.studynote3.VerticalLayoutandroid:layout_width='wrap_content'android:layout_height='wrap_content'> <TextView android:layout_width='100dp' android:layout_height='100dp' android:text='啦啦啦' android:textSize='20sp' android:textColor='@color/white' android:background='@color/design_default_color_primary' /> <TextView android:layout_width='300dp' android:layout_height='200dp' android:layout_marginTop='20dp' android:background='@color/cardview_dark_background' android:textSize='20sp' android:textColor='@color/white' android:text='你好啊' /> <TextView android:layout_width='140dp' android:layout_height='100dp' android:text='嘻嘻' android:layout_marginLeft='10dp' android:layout_marginTop='10dp' android:textSize='20sp' android:gravity='center' android:textColor='@color/black' android:background='@color/teal_200' /> </com.panda.studynote3.VerticalLayout>
到此这篇关于Java基础之Layout布局相关知识详解的文章就介绍到这了,更多相关Java Layout布局内容请搜索好吧啦网以前的文章或继续浏览下面的相关文章希望大家以后多多支持好吧啦网!
相关文章:

 网公网安备
网公网安备