Android Scroller的使用方法
本文实例为大家分享了Android Scroller的使用方法,供大家参考,具体内容如下
1、scrollTo和ScrollByView类定义了两个用于滚动View内容的方法:scrollTo和scrollBy:
/** * Set the scrolled position of your view. This will cause a call to * {@link #onScrollChanged(int, int, int, int)} and the view will be * invalidated. * @param x the x position to scroll to * @param y the y position to scroll to */public void scrollTo(int x, int y) { if (mScrollX != x || mScrollY != y) {int oldX = mScrollX;int oldY = mScrollY;mScrollX = x;mScrollY = y;invalidateParentCaches();onScrollChanged(mScrollX, mScrollY, oldX, oldY);if (!awakenScrollBars()) { postInvalidateOnAnimation();} }}/** * Move the scrolled position of your view. This will cause a call to * {@link #onScrollChanged(int, int, int, int)} and the view will be * invalidated. * @param x the amount of pixels to scroll by horizontally * @param y the amount of pixels to scroll by vertically */public void scrollBy(int x, int y) { scrollTo(mScrollX + x, mScrollY + y);}
可以看到scrollBy传入的x和y参数实际上是X方向和Y方向的滚动距离的增量,最终还是调用了scrollTo方法。而scrollTo方法中做了一些刷新和通知操作,最重要的是对mScrollX和mScrollY进行了赋值。
在View的draw方法中,我们可以看到如下代码:
int sx = 0;int sy = 0;if (!drawingWithRenderNode) { computeScroll(); sx = mScrollX; sy = mScrollY;}...if (offsetForScroll) { canvas.translate(mLeft - sx, mTop - sy);}
也就是说,mScrollX和mScrollY最终是用在了内容绘制的地方,其mLeft和mTop本身都没有因为scrollTo发生变化。scrollTo作用在View的内容上,而不是View本身。
2、 computeScroll在上面的View的draw方法的节选中我们看到在对mScrollX和mScrollY取值之前,调用了computeScroll方法。computeScroll方法声明如下:
/** * Called by a parent to request that a child update its values for mScrollX * and mScrollY if necessary. This will typically be done if the child is * animating a scroll using a {@link android.widget.Scroller Scroller} * object. */public void computeScroll() {}
根据注释,computeScroll的典型用法是与Scroller结合使用实现内容/字节点的滚动动画。
3、Scroller的使用Scroller事实上并不直接操作View的滚动,而是根据设置来计算当前X和Y方向的距离。Scroller的一般使用步骤:
1、初始化Scroller,可以指定插值器,不指定则使用默认的ViscousFluidInterpolator2、调用Scroller#startScroll方法,开始在一段时间内不断计算X和Y方向的滚动3、通知View刷新4、在View#computeScroll中通过scrollTo实现真正的滚动操作5、通知View刷新
其中在滚动执行完成之前4和5会不断地循环,直至scroller.computeScrollOffset()返回false。
class ScrollableLinearLayout @JvmOverloads constructor( context: Context, attrs: AttributeSet? = null, defStyleAttr: Int = 0) : LinearLayout(context, attrs, defStyleAttr) { private val scroller = Scroller(context, BounceInterpolator()) override fun computeScroll() {if(scroller.computeScrollOffset()) { // 真正实现滚动操作的地方 scrollTo(scroller.currX, scroller.currY) // 刷新 invalidate()} } fun scroll() {// 调用Scroller的startScrollif(scrollX == 0) { scroller.startScroll(scrollX, scrollY, /*dx*/ -500, /*dy*/ 0, /*duration*/ 300)} else { scroller.startScroll(scrollX, scrollY, 500, 0, 300)}// 刷新invalidate() }}
xml布局:
<?xml version='1.0' encoding='utf-8'?><LinearLayout xmlns:android='http://schemas.android.com/apk/res/android' xmlns:app='http://schemas.android.com/apk/res-auto' xmlns:tools='http://schemas.android.com/tools' android:layout_width='match_parent' android:layout_height='match_parent' android:orientation='vertical' tools:context='.scroller.activity.ScrollerSampleActivity'> <com.sahooz.customviewdemo.scroller.view.ScrollableLinearLayoutandroid: android:layout_width='match_parent'android:layout_height='200dp'android:gravity='center_vertical'android:orientation='vertical'android:background='#FFAAAA'><Button android: android:layout_width='wrap_content' android:layout_height='wrap_content' android:text='Scroll' /> </com.sahooz.customviewdemo.scroller.view.ScrollableLinearLayout></LinearLayout>
Activity
class ScrollerSampleActivity : AppCompatActivity() { override fun onCreate(savedInstanceState: Bundle?) {super.onCreate(savedInstanceState)setContentView(R.layout.activity_scroller_sample)val btnScroll = findViewById<Button>(R.id.btnScroll)btnScroll.setOnClickListener { findViewById<ScrollableLinearLayout>(R.id.sll).scroll()} }}
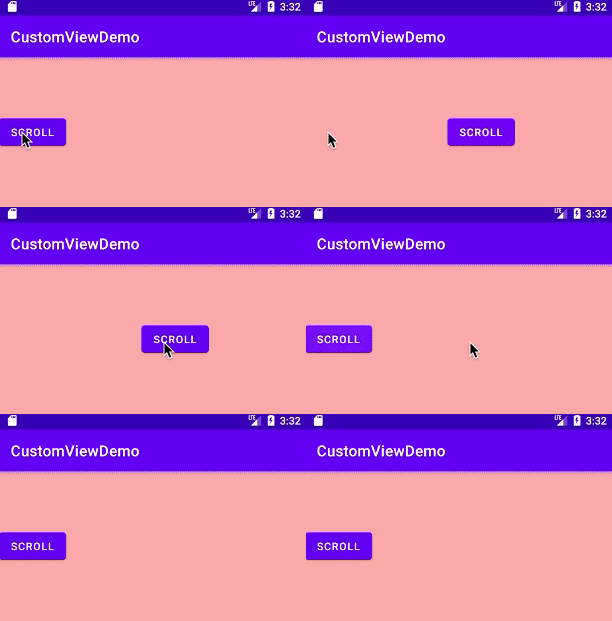
运行结果:

以上就是本文的全部内容,希望对大家的学习有所帮助,也希望大家多多支持好吧啦网。
相关文章:

 网公网安备
网公网安备