Android实现View滑动效果的6种方法
本文实例为大家分享了Android实现View滑动效果的具体代码,供大家参考,具体内容如下
一、View的滑动简介View的滑动是Android实现自定义控件的基础,同时在开发中我们也难免会遇到View的滑动的处理。其实不管是那种滑动的方式基本思想都是类似的:当触摸事件传到View时,系统记下触摸点的坐标,手指移动时系统记下移动后的触摸的坐标并算出偏移量,并通过偏移量来修改View的坐标。
实现View滑动有很多种方法,这篇文章主要讲解六种滑动的方法,分别是:layout()、offsetLeftAndRight()与offsetTopAndBottom()、LayoutParams、动画、scollTo与scollBy和Scroller;在下一篇文章我们会详细介绍属性动画。
二、实现View滑动的六种方法2.1 layout()
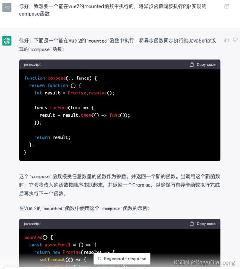
view进行绘制的时候会调用onLayout()方法来设置显示的位置,因此我们同样也可以通过修改View的left、top、right、bottom这四种属性来控制View的坐标。首先我们要自定义一个View,在onTouchEvent()方法中获取触摸点的坐标:
public boolean onTouchEvent(MotionEvent event) { //获取到手指处的横坐标和纵坐标 int x = (int) event.getX(); int y = (int) event.getY(); switch (event.getAction()) { case MotionEvent.ACTION_DOWN: lastX = x; lastY = y; break;
接下来我们在ACTION_MOVE事件中计算偏移量,再调用layout()方法重新放置这个自定义View的位置就好了:
case MotionEvent.ACTION_MOVE: //计算移动的距离 int offsetX = x - lastX; int offsetY = y - lastY; //调用layout方法来重新放置它的位置 layout(getLeft()+offsetX, getTop()+offsetY, getRight()+offsetX , getBottom()+offsetY); break;
当我们每次移动时都会调用layout()方法来对自己重新布局,从而达到移动View的效果。
自定义View的全部代码(CustomView.java):
package com.example.liuwangshu.moonviewslide;import android.content.Context;import android.util.AttributeSet;import android.view.MotionEvent;import android.view.View;public class CustomView extends View { private int lastX; private int lastY; public CustomView(Context context, AttributeSet attrs, int defStyleAttr) { super(context, attrs, defStyleAttr); } public CustomView(Context context, AttributeSet attrs) { super(context, attrs); } public CustomView(Context context) { super(context); } public boolean onTouchEvent(MotionEvent event) { //获取到手指处的横坐标和纵坐标 int x = (int) event.getX(); int y = (int) event.getY(); switch (event.getAction()) { case MotionEvent.ACTION_DOWN: lastX = x; lastY = y; break; case MotionEvent.ACTION_MOVE: //计算移动的距离 int offsetX = x - lastX; int offsetY = y - lastY; //调用layout方法来重新放置它的位置 layout(getLeft()+offsetX, getTop()+offsetY, getRight()+offsetX , getBottom()+offsetY); break; } return true; }}
布局中引用自定义View:
<?xml version='1.0' encoding='utf-8'?><LinearLayout xmlns:android='http://schemas.android.com/apk/res/android' xmlns:tools='http://schemas.android.com/tools' android:layout_width='match_parent' android:layout_height='match_parent' android:orientation='vertical'> <com.example.liuwangshu.moonviewslide.CustomView android: android:layout_width='80dp' android:layout_height='80dp' android:layout_margin='50dp' android:background='@android:color/holo_red_light' /></LinearLayout>
2.2 offsetLeftAndRight()与offsetTopAndBottom()
这两种方法和layout()方法效果方法差不多,使用也差不多,我们将ACTION_MOVE中的代码替换成如下代码:
case MotionEvent.ACTION_MOVE: //计算移动的距离 int offsetX = x - lastX; int offsetY = y - lastY; //对left和right进行偏移 offsetLeftAndRight(offsetX); //对top和bottom进行偏移 offsetTopAndBottom(offsetY); break;
2.3 LayoutParams(改变布局参数)
LayoutParams主要保存了一个View的布局参数,因此我们可以通过LayoutParams来改变View的布局的参数从而达到了改变View的位置的效果。同样的我们将ACTION_MOVE中的代码替换成如下代码:
LinearLayout.LayoutParams layoutParams= (LinearLayout.LayoutParams) getLayoutParams(); layoutParams.leftMargin = getLeft() + offsetX; layoutParams.topMargin = getTop() + offsetY; setLayoutParams(layoutParams);
因为父控件是LinearLayout,所以我们用了LinearLayout.LayoutParams,如果父控件是RelativeLayout则要使用RelativeLayout.LayoutParams。除了使用布局的LayoutParams外,我们还可以用ViewGroup.MarginLayoutParams来实现:
ViewGroup.MarginLayoutParams layoutParams = (ViewGroup.MarginLayoutParams) getLayoutParams();layoutParams.leftMargin = getLeft() + offsetX;layoutParams.topMargin = getTop() + offsetY;setLayoutParams(layoutParams);
2.4 动画
可以采用View动画来移动,在res目录新建anim文件夹并创建translate.xml:
<?xml version='1.0' encoding='utf-8'?><set xmlns:android='http://schemas.android.com/apk/res/android'> <translate android:fromXDelta='0' android:toXDelta='300' android:duration='1000'/></set>
在Java代码中引用:
mCustomView.setAnimation(AnimationUtils.loadAnimation(this, R.anim.translate));
当然使用属性动画移动那就更简单了,我们让CustomView在1000毫秒内沿着X轴像右平移300像素:
ObjectAnimator.ofFloat(mCustomView,'translationX',0,300).setDuration(1000).start();
2.5 scollTo与scollBy
scollTo(x,y)表示移动到一个具体的坐标点,而scollBy(dx,dy)则表示移动的增量为dx、dy。其中scollBy最终也是要调用scollTo的。scollTo、scollBy移动的是View的内容,如果在ViewGroup中使用则是移动他所有的子View。我们将ACTION_MOVE中的代码替换成如下代码:
((View)getParent()).scrollBy(-offsetX,-offsetY);
这里要实现CustomView随着我们手指移动的效果的话,我们就需要将偏移量设置为负值。
2.6 Scroller
我们用scollTo/scollBy方法来进行滑动时,这个过程是瞬间完成的,所以用户体验不大好。这里我们可以使用Scroller来实现有过度效果的滑动,这个过程不是瞬间完成的,而是在一定的时间间隔完成的。Scroller本身是不能实现View的滑动的,它需要配合View的computeScroll()方法才能弹性滑动的效果。在这里我们实现CustomView平滑的向右移动。
首先我们要初始化Scroller:
public CustomView(Context context, AttributeSet attrs) { super(context, attrs); mScroller = new Scroller(context); }
接下来重写computeScroll()方法,系统会在绘制View的时候在draw()方法中调用该方法,这个方法中我们调用父类的scrollTo()方法并通过Scroller来不断获取当前的滚动值,每滑动一小段距离我们就调用invalidate()方法不断的进行重绘,重绘就会调用computeScroll()方法,这样我们就通过不断的移动一个小的距离并连贯起来就实现了平滑移动的效果:
@Overridepublic void computeScroll() { super.computeScroll(); if(mScroller.computeScrollOffset()){ ((View) getParent()).scrollTo(mScroller.getCurrX(),mScroller.getCurrY()); //通过不断的重绘不断的调用computeScroll方法 invalidate(); } }
调用Scroller.startScroll()方法。我们在CustomView中写一个smoothScrollTo()方法,调用Scroller.startScroll()方法,在2000毫秒内沿X轴平移delta像素:
public void smoothScrollTo(int destX,int destY){ int scrollX=getScrollX(); int delta=destX-scrollX; //1000秒内滑向destX mScroller.startScroll(scrollX,0,delta,0,2000); invalidate(); }
最后我们在ViewSlideActivity.java中调用CustomView的smoothScrollTo()方法
//使用Scroll来进行平滑移动mCustomView.smoothScrollTo(-400,0);
这里我们是设定CustomView沿着X轴向右平移400像素。
以上就是本文的全部内容,希望对大家的学习有所帮助,也希望大家多多支持好吧啦网。
相关文章:
 网公网安备
网公网安备