Android实现三角形气泡效果方式汇总
在开发过程中,我们可能会经常遇到这样的需求样式:
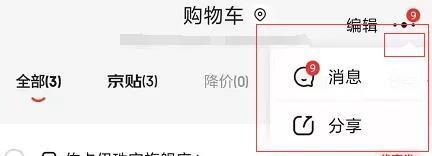
这张图是截取京东消息通知的弹出框,我们可以看到右上方有个三角形的气泡效果,这只是其中一种,三角形的方向还可以是上、下、左、右。
通过截图可以发现,气泡由正三角形和圆角长方形组成,于是可以通过组合来形成三角形气泡的效果,下面我们通过三种方式进行实现。
实现方式:
1、通过.9图进行实现;2、通过shape方式实现;3、通过自定义view的方式实现;
实现逻辑:1、通过.9图进行实现
这种方式就不用说了吧,找你们UI小姐姐切一个.9图,使用即可,不过这种方式的图片需要占一定体积哦。
2、通过shape方式实现
正三角形
<?xml version='1.0' encoding='utf-8'?><layer-list xmlns:android='http://schemas.android.com/apk/res/android'> <item> <rotate android:fromDegrees='45' android:pivotX='-40%' android:pivotY='80%'> <shape android:shape='rectangle'><size android: android: /><solid android:color='#ffffff' /> </shape> </rotate> </item></layer-list>
倒三角形
<?xml version='1.0' encoding='utf-8'?><layer-list xmlns:android='http://schemas.android.com/apk/res/android'> <item> <rotate android:fromDegrees='45' android:pivotX='135%' android:pivotY='15%'> <shape android:shape='rectangle'><size android: android: /><solid android:color='#ffffff' /> </shape> </rotate> </item></layer-list>
左三角形
<?xml version='1.0' encoding='utf-8'?><layer-list xmlns:android='http://schemas.android.com/apk/res/android'> <item> <rotate android:fromDegrees='-45' android:pivotX='85%' android:pivotY='-35%'>> <shape android:shape='rectangle'><size android: android: /><solid android:color='#ffffff' /> </shape> </rotate> </item></layer-list>
右三角形
<?xml version='1.0' encoding='utf-8'?><layer-list xmlns:android='http://schemas.android.com/apk/res/android'> <item> <rotate android:fromDegrees='-45' android:pivotX='15%' android:pivotY='135%'>> <shape android:shape='rectangle'><size android: android: /><solid android:color='#ffffff' /> </shape> </rotate> </item></layer-list>
上面就是通过shape方式实现各个方向的代码,这种方式缺点比较明显,如果要变化不同的角的位置需要再写不同的布局。
3、通过自定义view的方式实现
由于是比较简单这里就不讲解每个怎么搞了,可以复制过去直接用
添加自定义属性
<declare-styleable name='TriangleView'> <attr name='trv_color' format='color' /> <attr name='trv_direction'> <enum name='top' value='0' /> <enum name='bottom' value='1' /> <enum name='right' value='2' /> <enum name='left' value='3' /> </attr> </declare-styleable>
自定义代码文件
public class TriangleView extends View { private static final int TOP = 0; private static final int BOTTOM = 1; private static final int RIGHT = 2; private static final int LEFT = 3; private static final int DEFUALT_WIDTH = 10; private static final int DEFUALT_HEIGHT = 6; private static final int DEFUALT_COLOR = R.color.FFF; private Paint mPaint; private int mColor; private int mWidth; private int mHeight; private int mDirection; private Path mPath; public TriangleView(final Context context) { this(context, null); } public TriangleView(Context context, @Nullable AttributeSet attrs) { this(context, attrs, 0); } public TriangleView(final Context context, final AttributeSet attrs, final int defStyleAttr) { super(context, attrs, defStyleAttr); init(); TypedArray typedArray = context.getTheme().obtainStyledAttributes(attrs, R.styleable.TriangleView, 0, 0); mColor = typedArray.getColor(R.styleable.TriangleView_trv_color, ContextCompat.getColor(getContext(), DEFUALT_COLOR)); mDirection = typedArray.getInt(R.styleable.TriangleView_trv_direction, mDirection); typedArray.recycle(); mPaint.setColor(mColor); } private void init() { mPaint = new Paint(); mPaint.setAntiAlias(true); mPaint.setStyle(Paint.Style.FILL); mPath = new Path(); mDirection = TOP; } @Override protected void onMeasure(int widthMeasureSpec, int heightMeasureSpec) { super.onMeasure(widthMeasureSpec, heightMeasureSpec); mWidth = MeasureSpec.getSize(widthMeasureSpec); mHeight = MeasureSpec.getSize(heightMeasureSpec); final int widthMode = MeasureSpec.getMode(widthMeasureSpec); final int heightMode = MeasureSpec.getMode(heightMeasureSpec); if (mWidth == 0 || widthMode != MeasureSpec.EXACTLY) { mWidth = (int) PixelUtil.dp2px(DEFUALT_WIDTH); } if (mHeight == 0 || heightMode != MeasureSpec.EXACTLY) { mHeight = (int) PixelUtil.dp2px(DEFUALT_HEIGHT); } setMeasuredDimension(mWidth, mHeight); } @Override protected void onDraw(Canvas canvas) { super.onDraw(canvas); switch (mDirection) { case TOP:mPath.moveTo(0, mHeight);mPath.lineTo(mWidth, mHeight);mPath.lineTo(mWidth / 2, 0);break; case BOTTOM:mPath.moveTo(0, 0);mPath.lineTo(mWidth / 2, mHeight);mPath.lineTo(mWidth, 0);break; case RIGHT:mPath.moveTo(0, 0);mPath.lineTo(0, mHeight);mPath.lineTo(mWidth, mHeight / 2);break; case LEFT:mPath.moveTo(0, mHeight / 2);mPath.lineTo(mWidth, mHeight);mPath.lineTo(mWidth, 0);break; default:break; } mPath.close(); canvas.drawPath(mPath, mPaint); }}
布局文件添加
<com.sjl.keeplive.triange.TriangleView android:layout_width='10dp' android:layout_height='6dp' app:trv_color='@color/FFF' app:trv_direction='top' />
通过自定义的方式可以搞定四个方向,而且在代码中也可以使用,动态添加,动态改变颜色,还是比较好的方式。
到此这篇关于Android实现三角形气泡效果方式汇总的文章就介绍到这了,更多相关Android 三角形气泡 内容请搜索好吧啦网以前的文章或继续浏览下面的相关文章希望大家以后多多支持好吧啦网!
相关文章:

 网公网安备
网公网安备