Android实现动态体温计
本文实例为大家分享了Android实现动态体温计的具体代码,供大家参考,具体内容如下
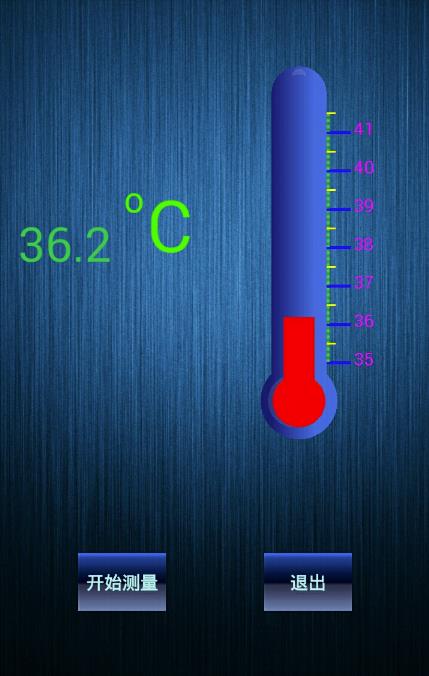
前段时间在做一个生理参数采集的项目,其中涉及到体温模块。这是我的部分总结。 实现内容: 从文件中读取体温数据,动态绘制体温的效果。即体温数据随时间在不停的变化。体温计绘制效果为立体效果。
实现原理:
1、体温计的绘制
绘制原理:
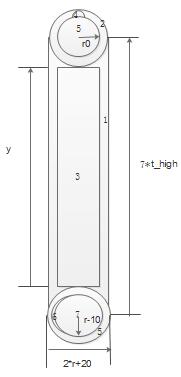
体温计的大体框架由图1,2,4,5,6,7构成,绘制通过自定义View,DrawView的onDraw()方法来实现,体温计水银柱的的绘制通过SurfaceView来实现。根据屏幕宽度来设定体温计大小及位置。
图1,2,6构成体温计玻璃管,由颜色Color.argb(255, 25, 25, 112)和颜色Color.argb(250, 65,105,225)从左往右一次填充,实现渐变。图3是动态矩形,为体温计水银柱,由Color.RED和Color.argb(250, 255, 255, 0)有下往上填充,实现红色到橙色的渐变。图8为体温计水银柱头部,用红色填充。图4,5组合形成光晕,图4由Color.argb(30, 250, 250, 250)填充,图5填充颜色与体温计玻璃管相同。先绘制图4再绘制图5,于是,便形成月牙形光晕。图7为光晕,由Color.argb(30, 250, 250, 250)填充。然后画出刻度线,这样便制作出具有立体感的体温计。感觉底座部分设计的不大好,立体感不强。
动态刷新原理:将从文件中的体温数据读取,存储到数组当中,绘制体温时,根据数据来确定中间红色水银柱的坐标,其实,也就是动态矩形的绘制,采用定时绘制的方法实现动态效果。
原理说的差不多了,我们来看下代码实现过程:
布局文件:textView用来显示数值,surfaceView用来绘制动态矩形。
temp.xml
<?xml version='1.0' encoding='utf-8'?><LinearLayout xmlns:android='http://schemas.android.com/apk/res/android' android:layout_width='match_parent' android:layout_height='match_parent' android:orientation='vertical' > <RelativeLayout android:layout_width='match_parent' android:layout_height='match_parent' android:background='@drawable/b03' android:paddingBottom='@dimen/activity_vertical_margin' android:paddingLeft='@dimen/activity_horizontal_margin' android:paddingRight='@dimen/activity_horizontal_margin' android:paddingTop='@dimen/activity_vertical_margin' > <LinearLayout android: android:layout_width='wrap_content' android:layout_height='wrap_content' android:orientation='horizontal' > </LinearLayout> <LinearLayout android: android:layout_width='wrap_content' android:layout_height='wrap_content' > <SurfaceView android: android:layout_width='wrap_content' android:layout_height='wrap_content' android:layout_marginRight='20dp' /> </LinearLayout> <TextView android: android:layout_width='wrap_content' android:layout_height='wrap_content' android:layout_alignParentLeft='true' android:layout_gravity='center' android:layout_marginTop='160dp' android:textColor='#00C957' android:textSize='40sp' /> <TextView android: android:layout_width='wrap_content' android:layout_height='wrap_content' android:layout_marginLeft='10dp' android:layout_marginTop='130dp' android:layout_toRightOf='@+id/textview01' android:textColor='#00FF00' android:textSize='30sp' /> <TextView android: android:layout_width='wrap_content' android:layout_height='wrap_content' android:layout_marginLeft='2dp' android:layout_marginTop='130dp' android:layout_toRightOf='@+id/textview02' android:textColor='#00FF00' android:textSize='60sp' /> <Button android: android:layout_width='wrap_content' android:layout_height='wrap_content' android:layout_alignParentBottom='true' android:layout_alignParentLeft='true' android:layout_marginBottom='40dp' android:layout_marginLeft='50dp' android:background='@drawable/button_selector' android:text='开始' android:textColor='@color/paleturquoise' android:textSize='15sp' /> <Button android: android:layout_width='wrap_content' android:layout_height='wrap_content' android:layout_alignParentBottom='true' android:layout_alignParentRight='true' android:layout_marginBottom='40dp' android:layout_marginRight='50dp' android:background='@drawable/button_selector' android:text='暂停' android:textColor='@color/paleturquoise' android:textSize='15sp' /> </RelativeLayout></LinearLayout>
体温计绘制View代码段:
import android.content.Context;import android.graphics.Canvas;import android.graphics.Color;import android.graphics.LinearGradient;import android.graphics.Paint;import android.graphics.RectF;import android.graphics.Shader;import android.util.DisplayMetrics;import android.view.View;public class DrawTemp extends View{ private float wide; private float high; private float t_wide; private float t_high ; private float r; //半径大小 private float x0;//圆心坐标 private float x1; private float y0; private float y1; /*自定义颜色*/ private int color_blue = Color.argb(255, 25, 25, 112); private int color_bule1 = Color.argb(250, 65,105,225); private int color_white = Color.argb(30, 250, 250, 250); private int color_white1 = Color.argb(60, 250, 250, 250); private int color_orange = Color.argb(250, 255, 255, 0); public DrawTemp(Context context) { super(context); // TODO 自动生成的构造函数存根 Paint paint = new Paint(); paint.setColor(Color.YELLOW); } protected void onDraw(Canvas canvas) { DisplayMetrics dm = new DisplayMetrics(); dm = getResources().getDisplayMetrics(); wide = dm.widthPixels; // 屏幕宽(像素,如:480px) high = dm.heightPixels; // 屏幕高(像素,如:800px) t_wide = wide/20; t_high = high/20; r = t_high-10; x0 = wide/2+2*t_wide; x1 = wide/2+4*t_wide; y0 = t_high*2; y1 = 10*t_high; float ydegree = 9*t_high; int min_temp = 35; //最低温度为35 int m1 = 4; int Line1_size = 1; int Line2_size = 3; int Line3_size = 5; //设置最小大刻度线条参数 Paint paintLine1 = new Paint(); paintLine1.setColor(Color.BLUE); paintLine1.setStrokeWidth(Line3_size); //设置中等刻度线条参数 Paint paintLine2 = new Paint(); paintLine2.setColor(Color.YELLOW); paintLine2.setStrokeWidth(Line2_size); //设置最小刻度线条参数 Paint paintLine3 = new Paint(); paintLine3.setColor(Color.GREEN); paintLine3.setStrokeWidth(Line1_size); //设置文字参数 Paint text = new Paint(); text.setColor(Color.MAGENTA); text.setTextSize(30); Paint mPaint = new Paint(); mPaint.setStrokeWidth(m1); LinearGradient ng= new LinearGradient(x0-10, y0, x1-10, y0, color_blue,color_bule1, Shader.TileMode.CLAMP); mPaint.setShader(ng); canvas.drawRect(x0-10, y0, x1+10, y1, mPaint);//绘制外围矩形 canvas.drawCircle(x0+t_wide, y0, t_wide+10,mPaint );//绘制外围上部分圆弧 canvas.drawCircle(x0+t_wide, y1,r+10, mPaint);//绘制外围底座 //绘制水银柱 Paint nPaint = new Paint(); nPaint.setColor(Color.RED); canvas.drawCircle(x0+t_wide, y1, r-10, nPaint); //LinearGradient mg= new LinearGradient(x0+10, y1, x0-10, y0, Color.RED,color_orange, Shader.TileMode.CLAMP); LinearGradient mg= new LinearGradient(x0+10, y1, x1-10, y0, Color.RED,color_orange, Shader.TileMode.CLAMP); nPaint.setShader(mg); //绘制动态矩形 // canvas.drawRect(x0+10, y, x1-10, y1, nPaint); //绘制光晕,圆角矩形 Paint paint = new Paint(); paint.setColor(color_white); RectF Rect = new RectF(x0-5, y0,x0+5, y1-t_high); canvas.drawCircle(x0+t_wide, y0-t_wide/2-t_wide/3, t_wide/3,paint ); canvas.drawCircle(x0+t_wide, y0, t_wide-t_wide/8,mPaint ); canvas.drawCircle(x0+t_wide-8, y1, r-10, paint); canvas.drawCircle(x0+t_wide, y1, r-10, nPaint); paint.setColor(color_white1); RectF Rect3 = new RectF(x0, y1, x0+t_wide, y1+t_wide); canvas.drawArc(Rect3, 0, 30, false, paint); while (ydegree > y0+30) { canvas.drawLine(x1+10, ydegree, x1+15, ydegree, paintLine3); if (ydegree % t_high == 0) { canvas.drawLine(x1+10, ydegree, x1+50, ydegree, paintLine1); canvas.drawText(min_temp + '', x1+55, ydegree + 5, text); min_temp++; } else if(ydegree % (t_high/2) == 0) { canvas.drawLine(x1+10, ydegree, x1+25, ydegree, paintLine2); } ydegree = ydegree - 2 ; } } }
主程序:
public void onCreate(Bundle savedInstanceState) { super.onCreate(savedInstanceState); setContentView(R.layout.temp_layout); innit(); // 初始化 ActionBarUtils.initActionBar(getApplicationContext(), getActionBar(), '体温'); timer = new Timer(); start.setOnClickListener(new OnClickListener() { @Override public void onClick(View v) { // TODO 自动生成的方法存根 timer= new Timer(); handler = new Handler() { @Override public void handleMessage(Message msg) { //刷新图表 s = String.valueOf(min_data); if(msg.what == 1){ text1.setText(s); }if(msg.what == 0){ String num = String.valueOf(number); text1.setText(num);}else if(msg.what == 2){ text1.setText('爆表啦');}super.handleMessage(msg); } }; task = new TimerTask() { @Override public void run() {Message message = new Message(); // drawPmThread pm = new drawPmThread(); if( min_data == number) {onDestroy(); } if(number>40){message.what = 2;handler.sendMessage(message);} if(0<min_data && min_data < 35) {message.what = 0;handler.sendMessage(message); } else if (35<=min_data && min_data<number) {draw(min_data);message.what = 1; handler.sendMessage(message);min_data++; } } }; //定时刷新 timer.schedule(task, 4, 40); } } ); stop.setOnClickListener(new OnClickListener() { @Override public void onClick(View v) { stopTimer(); } }); } // 初始化界面 private void innit() { // TODO Auto-generated method stub start = (Button) findViewById(R.id.button01); stop = (Button) findViewById(R.id.button02); text1 = (TextView) findViewById(R.id.textview01); text2 = (TextView) findViewById(R.id.textview02); text3 = (TextView) findViewById(R.id.textview03); save = (TextView) findViewById(R.id.textView1); linearLayout02 = (LinearLayout) findViewById(R.id.linearLayout02); drawView = new DrawTemp(this); linearLayout02.addView(drawView); surface = (SurfaceView) findViewById(R.id.surfacetemp); String s2 = 'o'; String s3 = 'C'; text2.setText(s2); text3.setText(s3); TextPaint tp = start.getPaint(); tp.setFakeBoldText(true); TextPaint tp1 = stop.getPaint(); tp1.setFakeBoldText(true); scrn = new DisplayMetrics(); getWindowManager().getDefaultDisplay().getMetrics(scrn); holder = surface.getHolder(); holder.addCallback(this); surface.setZOrderOnTop(true); //设置背景色为透明 surface.getHolder().setFormat(PixelFormat.TRANSLUCENT); // thread = new Thread(this,'SurfaceView'); width = scrn.widthPixels; // 宽度(PX) height = scrn.heightPixels; // 高度(PX) t_width = width/20; t_height = height/20; x0 = width/2+2*t_width; x1 = width/2+4*t_width; y1 = 10*t_height; } // 停止计时器 private void stopTimer() { if (timer != null) { timer.cancel(); timer = null; } if (task != null) { task.cancel(); task = null; } } // 绘制体温动态柱形图 private void draw(float min_data) { int ydegree = 9 * t_height; float y = ydegree - (min_data - 35) * t_height; Canvas canvas = holder.lockCanvas(); // 绘制动态矩形 Paint nPaint = new Paint(); nPaint.setColor(Color.RED); canvas.drawRect(x0 + 10, y, x1 - 10, y1, nPaint); holder.unlockCanvasAndPost(canvas);// 更新屏幕显示内容 */ } class MyCallBack implements SurfaceHolder.Callback { @Override public void surfaceChanged(SurfaceHolder arg0, int arg1, int arg2, int arg3) { // TODO Auto-generated method stub }
以上就是本文的全部内容,希望对大家的学习有所帮助,也希望大家多多支持好吧啦网。
相关文章:
1. 谷歌Chrome浏览器开发者工具教程—JS调试篇2. android H5本地缓存加载优化的实战3. 解决导入django_filters不成功问题No module named 'django_filter'4. Django查询优化及ajax编码格式原理解析5. spring Retryable注解实现重试详解6. 通过vue刷新左侧菜单栏操作7. Springboot WebFlux集成Spring Security实现JWT认证的示例8. python实现企业微信定时发送文本消息的示例代码9. Android自定义TextBanner实现自动滚动10. JS脚本实现定时到网站上签到/签退功能
 网公网安备
网公网安备