基于Android studio3.6的JNI教程之opencv实例详解
基本环境:
Android studio3.6
NDK:r14b(尽量使用该版本)
Opencv3.4.1 android sdk
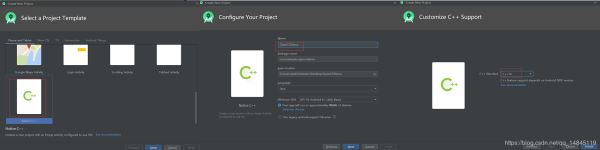
(1)新建工程OpenCVDemo,选择,一定要选择Native c++类型,最后要选c++14支持。
(2)File->Project Structure->SDK Location,设置这3个路径,NDK选择r14b。
(3)任意找一张图片,复制到res/drawable。
(4)修改布局文件res/layout/ activity_main.xml
<?xml version='1.0' encoding='utf-8'?><RelativeLayout xmlns:android='http://schemas.android.com/apk/res/android' android:layout_width='match_parent' android:layout_height='match_parent'> <ImageView android: android:layout_width='match_parent' android:layout_height='match_parent' /> <LinearLayout android:layout_width='match_parent' android:layout_height='wrap_content' android:layout_alignParentBottom='true' android:orientation='horizontal'> <Button android: android:layout_width='match_parent' android:layout_height='wrap_content' android:layout_weight='1' android:text='show' /> <Button android: android:layout_width='match_parent' android:layout_height='wrap_content' android:layout_weight='1' android:text='process' /> </LinearLayout></RelativeLayout>
(5)修改java文件,app/src/main/java/ com.example.opencvdemo/ MainActivity
主要修改包括修改
继承OnClickListener类,
修改onCreate方法
增加c++的接口函数,getEdge
实现点击按钮的方法,
整体代码如下,
(6)Termi
package com.example.opencvdemo;import androidx.appcompat.app.AppCompatActivity;import android.graphics.Bitmap;import android.graphics.BitmapFactory;import android.os.Bundle;import android.view.View;import android.widget.ImageView;import android.widget.TextView;public class MainActivity extends AppCompatActivity implements View.OnClickListener{ // Used to load the ’native-lib’ library on application startup. static { System.loadLibrary('native-lib'); } @Override protected void onCreate(Bundle savedInstanceState) { super.onCreate(savedInstanceState); setContentView(R.layout.activity_main); imageView = findViewById(R.id.imageView); findViewById(R.id.show).setOnClickListener(this); findViewById(R.id.process).setOnClickListener(this); } /** * A native method that is implemented by the ’native-lib’ native library, * which is packaged with this application. */ //获得Canny边缘 public native void getEdge(Object bitmap); private ImageView imageView; @Override public void onClick(View v) { if (v.getId() == R.id.show) { Bitmap bitmap = BitmapFactory.decodeResource(getResources(), R.drawable.test); imageView.setImageBitmap(bitmap); } else { Bitmap bitmap = BitmapFactory.decodeResource(getResources(), R.drawable.test); getEdge(bitmap); imageView.setImageBitmap(bitmap); } }}
nal下进入appsrcmainjava这一层目录,执行,
javah com.example.opencvdemo.MainActivity
将生成的com_example_opencvdemo_MainActivity.h,剪切到app/src/main/cpp目录下。
(7)修改app/src/main/cpp下面的native-lib.cpp,主要通过c++实现getEdge方法,主要代码如下,
#include <jni.h>#include <string>#include 'com_example_opencvdemo_MainActivity.h'#include <android/bitmap.h>#include <opencv2/opencv.hpp>using namespace cv;extern 'C'JNIEXPORT void JNICALLJava_com_example_opencvdemo_MainActivity_getEdge(JNIEnv *env, jobject obj, jobject bitmap){ // TODO: implement getEdge() AndroidBitmapInfo info; void *pixels; CV_Assert(AndroidBitmap_getInfo(env, bitmap, &info) >= 0); CV_Assert(info.format == ANDROID_BITMAP_FORMAT_RGBA_8888 || info.format == ANDROID_BITMAP_FORMAT_RGB_565); CV_Assert(AndroidBitmap_lockPixels(env, bitmap, &pixels) >= 0); CV_Assert(pixels); if (info.format == ANDROID_BITMAP_FORMAT_RGBA_8888) { Mat temp(info.height, info.width, CV_8UC4, pixels); Mat gray; cvtColor(temp, gray, COLOR_RGBA2GRAY); Canny(gray, gray, 125, 225); cvtColor(gray, temp, COLOR_GRAY2RGBA); } else { Mat temp(info.height, info.width, CV_8UC2, pixels); Mat gray; cvtColor(temp, gray, COLOR_RGB2GRAY); Canny(gray, gray, 125, 225); cvtColor(gray, temp, COLOR_GRAY2RGB); } AndroidBitmap_unlockPixels(env, bitmap);}
(8)修改CMakeLists.txt
包括增加opencv包含路径,增加opencv链接,增加目标库的链接(OpenCV_LIBS和jnigraphics)
全部代码如下,
# For more information about using CMake with Android Studio, read the# documentation: https://d.android.com/studio/projects/add-native-code.html# Sets the minimum version of CMake required to build the native library.cmake_minimum_required(VERSION 3.4.1)# Creates and names a library, sets it as either STATIC# or SHARED, and provides the relative paths to its source code.# You can define multiple libraries, and CMake builds them for you.# Gradle automatically packages shared libraries with your APK.#设置OpenCV-android-sdk路径set( OpenCV_DIR E:/Android/OpenCV-android-sdk/sdk/native/jni )find_package(OpenCV REQUIRED )if(OpenCV_FOUND) include_directories(${OpenCV_INCLUDE_DIRS}) message(STATUS 'OpenCV library status:') message(STATUS ' version: ${OpenCV_VERSION}') message(STATUS ' libraries: ${OpenCV_LIBS}') message(STATUS ' include path: ${OpenCV_INCLUDE_DIRS}')else(OpenCV_FOUND) message(FATAL_ERROR 'OpenCV library not found')endif(OpenCV_FOUND) set(CMAKE_SHARED_LINKER_FLAGS '${CMAKE_SHARED_LINKER_FLAGS} -Wl,--exclude-libs,libippicv.a -Wl,--exclude-libs,libippiw.a') add_library( # Sets the name of the library. native-lib # Sets the library as a shared library. SHARED # Provides a relative path to your source file(s). native-lib.cpp ) # Searches for a specified prebuilt library and stores the path as a# variable. Because CMake includes system libraries in the search path by# default, you only need to specify the name of the public NDK library# you want to add. CMake verifies that the library exists before# completing its build. find_library( # Sets the name of the path variable. log-lib # Specifies the name of the NDK library that # you want CMake to locate. log ) # Specifies libraries CMake should link to your target library. You# can link multiple libraries, such as libraries you define in this# build script, prebuilt third-party libraries, or system libraries. target_link_libraries( # Specifies the target library. native-lib ${OpenCV_LIBS} jnigraphics # Links the target library to the log library # included in the NDK. ${log-lib} )
(9)修改app/build.gradle
主要增加cmake的cppFlags,arguments
全部代码如下,
apply plugin: ’com.android.application’android { compileSdkVersion 29 buildToolsVersion '29.0.3' defaultConfig { applicationId 'com.example.opencvdemo' minSdkVersion 16 targetSdkVersion 29 versionCode 1 versionName '1.0' testInstrumentationRunner 'androidx.test.runner.AndroidJUnitRunner' externalNativeBuild { cmake { cppFlags '-std=c++14 -frtti -fexceptions' arguments ’-DANDROID_STL=gnustl_shared’ //支持C++异常处理标准模板快,ndk16+需要注释 //abiFilters 'armeabi-v7a', 'arm64-v8a', 'x86_64' } } } buildTypes { release { minifyEnabled false proguardFiles getDefaultProguardFile(’proguard-android-optimize.txt’), ’proguard-rules.pro’ } } externalNativeBuild { cmake { path 'src/main/cpp/CMakeLists.txt' version '3.10.2' } }}dependencies { implementation fileTree(dir: ’libs’, include: [’*.jar’]) implementation ’androidx.appcompat:appcompat:1.1.0’ implementation ’androidx.constraintlayout:constraintlayout:1.1.3’ testImplementation ’junit:junit:4.12’ androidTestImplementation ’androidx.test.ext:junit:1.1.1’ androidTestImplementation ’androidx.test.espresso:espresso-core:3.2.0’}
(10)整体目录结构如下,

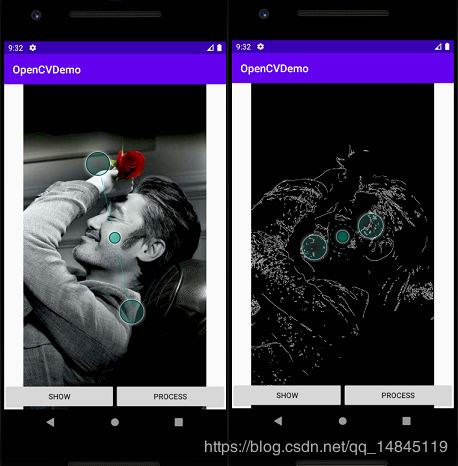
运行程序,
代码链接:
References:
https://www.jianshu.com/p/6e16c0429044
https://www.bilibili.com/video/av55834524/
总结
到此这篇关于基于Android studio3.6的JNI教程之opencv实例详解的文章就介绍到这了,更多相关android studio JNI教程opencv内容请搜索好吧啦网以前的文章或继续浏览下面的相关文章希望大家以后多多支持好吧啦网!
相关文章:

 网公网安备
网公网安备