解决vue单页面多个组件嵌套监听浏览器窗口变化问题
需求
最近公司有个大屏展示项目(如下图)

页面的元素需要做响应式监听,图表需要跟着窗口响应变化
问题
每一个图表都被我写成了一个组件,然后就在每一个组件里写了一串代码,监听浏览器变化
结果只有父组件的代码生效
mounted(){ window.onresize = () => { //当窗口发生改变时触发 // };}
原因
经简单测试后发现,同一个路由页面只能注册一次浏览器窗口监听事件,第二次注册的会覆盖第一次注册
下边代码即可测试
mounted(){ window.onresize = () => { //当窗口发生改变时触发 console.log(1) }; window.onresize = () => { //当窗口发生改变时触发 (会覆盖上一个函数) console.log(2) };}
父子嵌套组件同理,子组件生命周期执行在父组件之前,父组件函数会覆盖子组件函数
解决方案
1、只在父页面写个监听,但是通过组件传值的方式传给子组件,并且子组件用watch监听传值的变化,响应改变
2、假如是多层组件嵌套,用vuex可能会更省力
补充知识:vue/组件嵌套/无限嵌套/嵌套组件消息传递/嵌套父子组件传值
目前接到一个需求,是我之前从来没有实践过的,正好趁此机会做一个深度剖析,并记录下这次的成长,并分享给大家。
需求文档
一 、(一个厂商编号和一个版本号)唯一决定一个配置
二 、 配置内容支持无限嵌套
三、配置数据格式示例(配置包括项和模块):
{ 'vendorId': 'IL03#sub_01', 'version': '9.0.0', 'config': { 'module-1': { 'property-1': 'value-1', 'property-2': 'value-2', 'property-3': 'value-3', 'module-1_1': { 'property-1_1': 'value-1_1', 'property-1_2': 'value-1_2', 'property-1_3': 'value-1_3' } }, 'module-2': { 'property-4': 'value-4', 'property-5': 'value-5' } }}
四、配置成果物如下:
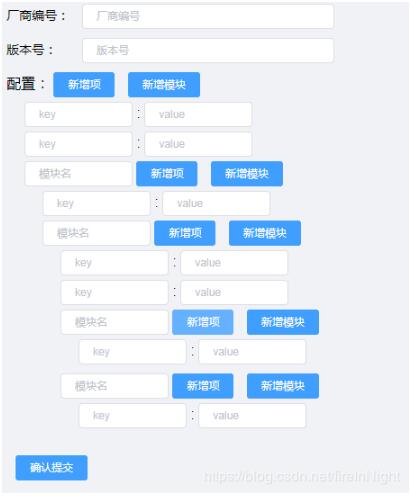
需求分解
一个简单的嵌套组件:
<template> <div> <span>{{data.content}}<span> <div> <nested :data='data.child'></nested> <div> </div></template><script>export default { name: ’nested’, props: [’data’]}</script>
我们给最外层的组件(根嵌套组件)绑定形如
{ 'content': 'value', 'child': { 'content': 'value-1' 'child': { 'content': 'value-1_1' ...... } }}
的数据结构,就可以看见效果了,是不是和我们前面需求的数据结构很像?
开始动工
step1:最外层列表展示
这里作为静态路由页面展示即可(分页、查询、删除功能在这里做)
<!-- 这里使用了EL-UI --><template> <!-- 应用配置入口 --> <div class='app-config-wrap'> <!-- 增 --> <div class='app-config-add'> <el-button type='primary' size='mini' @click='handleClickAdd'>新增配置</el-button> </div> <!-- 查 --> <div class='app-config-search'> <div @click='isShowFilter = !isShowFilter'> <span class='text'>查询App配置</span> <span v-if='!isShowFilter'></span> <span v-else></span> </div> <div @click='handleClearAll' v-if='isShowFilter'> <span class='text'>清空条件</span> </div> <div v-show='isShowFilter'> <div class='by-vendorId'> <el-input type='text' size='mini' placeholder='按厂商编号查询' clearable v-model.trim='vendorId'> </el-input> </div> <div class='by-version'> <el-input type='text' size='mini' placeholder='按版本号查询' clearable v-model.trim='version'> </el-input> </div> <div class='search-button'> <el-button type='primary' size='mini' @click='handleClickSearch'>查 询</el-button> </div> </div> </div> <div :style='tableHeight'> <el-table size='mini' :data='configList' stripe @row-click='handleClickRow' highlight-current-row style='width: 100%;'> <el-table-column type='index' label='No.' width='60'></el-table-column> <el-table-column prop='vendorId' label='厂商编号' :show-overflow-tooltip='true'></el-table-column> <el-table-column prop='version' label='版本号' :show-overflow-tooltip='true'></el-table-column> <el-table-column prop='operation' label='操作'> <template slot-scope='scope'> <!-- 删 --> <el-button type='danger' size='mini' @click='handleClickDelete(scope.row.id)'>删除配置</el-button> </template> </el-table-column> </el-table> </div> <el-pagination v-if='total' background small :current-page='pageNum' :page-sizes='[10, 20, 40, 60]' :page-size='pageSize' layout='total, sizes, prev, pager, next, jumper' :total='parseInt(total)' @current-change='changePageNo' @size-change='changePageSize'> </el-pagination> </div></template><script>export default { name: ’appConfig’, components: {}, props: [], data () { return { isShowFilter: false, vendorId: ’’, version: ’’, pageNum: 1, pageSize: 20, total: 0, configList: [{ // 假数据 id: 1, vendorId: ’cjm’, version: ’10.0.0’ }] } }, computed: { tableHeight () { return this.isShowFilter ? { height: ’calc(100% - 129px)’ } : { height: ’calc(100% - 90px)’ } } }, methods: { handleClearAll () { this.vendorId = ’’ this.version = ’’ }, handleClickSearch () { // 这里发送查询请求 }, changePageNo (val) { // 这里发送分页请求 this.pageNum = val }, changePageSize (val) { // 这里发送分页请求 this.pageSize = val }, handleClickDelete (id) { // 这里发送删除请求 }, handleClickAdd () { // 使用路由方式跳转到配置页面(增加配置和修改配置同一页面即可) this.$router.push({ name: ’configData’, query: {} }) }, handleClickRow (row) { // 通过id让配置页面初始化时请求数据,在跳转页面中watch即可 this.$router.push({ name: ’configData’, query: { id: row.id } }) } }}</script>// 样式我就不贴了,节省篇幅
step2:动态路由页准备
由于配置页面展示是根据厂商编号和版本号动态改变的,所以这里用到
this.$router.push({ name: ’configData’, query: { id: row.id }})
来实现动态路由页面,这里也需要引入我们的根嵌套组件(嵌套入口)。
<template> <div class='config-data-warp'> <div class='config-head'> <span class='text'>厂商编号:</span> <el-input type='text' size='mini' placeholder='厂商编号' clearable v-model.trim='vendorId'> </el-input> </div> <div class='config-head'> <span class='text'>版本号:</span> <el-input type='text' size='mini' placeholder='版本号' clearable v-model.trim='version'> </el-input> </div> <div class='config-main'> <config-module :data='config' :root='true' :commit='commit' @commit='handlerCommit'></config-module> </div> <el-button type='primary' size='mini' @click='commit = true'>确认提交</el-button> </div></template><script>import configModule from ’./configModule’export default { name: ’configData’, components: {configModule}, data () { return { id: this.$route.id, commit: false, vendorId: ’’, version: ’’, config: {} // 这里放点假数据 } }, mounted () { // 如果id存在,就去请求数据 if (id) { ... } }, methods: { handlerCommit (data) { // 这里是汇总数据的地方,记下来,等下提到了好找 console.log(data) this.commit = false } }}</script>
值得注意的是,确认提交按钮只是将commit变量置为true,而commit绑定在我们的嵌套组件中。
<div v-for='(value, index) in configJsonChildren' :key='index + ’child’ + moduleName'> <config-module :index='index' @change='changeChildName' @commit='handlerCommit' :commit='commit' :data='{key: value[0], child: value[1]}'></config-module></div>
这是嵌套组件的部分代码,我们可以看到commit被原封不动的传递给了子嵌套组件,也就是说,这里的commit变量起到通知所有嵌套组件执行了提交动作,这也是父组件控制子组件组件的唯一方式——传递数据变化props(或者使用vuex也可以)。
这里还有一点,就是定义什么是嵌套部分,什么是嵌套外部分,显然,厂商编号和版本号不属于嵌套部分。
还有传入的root变量,是为了控制根嵌套组件的名称不可修改,所以传个true就可以了。
step3:嵌套组件的实现(重点)
这里梳理一下嵌套组件需要提供的功能点:
1、能够做到传入数据的展示
2、能够动态添加项和模块
3,能够将修改了的数据传递出去
传入数据的展示
我们再回过头看看后台传给我们的数据格式:
{ 'vendorId': 'IL03#sub_01', 'version': '9.0.0', 'config': { 'module-1': { 'property-1': 'value-1', 'property-2': 'value-2', 'property-3': 'value-3', 'module-1_1': { 'property-1_1': 'value-1_1', 'property-1_2': 'value-1_2', 'property-1_3': 'value-1_3' } }, 'module-2': { 'property-4': 'value-4', 'property-5': 'value-5' } }}
从中我们是否可以提炼出每个嵌套组件的数据格式?
module: { property-1: value-1, property-2: value-2, ...... module-1: { ...... }, mpdule-2: { ...... }, ......}
而且,我们需要这个对象的key和value是可以被双向绑定的。
可是我们想一下,对象的key可以双向绑定吗?显然不能!
这也就是说,原始传入的数据结构并不能用,需要进行处理:
<template> <div class='config-module-warp'> <div class='config-head'> <!-- 根组件固定模块名,或者说不需要模块名 --> <span v-if='root'>配置:</span> <div v-else> <el-input type='text' size='mini' placeholder='模块名' clearable v-model='moduleName' @change='changeModuleName'></el-input> </div> <el-button type='primary' size='mini' @click='handleClickAddProperty'>新增项</el-button> <el-button type='primary' size='mini' @click='handleClickAddModule'>新增模块</el-button> <el-button v-if='root' type='danger' size='mini' @click='handleClickClear'>清空配置</el-button> <el-button v-else type='danger' size='mini' @click='handleClickDeleteModule'>删除模块</el-button> <div v-for='(value, index) in configJsonProperty' :key='index + ’property’'> <el-input type='text' size='mini' placeholder='key' clearable v-model='value[0]'></el-input> : <el-input type='text' size='mini' placeholder='value' clearable v-model='value[1]'></el-input> <el-button type='danger' size='mini' @click='handleClickDeleteProperty(index)'>删除该项</el-button> </div> <div v-for='(value, index) in configJsonChildren' :key='index + ’child’'> <config-module :index='index' @change='changeChildName' @commit='handlerCommit' :commit='commit' :data='{key: value[0], child: value[1]}'></config-module> </div> </div></template>...data () { return { moduleName: ’’, // 绑定当前子模块名 configJsonProperty: [], // 这里是子模块的property configJsonChildren: [], // 这里是子模块下的子模块(?I模块^-^) ... }}...mounted () { if (this.data && this.root) { // 由于根节点是没有模块名的,数据的解析结构是{key: moduleName, child: moduleValue},参上。 this.classify({child: this.data}) } else if (this.data) { this.classify(this.data) }}// 或者将引用根组件的地方改成下面这样也可以:// <config-module :data='{child: config}' :root='true' :commit='commit'// @commit='handlerCommit'></config-module>// _____________________________________// mounted () {// if (this.data) {// this.classify(this.data)// }// }...classify (prop) { let data = prop.child this.moduleName = prop.key for (let key in data) { if (typeof data[key] === ’object’) { this.configJsonChildren.push([ // 这里将数组转化为可以双向绑定的二维数组 key, data[key] ]) } else { this.configJsonProperty.push([ key, data[key] ]) } }}
实现动态增加
只需要添加空项就行了,但由于模块是由父组件传入的,所以改变模块名也需要同步改变父组件的模块名,而这里就用到了props中的index,代表父组件中的位置。
handleClickAddProperty () {this.configJsonProperty.push([ ’’, ’’ ])},handleClickAddModule () { this.configJsonChildren.push([ ’’, {} ])},changeModuleName (value) { this.$emit(’change’, this.index, value)},changeChildName (index, name) { this.$set(this.configJsonChildren[index], 0, name)},
孪生兄弟:动态删除
其实,增加数据和删除数据无外乎就是,本地数据本地改,外部数据同步改:
handleClickClear () { // 如果本身就是空,就无需操作,防止误操作,毕竟我挺讨厌弹窗的 if (!this.configJsonProperty.length && !this.configJsonChildren.length) { return } // 敏感操作给个弹窗 this.$confirm(’确定清空所有配置?’, ’警告’, { confirmButtonText: ’确定’, cancelButtonText: ’取消’, type: ’warning’ }).then(() => { // 这个是本地触发的哦! this.configJsonProperty = [] this.configJsonChildren = [] })},handleClickDeleteProperty (index) { // 本地数据本地改 this.configJsonProperty.splice(index, 1)},handleClickDeleteModule () { // 外部数据传出改,由于是删除操作,外部销毁了会直接导致本地销毁,本地无需再销毁 // 和改模块名不一样 // 改模块名时,虽然外部数据改变触发了本地更新,但由于是push操作,并不会改变本地数据 this.$emit(’delete’, this.index)},deleteModule (index) { // 与handleClickDeleteProperty方法比较,一定要分清哪个是子组件触发,哪个是父组件触发 this.configJsonChildren.splice(index, 1)},
重中之重:提取这个树结构中的数据
数据在各个子组件中保存,怎么把它们提取出来呢?
聪明的你肯定马上想到了我之前所说的commit变量吧,它将这个动作分发到了各个子组件。
所以,只要每个子组件听从命令,把数据层层上报,是不是就完成了呢?
这就好比是公司总经理想要开发一个软件,他就只要告诉各个部门:
哎,你们软件部负责做出软件可行性方案;
你们市场部负责调查同类软件和市场份额;
你们营销部赶快出炉软件推广方案,等等。
然后部门总监给各项目经理发小人物,然后项目经理再分解任务成需求给你。
最后做完了,流程就是:你 -》经理-》总监-》总经理。
在我们这份代码中,也是这样子的:
第一步:你要知道任务来了:
watch: { commit (val) { if (val) { this.handleClickCommit() // 接到任务 } else { this.commitData = {} // 这里也标记一下 } }},
第一步:找到最底层的“你”,也就是找到这个树组件的末梢节点,
它的标志是:
if (!this.configJsonChildren.length) { ...... } // 他没有子节点了
d收集它的“工作成果”:
let obj = {}this.configJsonProperty.forEach(v => { if (v[0] && v[1]) { obj[v[0]] = v[1] } else { this.$emit(’error’) // 如果有项不完整,可以报错 }})
你觉得上面代码有没有小问题?给你五秒想一想。
1
2
3
4
5
有没有这样一种情况?我们一不注意写了两个同样键名的项,不管是写到了错的模块里面还是怎样。
那么在上面的代码中,就会使得新值覆盖旧值,就有可能导致严重的事故!!!
所以我们改成:
handleClickCommit () { if (!this.configJsonChildren.length) { if (!this.moduleName && !this.root) { this.$emit(’error’) return } let obj = {} for (let v of this.configJsonProperty) { if (v[0] && v[1]) { if (obj.hasOwnProperty(v[0])) { this.$emit(’error’) // 啊,一不小心走神了 return } obj[v[0]] = v[1] } else { this.$emit(’error’) // 这里不需要return是因为不会造成严重后果,当然也可以加上 // 主要是我用这个功能时会一口气添加好多项,也不一定全填满,省得一个个删。 } } this.$emit(’commit’, { // 把数据给经理!!!这个杀千刀的,天天催! key: this.moduleName, // 身份狗牌 value: obj }) }}
啊,工作终于提交了,再也不担心了,接下来的事就交给经理去做吧!
经理:我手下管着这么多人,不可能来一个我上交一个吧?那就等他们全部上交了,我再整个打包上交吧。
首先第一步,我需要一个箱子来存他们的成果:
data () { return { moduleName: ’’, configJsonProperty: [], configJsonChildren: [], commitData: {} // 存放成果的箱子 }}
接下来就等他们上交了:
handlerCommit (data) { if (!this.moduleName && !this.root) { // 领导也要有名字,但总经理只有一个 this.$emit(’error’) return } this.commitData[data.key] = data.value // 先按人头收下成果 for (let item of this.configJsonChildren) { if (!this.commitData.hasOwnProperty(item[0])) return // 如果没收齐,继续等待 } // 欧耶,收齐了 let obj = {} for (let v of this.configJsonProperty) { // 这个for循环可以封成一个函数的,毕竟写了两次 if (v[0] && v[1]) { if (obj.hasOwnProperty(v[0])) { this.$emit(’error’) return } obj[v[0]] = v[1] } else { this.$emit(’error’) } } this.$emit(’commit’, { key: this.moduleName, value: Object.assign(obj, this.commitData) // 领导自己的成果加上员工的成果 })}
还记得上面我让你记下的地方吗?
handlerCommit (data) { console.log(data) // 汇总数据,在这里可以发送给后台了 this.commit = false // 任务完成标志}
watch: { commit (val) { if (val) { this.handleClickCommit() } else { this.commitData = {} // 初始化子组件 } }},
到这里,嵌套组件也大致完工了,贴全代码:
<template> <div class='config-module-warp'> <div class='config-head'> <span v-if='root'>配置:</span> <div v-else> <el-input type='text' size='mini' placeholder='模块名' clearable v-model='moduleName' @change='changeModuleName'></el-input> </div> <el-button type='primary' size='mini' @click='handleClickAddProperty'>新增项</el-button> <el-button type='primary' size='mini' @click='handleClickAddModule'>新增模块</el-button> <el-button v-if='root' type='danger' size='mini' @click='handleClickClear'>清空配置</el-button> <el-button v-else type='danger' size='mini' @click='handleClickDeleteModule'>删除模块</el-button> </div> <div v-for='(value, index) in configJsonProperty' :key='index + ’property’'> <el-input type='text' size='mini' placeholder='key' clearable v-model='value[0]'></el-input> : <el-input type='text' size='mini' placeholder='value' clearable v-model='value[1]'></el-input> <el-button type='danger' size='mini' @click='handleClickDeleteProperty(index)'>删除该项</el-button> </div> <div v-for='(value, index) in configJsonChildren' :key='index + ’child’'> <config-module :index='index' @change='changeChildName' @delete='deleteModule' @commit='handlerCommit' :commit='commit' :data='{key: value[0], child: value[1]}'></config-module> </div> </div></template><script>export default { name: ’configModule’, props: [’data’, ’root’, ’commit’, ’index’], data () { return { moduleName: ’’, configJsonProperty: [], configJsonChildren: [], commitData: {}, error: false } }, watch: { commit (val) { if (val) { this.handleClickCommit() } else { this.commitData = {} this.error = false } } }, computed: { }, mounted () { if (this.data) { this.classify(this.data) } }, methods: { classify (prop) { let data = prop.child this.moduleName = prop.key for (let key in data) { if (typeof data[key] === ’object’) { this.configJsonChildren.push([ key, data[key] ]) } else { this.configJsonProperty.push([ key, data[key] ]) } } }, handleClickAddProperty () { this.configJsonProperty.push([ ’’, ’’ ]) }, handleClickAddModule () { this.configJsonChildren.push([ ’’, {} ]) }, handleClickClear () { if (!this.configJsonProperty.length && !this.configJsonChildren.length) { return } this.$confirm(’确定清空所有配置?’, ’警告’, { confirmButtonText: ’确定’, cancelButtonText: ’取消’, type: ’warning’ }).then(() => { this.configJsonProperty = [] this.configJsonChildren = [] }) }, handleClickDeleteProperty (index) { this.configJsonProperty.splice(index, 1) }, handleClickDeleteModule () { this.$emit(’delete’, this.index) }, deleteModule (index) { this.configJsonChildren.splice(index, 1) }, changeModuleName (value) { this.$emit(’change’, this.index, value) }, changeChildName (index, name) { this.$set(this.configJsonChildren[index], 0, name) }, handleClickCommit () { if (!this.configJsonChildren.length) { if (!this.moduleName && !this.root) { this.$emit(’error’) return } let obj = {} for (let v of this.configJsonProperty) { if (v[0] && v[1]) { if (obj.hasOwnProperty(v[0])) { this.$emit(’error’) return } obj[v[0]] = v[1] } else { this.$emit(’error’) } } this.$emit(’commit’, { key: this.moduleName, value: obj }) } }, handlerCommit (data) { if (!this.moduleName && !this.root) { this.$emit(’error’) return } this.commitData[data.key] = data.value for (let item of this.configJsonChildren) { if (!this.commitData.hasOwnProperty(item[0])) return } let obj = {} for (let v of this.configJsonProperty) { if (v[0] && v[1]) { if (obj.hasOwnProperty(v[0])) { this.$emit(’error’) return } obj[v[0]] = v[1] } else { this.$emit(’error’) } } this.$emit(’commit’, { key: this.moduleName, value: Object.assign(obj, this.commitData) }) } }}</script>
总结
其实聪明的人根本就不需要我总结嘛,代码是最好的语言
所以这里我提出一些我的不足和没做完的部分,不过都是细枝末节啦:
第一个是错误的处理,我这边没有加上
第二个是模块应该有折叠功能,不然配置多看着就眼花缭乱,
不过v-show的使用大家应该也是登峰造极了。
然后,大家有什么意见和建议都可以在下方反馈。
感谢大家看完这一篇长文,么么哒~希望能给大家一个参考,也希望大家多多支持好吧啦网
相关文章:

 网公网安备
网公网安备