Vue实现Tab标签路由效果并用Animate.css做转场动画效果的代码第1/3页
类似于浏览器窗口一样的路由切换逻辑,看着还是挺高大上的,本以为有很多高级的玩意儿,奈何复杂的东西总是由简单的东西拼接而成的,这个功能也不例外。
本篇文章主要描述两个问题:
如何实现这种Tab标签页的路由效果 如何为路由切换添加转场动画。
该功能的开发主要使用到 AntDesignVue 组件库的Tab组件和 Animate.css
效果如下:

Tab标签页实现
首先是该组件的模板部分, ContextMenu 组件是我们自定义的右键菜单,后面会说到。 a-tabs 组件则是 ant 的组件,具体用法不详述,可以查看官方文档。还有一个 PageToggleTransition 组件,是我们用来实现动画切换的组件,非常简单。
/** * TabLayout.vue 的模板部分,简单看一下有个印象 */<template> <PageLayout> <ContextMenu :list='menuItems' :visible.sync='menuVisible' @select='onMenuSelect' /> <!-- 标签部分 --> <a-tabs type='editable-card' :hide-add='true' :active-key='activePage' @change='changePage' @edit='editPage' @contextmenu='onContextmenu' > <a-tab-pane v-for='page in pageList' :key='page.fullPath'> <template #tab> <span :data-key='page.fullPath'> {{ page.name }} </span> </template> </a-tab-pane> </a-tabs> <!-- 路由出口 --> <PageToggleTransition name='fadeIn'> <keep-alive :exclude='dustbin'> <router-view /> </keep-alive> </PageToggleTransition> </PageLayout></template>
原理
维护一个 pageList ,通过监听路由变化动态的添加和删除page。而所谓的page,就是页面的路由对象($route),我们正是通过 $route.fullPath 作为页面的唯一标识的。而删除页面时不光要操作 pageList ,还要利用 keep-alive 组件的 exclude 属性删除缓存。至于 a-tabs 组件的这个插槽,主要是为了绑定一个数据key,以便触发contextmenu事件时,可以更容易的获取到对应页面的key值(fullPath)
理论存在,实践开始。
路由监听
watch: { $route: { handler (route) { this.activePage = route.fullPath this.putCache(route) const index = this.pageList.findIndex(item => item.fullPath === route.fullPath) if (index === -1) { this.pageList.push(route) } }, immediate: true }}
路由变化时,主要做三件事:
设置当前页(activePage) 将当前页加入缓存,即移出垃圾桶(dustbin) 如果当前页不在pageList中,则添加进来。页面跳转
methods: { changePage (key) { this.activePage = key this.$router.push(key) }, editPage (key, action) { if (action === ’remove’) { this.remove(key) } }, remove (key) { if (this.pageList.length <= 1) { return message.info(’最后一页了哦~’) } let curIndex = this.pageList.findIndex(item => item.fullPath === key) const { matched } = this.pageList[curIndex] const componentName = last(matched).components.default.name this.dustbin.push(componentName) this.pageList.splice(curIndex, 1) // 如果删除的是当前页才需要跳转 if (key === this.activePage) { // 判断向左跳还是向右跳 curIndex = curIndex >= this.pageList.length ? this.pageList.length - 1 : curIndex const page = this.pageList[curIndex] this.$router.push(page.fullPath).finally(() => { this.dustbin.splice(0) // 重置,否则会影响到某些组件的缓存 }) } } ... ...}
这里主要主要说一下remove方法:
如果是最后一页,则忽略 在pageList中找到当前页对应的组件名用于删除缓存(这里不清楚的可以看一下 keep-alive组件 ,和 $route.matched ) 如果删除的是当前页,需要进行页面跳转,向左挑还是向右跳呢?需要强调的时 keep-alive 的 exclude 属性,当组件名被匹配到的时候就会立即清除缓存,所以, dustbin 添加完之后记得要重置,否则下次就不会缓存了。
自定义contextmenu事件
解释下,contextmenu事件就是右键菜单事件,我们可以通过监听事件,使得右键菜单事件触发的时候显示我们的自定义菜单。
methods: { // 自定义右键菜单的关闭功能 onContextmenu (e) { const key = getTabKey(e.target) // 这里的判断,用到了前面在span标签上加的data-key自定义属性 if (!key) return // 主要是为了控制菜单的显示或隐藏 e.preventDefault() // 组织默认行为,显示我们的自定义邮件菜单 this.menuVisible = true } ... ...}/** * 由于ant-design-vue组件库的TabPane组件暂不支持自定义监听器,无法直接获取到右键target所在标签页的key 。故增加此方法用于 * 查询右键target所在标签页的标识 key ,以用于自定义右键菜单的事件处理。 * 注:TabPane组件支持自定义监听器后可去除该方法并重构 ‘自定义右键菜单的事件处理’ * @param target 查询开始目标 * @param depth 查询层级深度 (查找层级最多不超过3层,超过3层深度直接返回 null) * @returns {String} */function getTabKey (target, depth = 0) { if (depth > 2 || !target) { return null } return target.dataset.key || getTabKey(target.firstElementChild, ++depth)}
另外要说的是,dom元素上以 data- 开头的属性会被收录进元素的 dataset 属性中, data-key 访问时就是 dom.dataset.key
下面就是我们的 ContextMenu 组件了:
效果图:
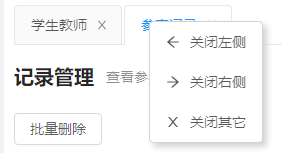
代码如下:
<template> <a-menu v-show='visible' : :selectedKeys='selectedKeys' @click='handleClick' > <a-menu-item v-for='item in list' :key='item.key'> <a-icon v-if='item.icon' :type='item.icon'/> <span>{{ item.text }}</span> </a-menu-item> </a-menu></template><script>export default { name: ’ContextMenu’, props: { visible: { type: Boolean, required: false, default: false }, list: { type: Array, required: true, default: () => [] } }, data () { return { left: 0, top: 0, target: null, selectedKeys: [] } }, computed: { style () { return { left: this.left + ’px’, top: this.top + ’px’ } } }, created () { const clickHandler = () => this.closeMenu() const contextMenuHandler = e => this.setPosition(e) window.addEventListener(’click’, clickHandler) window.addEventListener(’contextmenu’, contextMenuHandler) this.$emit(’hook:beforeDestroy’, () => { window.removeEventListener(’click’, clickHandler) window.removeEventListener(’contextmenu’, contextMenuHandler) }) }, methods: { closeMenu () { this.$emit(’update:visible’, false) }, setPosition (e) { this.left = e.clientX this.top = e.clientY this.target = e.target }, handleClick ({ key }) { this.$emit(’select’, key, this.target) this.closeMenu() } }}</script><style lang='stylus' scoped> .contextmenu position fixed z-index 1000 border-radius 4px border 1px lightgrey solid box-shadow 4px 4px 10px lightgrey !important .ant-menu-item margin 0 !important</style>
这里需要强调的是钩子函数 created 的内容:
1.首先全局事件需要成对出现,有添加就要有移除,否则可能造成内存泄漏,并导致一些其他的bug。就比如在模块热替换的项目中,会造成反复绑定的问题。
2.为什么这里要给window绑定contextmenu事件和click事件,之前不是绑过了吗?这里的click事件主要是为了关闭菜单,右键菜单的特点是,不论点了什么点了哪里,只要点一下就会关闭。这里的contextmenu事件主要是为了获取到事件对象 event ,以此来设置菜单的位置。而之前绑定在 a-tabs 组件上的contextmenu事件主要是为了阻止默认事件,我们只拦截了该组件,而不需要拦截全局范围。
自定义右键菜单主要是为了 从 event.target 中获取到我们需要的key并以事件的形式传递出来 ,便于分发后面的逻辑,即:
onMenuSelect (key, target) { const tabKey = getTabKey(target) switch (key) { case ’1’: this.closeLeft(tabKey); break case ’2’: this.closeRight(tabKey); break case ’3’: this.closeOthers(tabKey); break default: break }}
这三种情况的逻辑是基本一致的,主要做了三件事:
清除缓存 删除页面,并设置当前页面 页面跳转以closeOthers为例:
closeOthers (tabKey) { const index = this.pageList.findIndex(item => item.fullPath === tabKey) // 找到触发事件时鼠标停留在那个tab上 for (const route of this.pageList) { if (route.fullPath !== tabKey) { this.clearCache(route) // 清缓存 } } const page = this.pageList[index] this.pageList = 123下一页阅读全文
相关文章:
 网公网安备
网公网安备