SpringBoot动态修改日志级别的操作
为了减少日志频繁打印带来的性能影响,线上环境设置的日志级别一般都相对较高。而当出现生产问题需要排查的时候,可能需要适当降低日志级别(例如DEBUG)来打印更多的日志信息帮助定位问题。
传统的做法一般是:1、配置里修改日志级别
2、重启应用
3、问题复现查看报错日志排查问题
这个过程需要重启应用,比较麻烦,效率较低,而且针对大型在线项目,不可能随便停机重启。那么有没有一种方式在不重启应用的情况下实现动态修改日志级别呢?
下面,让老万教你如何通过SpringBoot的actuator组件来实现动态修改日志级别。
一、添加依赖<dependency><groupId>org.springframework.boot</groupId><artifactId>spring-boot-starter-actuator</artifactId></dependency>二、配置actuator暴露的端口
#启用actuator端口management.endpoints.enabled-by-default=fasle#设置actuator的访问根路径,默认是/actuatormanagement.endpoints.web.base-path=/message#启用的端点management.endpoints.web.exposure.include=loggers
这里我修改了actuator的默认访问路径/actuator,改为/message,为的是和项目的基础访问路径保存一致。
启用端口的2中配置方法:方式一:(推荐)
management.endpoints.web.exposure.include=loggers
方式二:(这种方式测试没有生效)
management.endpoint.loggers.enabled=true
补充:如何禁用info端口
management.endpoints.enabled-by-default=falsemanagement.endpoint.info.enabled=true
关于actuator组件被称为spring boot的4大组件之一,功能强大,大家在网上自己找些资料进一步了解。
actuator的endpoint端口说明:ID 描述 默认启用 auditevents 显示当前应用程序的审计事件信息 Yes beans 显示一个应用中所有Spring Beans的完整列表 Yes conditions 显示配置类和自动配置类(configuration and auto-configuration classes)的状态及它们被应用或未被应用的原因 Yes configprops 显示一个所有@ConfigurationProperties的集合列表 Yes env 显示来自Spring的 ConfigurableEnvironment的属性 Yes flyway 显示数据库迁移路径,如果有的话 Yes health 显示应用的健康信息(当使用一个未认证连接访问时显示一个简单的’status’,使用认证连接访问则显示全部信息详情) Yes info 显示任意的应用信息 Yes liquibase 展示任何Liquibase数据库迁移路径,如果有的话 Yes metrics 展示当前应用的metrics信息 Yes mappings 显示一个所有@RequestMapping路径的集合列表 Yes scheduledtasks 显示应用程序中的计划任务 Yes sessions 允许从Spring会话支持的会话存储中检索和删除(retrieval and deletion)用户会话。使用Spring Session对反应性Web应用程序的支持时不可用。 Yes shutdown 允许应用以优雅的方式关闭(默认情况下不启用) No threaddump 执行一个线程dump Yes 如果使用web应用(Spring MVC, Spring WebFlux, 或者 Jersey),你还可以使用以下端点:ID 描述 默认启用 heapdum 返回一个GZip压缩的hprof堆dump文件 Yes jolokia 通过HTTP暴露JMX beans(当Jolokia在类路径上时,WebFlux不可用) Yes logfile 返回日志文件内容(如果设置了logging.file或logging.path属性的话),支持使用HTTP Range头接收日志文件内容的部分信息 Yes prometheus 以可以被Prometheus服务器抓取的格式显示metrics信息 Yes 要更改公开哪些端点,请使用以下技术特定的include和exclude属性:Property Default management.endpoints.jmx.exposure.exclude * management.endpoints.jmx.exposure.include * management.endpoints.web.exposure.exclude * management.endpoints.web.exposure.include info, healthinclude属性列出了公开的端点的ID,
exclude属性列出了不应该公开的端点的ID
exclude属性优先于include属性。包含和排除属性都可以使用端点ID列表进行配置。
*可以用来选择所有端点。
例如,要通过HTTP公开除env和beans端点之外的所有内容,请使用以下属性:
management.endpoints.web.exposure.include=*management.endpoints.web.exposure.exclude=env,beans三、关闭鉴权
一般我们会将actuator和spring security鉴权组件结合使用,防止这些功能端口被随便调用。由于这里是功能演示,先放开actuator相关端口的权限认证。

此外,如果存在Spring Security,则需要添加自定义安全配置,以允许对端点进行未经身份验证的访问,如以下示例所示:放开所有Endpoint端点进行匹配
@Configurationpublic class ActuatorSecurity extends WebSecurityConfigurerAdapter { @Overrideprotected void configure(HttpSecurity http) throws Exception { http.requestMatcher(EndpointRequest.toAnyEndpoint()).authorizeRequests() .anyRequest().permitAll()}}四 、通过/loggers端口查看日志级别
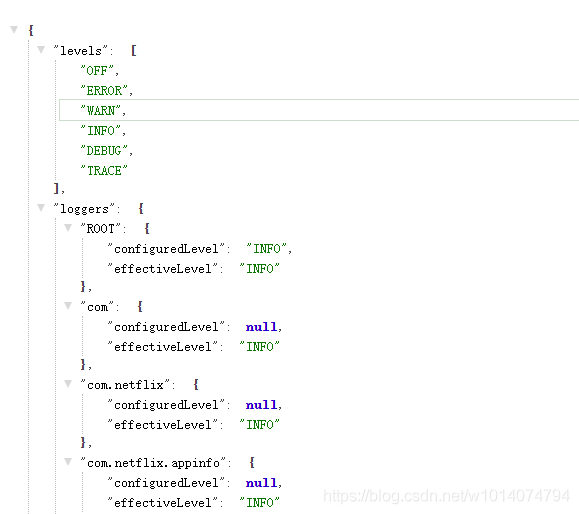
请求链接:http://localhost:8090/message/loggers
注意上面我说过的,我调整了management.endpoints.web.base-path=/message。如果没有设置此参数,则使用默认的/actuator去访问。

这里演示,修改目录com.wxswj.provider.message.controller的日志级别为debug
请求类型为POST,参数格式是JSON
curl -H 'Content-Type: application/json' -X POST --data ’{ 'configuredLevel': 'DEBUG'}’ http://localhost:8090/message/loggers/com.wxswj.provider.message.controller
大家可以在服务器上通过curl发起http请求,或者通过Postman发起请求。
curl -H 'Content-Type: application/json' -X POST --data ’{'configuredLevel': 'DEBUG'}’ http://localhost:8090/loggers/com.wxswj.provider.message.controller六、查询日志级别修改结果
http://localhost:8090/message/loggers/com.wxswj.provider.message.controller
{'configuredLevel': 'DEBUG','effectiveLevel': 'DEBUG'}
说明我们的修改日志级别的请求生效。
总结通过整合spring boot的actuator组件,公开对应的/loggers端口,我们就可以轻松的实现动态调整系统的日志级别,而不用项目重启。
以上为个人经验,希望能给大家一个参考,也希望大家多多支持好吧啦网。
相关文章:

 网公网安备
网公网安备