SpringBoot集成FastDFS依赖实现文件上传的示例
对FastDFS文件系统安装后的使用。
FastDFS的安装请参考这篇:Docker中搭建FastDFS文件系统(多图)
本文环境:IDEA + JDK1.8 + Maven
本文项目代码:fastdfs_jb51.rar
1、引入依赖简单说一下这个依赖部分,目前大部分都是采用的如下依赖:
<!-- https://mvnrepository.com/artifact/net.oschina.zcx7878/fastdfs-client-java --><dependency> <groupId>net.oschina.zcx7878</groupId> <artifactId>fastdfs-client-java</artifactId> <version>1.27.0.0</version></dependency>
本着不重复造轮子,且为了使用方便我们可以去GitHub找一个集成好的依赖:
https://github.com/tobato/FastDFS_Client
<dependency> <groupId>com.github.tobato</groupId> <artifactId>fastdfs-client</artifactId> <version>1.27.2</version></dependency>2、将Fdfs配置引入项目
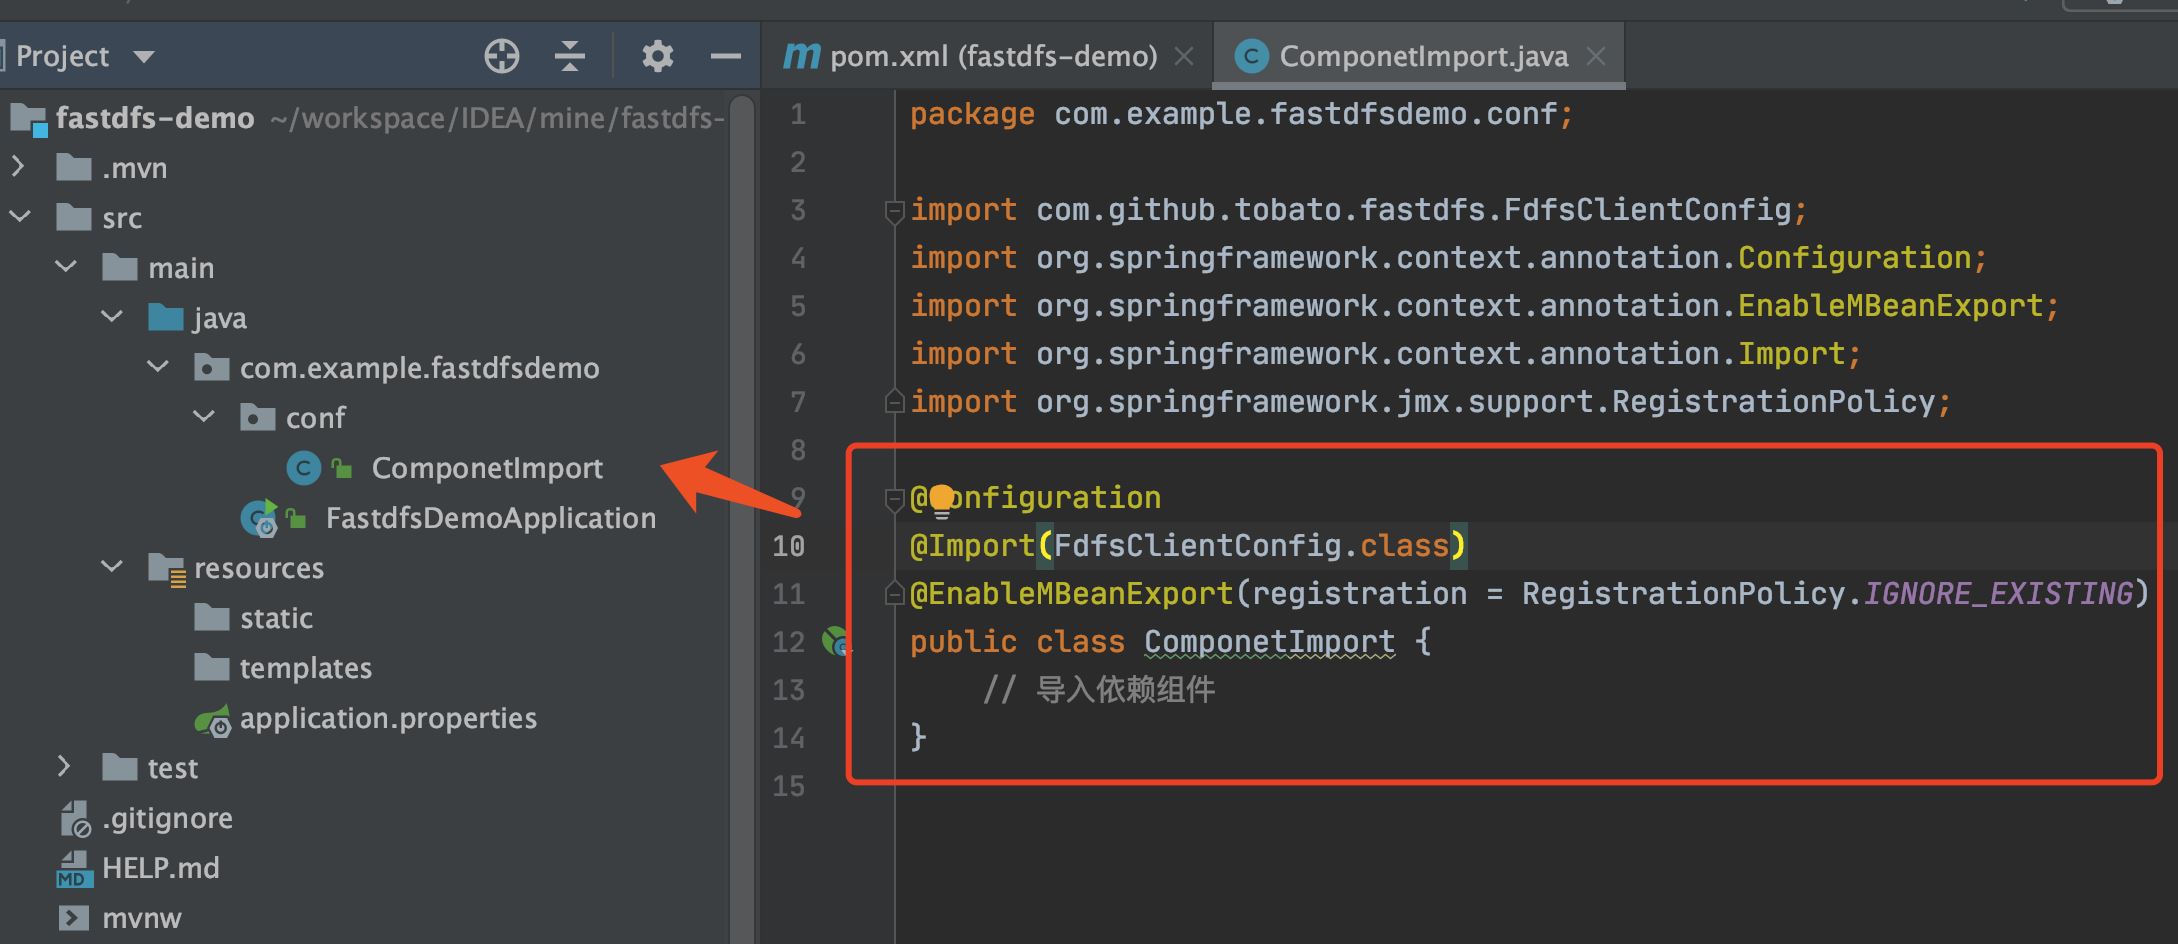
只需要创建一个配置类就可以了:
@Configuration@Import(FdfsClientConfig.class)@EnableMBeanExport(registration = RegistrationPolicy.IGNORE_EXISTING)public class ComponetImport { // 导入依赖组件}
参考截图:
根据自己情况修改相应ip地址及端口号:
server: port: 8080ip: 10.211.55.4 # 根据自己FastDFS服务器修改fdfs: so-timeout: 1501 connect-timeout: 601 thumb-image: #缩略图生成参数 width: 150 height: 150 tracker-list: #TrackerList参数,支持多个 - 10.211.55.4:22122 web-server-url: http://${ip}:8888/4、client封装工具类
创建FastDFSClient.java包装工具类,方便后面使用:
import com.github.tobato.fastdfs.domain.conn.FdfsWebServer;import com.github.tobato.fastdfs.domain.fdfs.StorePath;import com.github.tobato.fastdfs.domain.proto.storage.DownloadByteArray;import com.github.tobato.fastdfs.exception.FdfsUnsupportStorePathException;import com.github.tobato.fastdfs.service.FastFileStorageClient;import org.apache.commons.io.FilenameUtils;import org.apache.commons.lang3.StringUtils;import org.springframework.beans.factory.annotation.Autowired;import org.springframework.stereotype.Component;import org.springframework.web.multipart.MultipartFile;import java.io.ByteArrayInputStream;import java.io.File;import java.io.FileInputStream;import java.io.IOException;import java.nio.charset.Charset;@Componentpublic class FastDFSClient { @Autowired private FastFileStorageClient storageClient; @Autowired private FdfsWebServer fdfsWebServer; /** * 上传文件 * @param file 文件对象 * @return 文件访问地址 * @throws IOException */ public String uploadFile(MultipartFile file) throws IOException {StorePath storePath = storageClient.uploadFile(file.getInputStream(),file.getSize(), FilenameUtils.getExtension(file.getOriginalFilename()),null);return getResAccessUrl(storePath); } /** * 上传文件 * @param file 文件对象 * @return 文件访问地址 * @throws IOException */ public String uploadFile(File file) throws IOException {FileInputStream inputStream = new FileInputStream (file);StorePath storePath = storageClient.uploadFile(inputStream,file.length(), FilenameUtils.getExtension(file.getName()),null);return getResAccessUrl(storePath); } /** * 将一段字符串生成一个文件上传 * @param content 文件内容 * @param fileExtension * @return */ public String uploadFile(String content, String fileExtension) {byte[] buff = content.getBytes(Charset.forName('UTF-8'));ByteArrayInputStream stream = new ByteArrayInputStream(buff);StorePath storePath = storageClient.uploadFile(stream,buff.length, fileExtension,null);return getResAccessUrl(storePath); } /** * 封装图片完整URL地址 */ private String getResAccessUrl(StorePath storePath) {String fileUrl = fdfsWebServer.getWebServerUrl() + storePath.getFullPath();return fileUrl; } /** * 删除文件 * @param fileUrl 文件访问地址 * @return */ public void deleteFile(String fileUrl) {if (StringUtils.isEmpty(fileUrl)) { return;}try { StorePath storePath = StorePath.parseFromUrl(fileUrl); storageClient.deleteFile(storePath.getGroup(), storePath.getPath());} catch (FdfsUnsupportStorePathException e) { System.out.println(e.getMessage()); /** TODO 只是测试,所以未使用,logger,正式环境请修改打印方式 **/} } /** * 下载文件 * * @param fileUrl 文件URL * @return 文件字节 * @throws IOException */ public byte[] downloadFile(String fileUrl) throws IOException {String group = fileUrl.substring(0, fileUrl.indexOf('/'));String path = fileUrl.substring(fileUrl.indexOf('/') + 1);DownloadByteArray downloadByteArray = new DownloadByteArray();byte[] bytes = storageClient.downloadFile(group, path, downloadByteArray);return bytes; }}5、创建Conttoler测试类5.1 文件上传测试
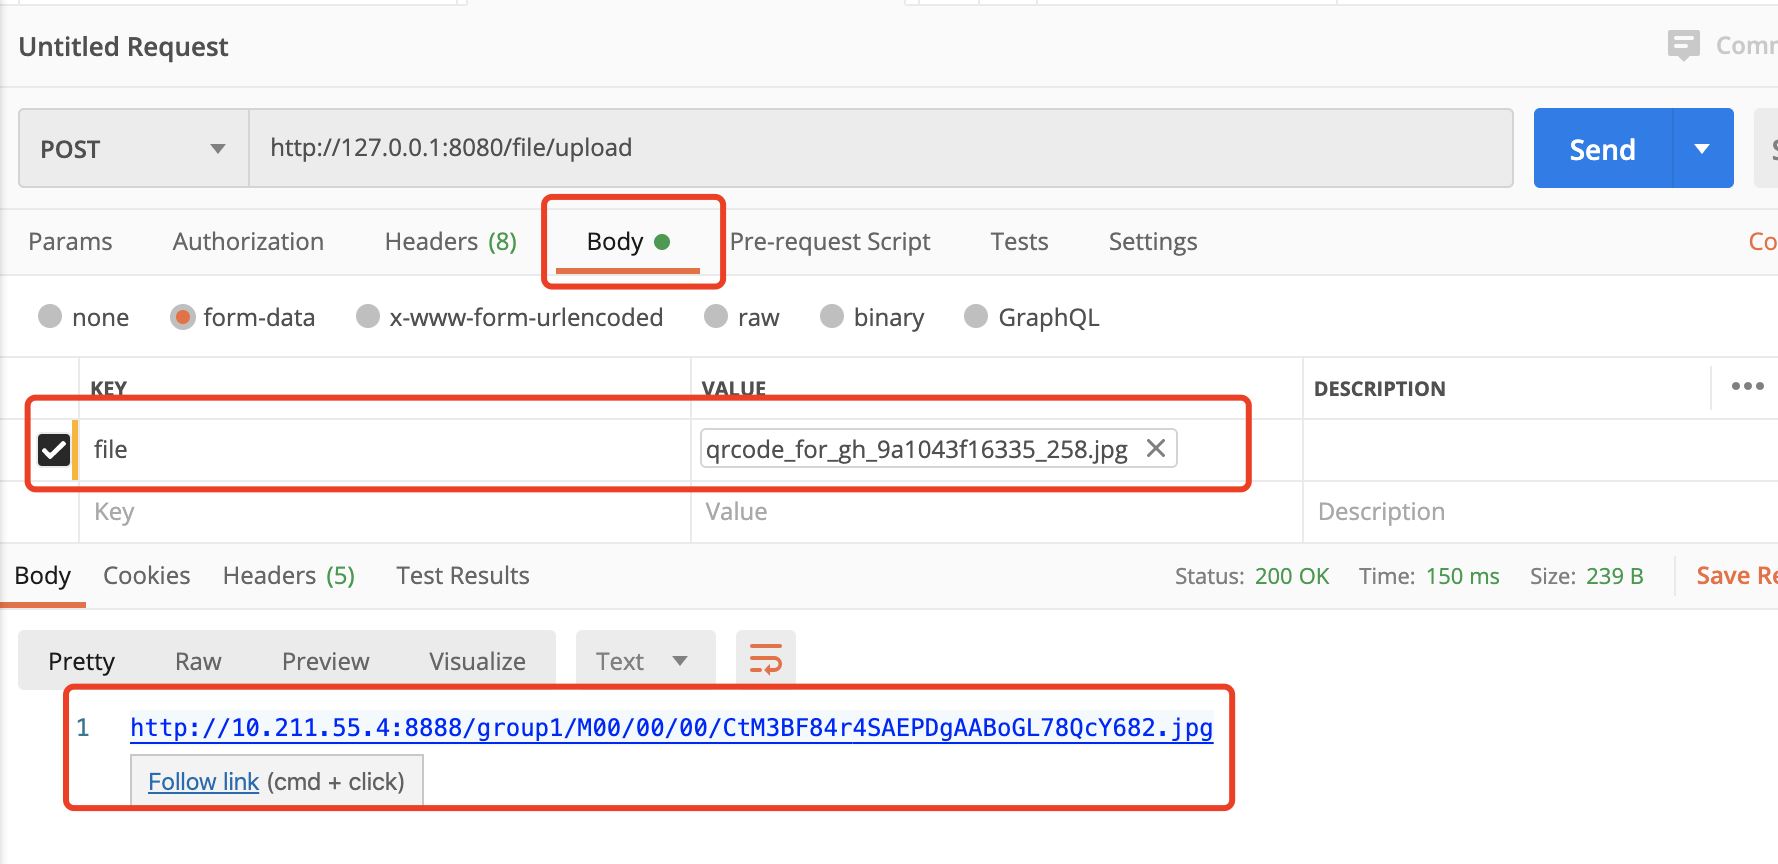
@RestController@RequestMapping('/file')public class FileUploadController { @Autowired private FastDFSClient fastDFSClient; /** * 上传 * @param file * @return * @throws IOException */ @RequestMapping('/upload') public String uploadFile(MultipartFile file) throws IOException {return fastDFSClient.uploadFile(file); }}
执行效果截图:
@RestController@RequestMapping('/file')public class FileUploadController { @Autowired private FastDFSClient fastDFSClient; /** * 下载 * @param fileUrl * @param response * @throws IOException */ @RequestMapping('/download') public void downloadFile(String fileUrl, HttpServletResponse response) throws IOException {byte[] bytes = fastDFSClient.downloadFile(fileUrl);/** TODO 这里只是为了整合fastdfs,所以写死了文件格式。需要在上传的时候保存文件名。下载的时候使用对应的格式 **/response.setHeader('Content-disposition', 'attachment;filename=' + URLEncoder.encode('sb.xlsx', 'UTF-8'));response.setCharacterEncoding('UTF-8');ServletOutputStream outputStream = null;try { outputStream = response.getOutputStream(); outputStream.write(bytes);} catch (IOException e) { e.printStackTrace();} finally { try {outputStream.flush();outputStream.close(); } catch (IOException e) {e.printStackTrace(); }} }}
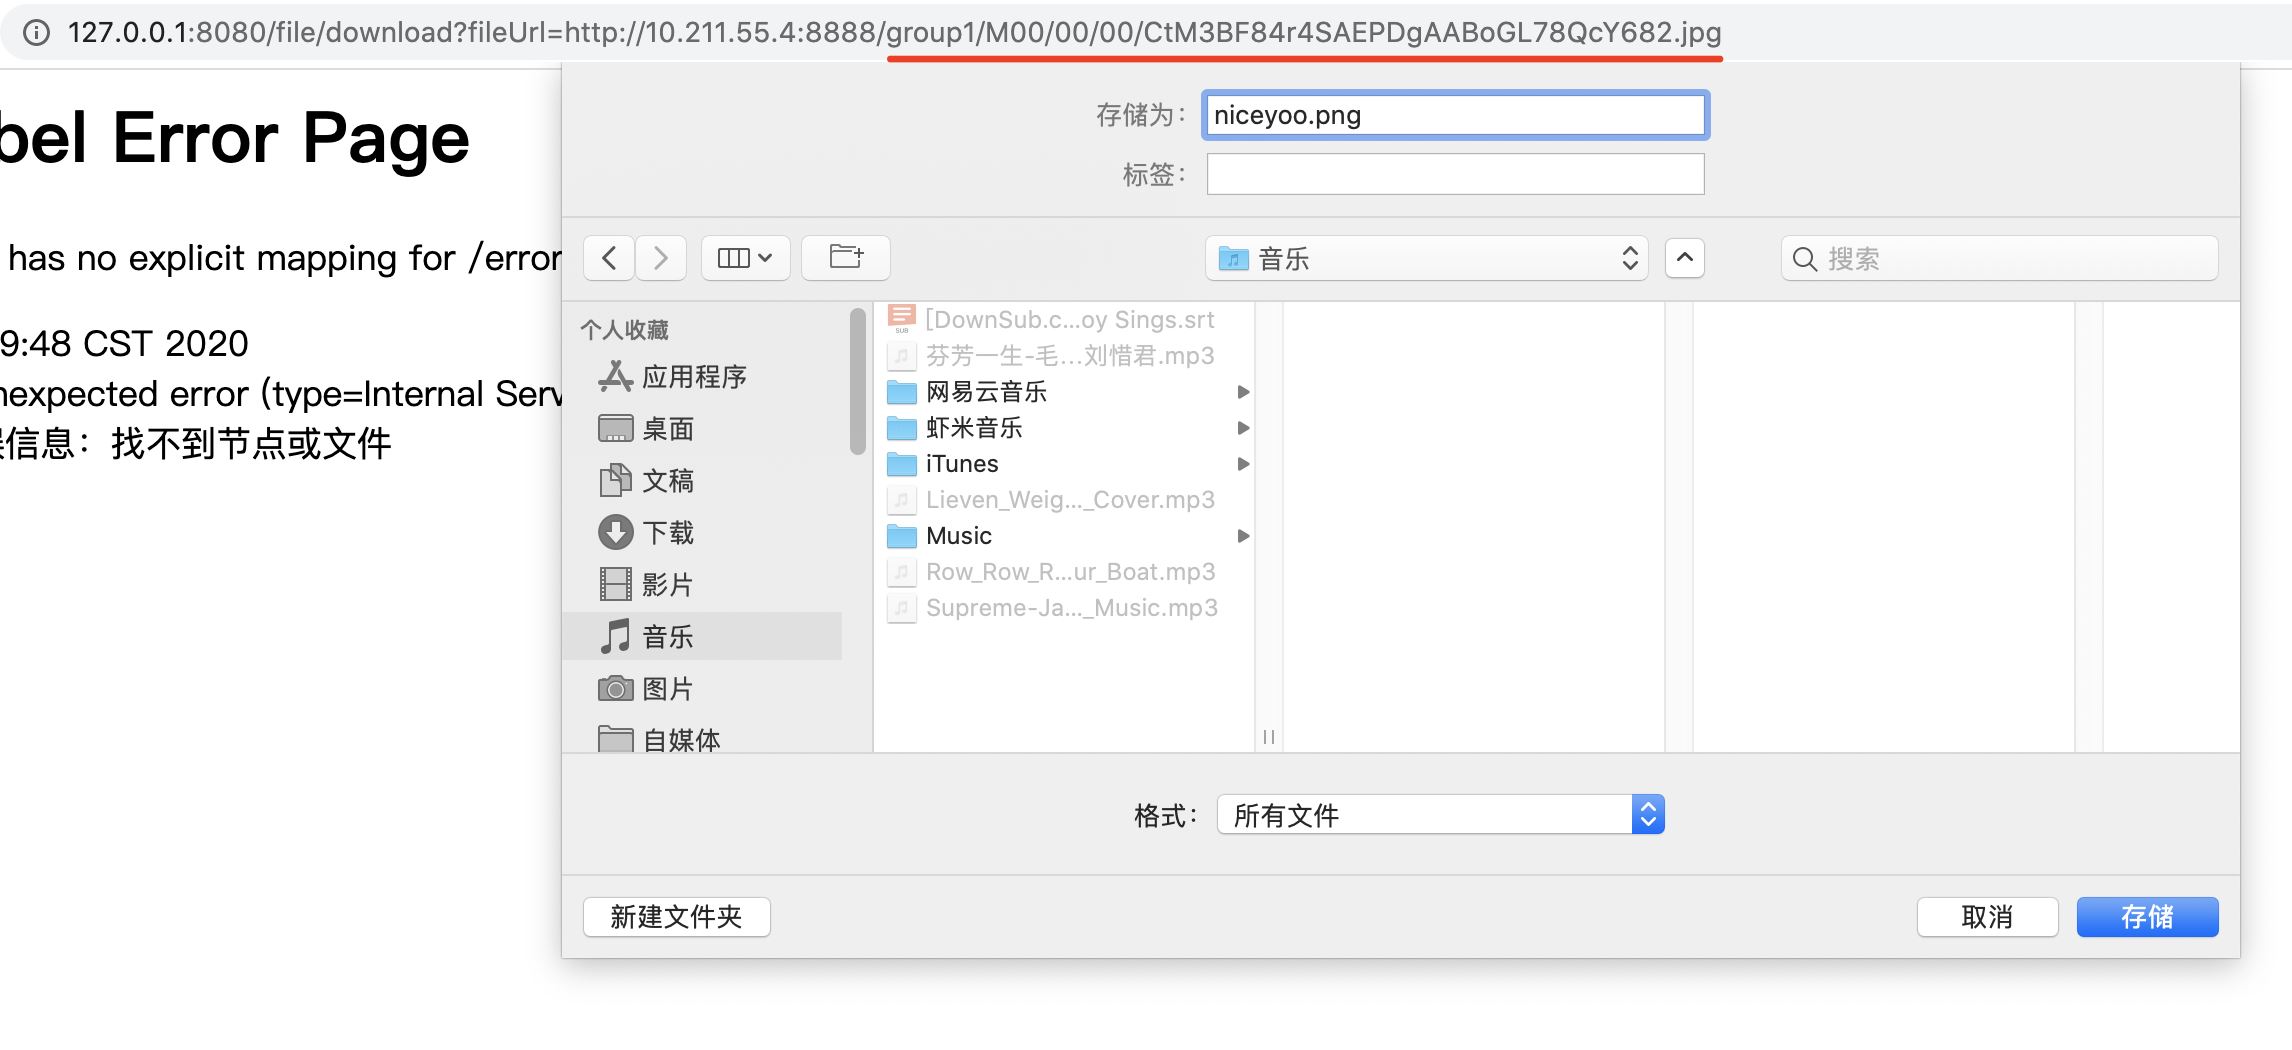
测试下载路径:
http://127.0.0.1:8080/file/download?fileUrl=group1/M00/00/00/CtM3BF84r4SAEPDgAABoGL78QcY682.jpg
拼接的参数为:group1/M00/00/00/CtM3BF84r4SAEPDgAABoGL78QcY682.jpg
大家想修改路径的话,需要同步修改 downloadFile() 方法里的分隔方式。
到此这篇关于SpringBoot集成FastDFS依赖实现文件上传的示例的文章就介绍到这了,更多相关SpringBoot FastDFS文件上传内容请搜索好吧啦网以前的文章或继续浏览下面的相关文章希望大家以后多多支持好吧啦网!
相关文章:

 网公网安备
网公网安备