SpringBoot整合MybatisPlus的教程详解
Mybatis-Plus(简称MP)是一个 Mybatis 的增强工具,在 Mybatis 的基础上只做增强不做改变,为简化开发、提高效率而生。
它已经封装好了一些crud方法,对于非常常见的一些sql我们不用写xml了,直接调用这些方法就行,但它也是支持我们自己手动写xml。
帮我们摆脱了用mybatis需要写大量的xml文件的麻烦,非常安逸哦
用过就不想用其他了,太舒服了
好了,我们开始整合整合
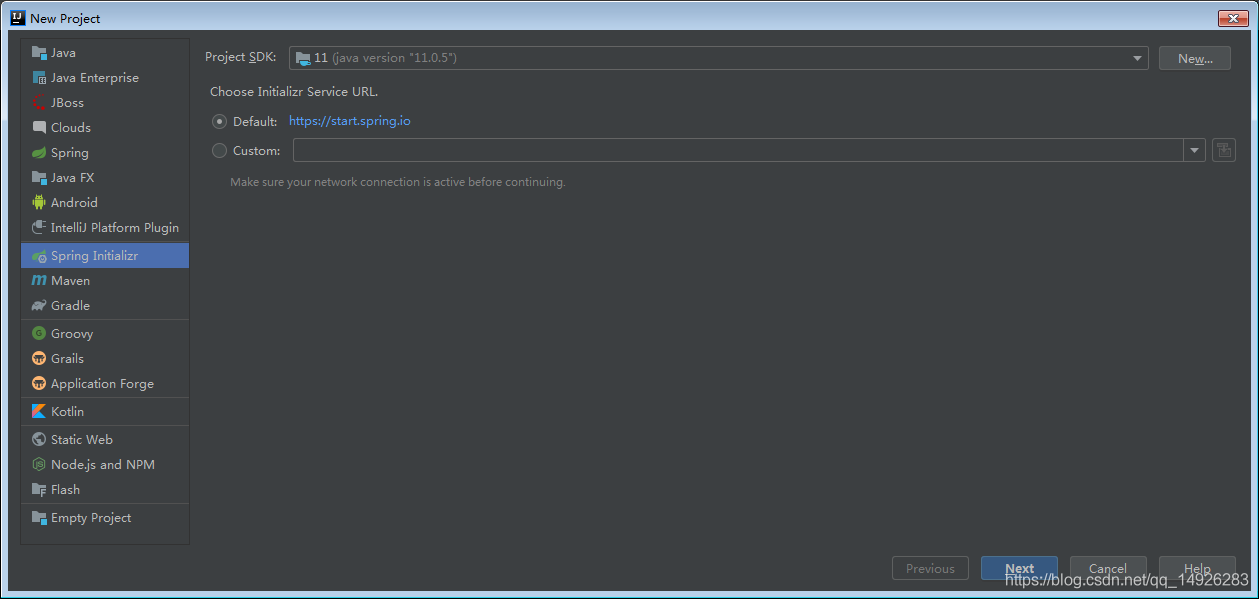
新建一个SpringBoot的工程

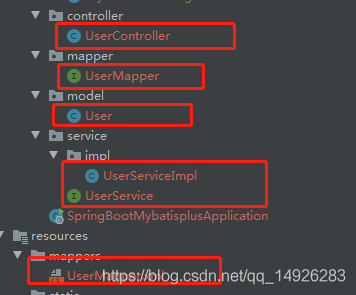
这里是我整合完一个最终的结构,可以参考一下
<?xml version='1.0' encoding='UTF-8'?><project xmlns='http://maven.apache.org/POM/4.0.0' xmlns:xsi='http://www.w3.org/2001/XMLSchema-instance' xsi:schemaLocation='http://maven.apache.org/POM/4.0.0 https://maven.apache.org/xsd/maven-4.0.0.xsd'> <modelVersion>4.0.0</modelVersion> <parent> <groupId>org.springframework.boot</groupId> <artifactId>spring-boot-starter-parent</artifactId> <version>2.4.0</version> <relativePath/> <!-- lookup parent from repository --> </parent> <groupId>com.zkb</groupId> <artifactId>spring-boot-mybatisplus</artifactId> <version>0.0.1-SNAPSHOT</version> <name>spring-boot-mybatisplus</name> <description>Demo project for Spring Boot</description> <properties> <java.version>11</java.version> </properties> <dependencies> <dependency> <groupId>org.springframework.boot</groupId> <artifactId>spring-boot-starter-web</artifactId> </dependency> <dependency> <groupId>org.projectlombok</groupId> <artifactId>lombok</artifactId> <optional>true</optional> </dependency> <dependency> <groupId>org.springframework.boot</groupId> <artifactId>spring-boot-starter-test</artifactId> <scope>test</scope> </dependency> <dependency> <groupId>mysql</groupId> <artifactId>mysql-connector-java</artifactId> <version>8.0.18</version> </dependency> <dependency> <groupId>com.alibaba</groupId> <artifactId>druid</artifactId> <version>1.1.21</version> </dependency> <dependency> <groupId>com.baomidou</groupId> <artifactId>mybatis-plus-boot-starter</artifactId> <version>3.3.2</version> </dependency> <dependency> <groupId>com.baomidou</groupId> <artifactId>mybatis-plus-generator</artifactId> <version>3.3.2</version> <scope>test</scope> </dependency> <dependency> <groupId>org.freemarker</groupId> <artifactId>freemarker</artifactId> <version>2.3.30</version> <scope>test</scope> </dependency> </dependencies> <build> <plugins> <plugin><groupId>org.springframework.boot</groupId><artifactId>spring-boot-maven-plugin</artifactId> </plugin> </plugins> </build> </project>
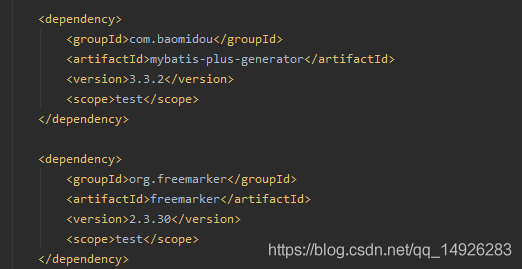
引入相关的jar包
可以看到我这边策略也有引入,它与mybatis一样,也有对应生成代码的策略,我们直接用这个来帮我们把代码生成就好
package com.example.mybatisplus; import com.baomidou.mybatisplus.core.toolkit.StringPool;import com.baomidou.mybatisplus.generator.AutoGenerator;import com.baomidou.mybatisplus.generator.InjectionConfig;import com.baomidou.mybatisplus.generator.config.*;import com.baomidou.mybatisplus.generator.config.po.TableInfo;import com.baomidou.mybatisplus.generator.config.rules.NamingStrategy;import com.baomidou.mybatisplus.generator.engine.FreemarkerTemplateEngine; import java.util.ArrayList;import java.util.List; public class MysqlGenerator { public static void main(String[] args) { // 代码生成器 AutoGenerator mpg = new AutoGenerator(); // 全局配置 GlobalConfig gc = new GlobalConfig(); String projectPath = System.getProperty('user.dir'); gc.setOutputDir(projectPath + '/src/main/java'); gc.setAuthor('zkb'); gc.setOpen(false); // service 命名方式 gc.setServiceName('%sService'); // service impl 命名方式 gc.setServiceImplName('%sServiceImpl'); gc.setMapperName('%sMapper'); gc.setXmlName('%sMapper'); gc.setFileOverride(true); gc.setActiveRecord(true); // XML 二级缓存 gc.setEnableCache(false); // XML ResultMap gc.setBaseResultMap(true); // XML columList gc.setBaseColumnList(false); // gc.setSwagger2(true); 实体属性 Swagger2 注解 mpg.setGlobalConfig(gc); // 数据源配置 DataSourceConfig dsc = new DataSourceConfig(); dsc.setUrl('jdbc:mysql://localhost:3306/900?serverTimezone=UTC&useUnicode=true&characterEncoding=utf8&useSSL=false'); // dsc.setSchemaName('public'); dsc.setDriverName('com.mysql.cj.jdbc.Driver'); dsc.setUsername('root'); dsc.setPassword('baishou888'); mpg.setDataSource(dsc); // 包配置 PackageConfig pc = new PackageConfig(); pc.setParent('com.zkb'); pc.setEntity('model'); pc.setService('service'); pc.setServiceImpl('service.impl'); mpg.setPackageInfo(pc); // 自定义配置 InjectionConfig cfg = new InjectionConfig() { @Override public void initMap() {// to do nothing } }; // 如果模板引擎是 freemarker String templatePath = '/templates/mapper.xml.ftl'; // 如果模板引擎是 velocity // String templatePath = '/templates/mapper.xml.vm'; // 自定义输出配置 List<FileOutConfig> focList = new ArrayList<>(); // 自定义配置会被优先输出 focList.add(new FileOutConfig(templatePath) { @Override public String outputFile(TableInfo tableInfo) {// 自定义输出文件名 , 如果你 Entity 设置了前后缀、此处注意 xml 的名称会跟着发生变化!!return projectPath + '/src/main/resources/mappers/' + '/' + tableInfo.getEntityName() + 'Mapper' + StringPool.DOT_XML; } }); /* cfg.setFileCreate(new IFileCreate() { @Override public boolean isCreate(ConfigBuilder configBuilder, FileType fileType, String filePath) {// 判断自定义文件夹是否需要创建checkDir('调用默认方法创建的目录');return false; } }); */ cfg.setFileOutConfigList(focList); mpg.setCfg(cfg); // 配置模板 TemplateConfig templateConfig = new TemplateConfig(); // 配置自定义输出模板 //指定自定义模板路径,注意不要带上.ftl/.vm, 会根据使用的模板引擎自动识别 // templateConfig.setEntity('templates/entity2.java'); // templateConfig.setService(); // templateConfig.setController(); templateConfig.setXml(null); mpg.setTemplate(templateConfig); // 策略配置 StrategyConfig strategy = new StrategyConfig(); strategy.setNaming(NamingStrategy.underline_to_camel); strategy.setColumnNaming(NamingStrategy.underline_to_camel);// strategy.setSuperEntityClass('com.baomidou.ant.common.BaseEntity'); strategy.setEntityLombokModel(true); strategy.setRestControllerStyle(true); // 公共父类// strategy.setSuperControllerClass('com.baomidou.ant.common.BaseController'); // 写于父类中的公共字段// strategy.setSuperEntityColumns('id'); strategy.setInclude(new String[]{'t_user'}); strategy.setControllerMappingHyphenStyle(true); strategy.setTablePrefix('t' + '_'); mpg.setStrategy(strategy); mpg.setTemplateEngine(new FreemarkerTemplateEngine()); mpg.execute(); }}
我有一个t_user的表
CREATE TABLE `t_user` ( `id` bigint NOT NULL AUTO_INCREMENT, `username` varchar(255) COLLATE utf8mb4_unicode_ci NOT NULL, `password` varchar(255) COLLATE utf8mb4_unicode_ci NOT NULL, `nickname` varchar(255) COLLATE utf8mb4_unicode_ci NOT NULL, `gender` varchar(255) COLLATE utf8mb4_unicode_ci NOT NULL, `telephone` varchar(255) COLLATE utf8mb4_unicode_ci NOT NULL, `registerdate` datetime NOT NULL, `address` varchar(255) COLLATE utf8mb4_unicode_ci NOT NULL, `addTime` timestamp NOT NULL DEFAULT ’2015-09-15 00:00:00’, `updateTime` timestamp NOT NULL DEFAULT ’2015-09-15 00:00:00’ ON UPDATE CURRENT_TIMESTAMP, PRIMARY KEY (`id`)) ENGINE=InnoDB AUTO_INCREMENT=44138653810545248 DEFAULT CHARSET=utf8mb4 COLLATE=utf8mb4_unicode_ci;
我是直接针对它执行策略的,
这几个文件都是策略生成的,我没有去动过
package com.zkb.conf; import com.baomidou.mybatisplus.extension.plugins.PaginationInterceptor;import org.springframework.context.annotation.Bean;import org.springframework.context.annotation.Configuration; /** * 配置分页插件 * */@Configurationpublic class MybatisPlusConfig { /** * 分页插件 */ @Bean public PaginationInterceptor paginationInterceptor() { return new PaginationInterceptor(); }}
server: port: 8081 servlet: context-path: / spring: datasource: # mysql5.x 配置,高版本需要加useSSL=false #url: jdbc:mysql://localhost:3306/test?characterEncoding=utf8&useSSL=false # mysql8.0 需要加&useSSL=false&serverTimezone=UTC url: jdbc:mysql://localhost:3306/900?zeroDateTimeBehavior=convertToNull&characterEncoding=utf8&useSSL=false&serverTimezone=UTC username: root password: baishou888 # mysql8.0 驱动 driver-class-name: com.mysql.cj.jdbc.Driver # mysql5.x 驱动 #driver-class-name: com.mysql.jdbc.Driver debug: false #Druid# name: test type: com.alibaba.druid.pool.DruidDataSource filters: stat maxActive: 20 initialSize: 1 maxWait: 60000 minIdle: 1 timeBetweenEvictionRunsMillis: 60000 minEvictableIdleTimeMillis: 300000 validationQuery: select ’x’ testWhileIdle: true testOnBorrow: false testOnReturn: false poolPreparedStatements: true maxOpenPreparedStatements: 20 jackson: date-format: yyyy-MM-dd HH:mm:ss time-zone: GMT+8 mybatis-plus: configuration: map-underscore-to-camel-case: true auto-mapping-behavior: full log-impl: org.apache.ibatis.logging.stdout.StdOutImpl mapper-locations: classpath*:mapper/**/*Mapper.xml global-config: # 逻辑删除配置 db-config: # 删除前 logic-not-delete-value: 1 # 删除后 logic-delete-value: 0
package com.zkb; import org.mybatis.spring.annotation.MapperScan;import org.springframework.boot.SpringApplication;import org.springframework.boot.autoconfigure.SpringBootApplication; @SpringBootApplication@MapperScan('com.zkb.mapper')public class SpringBootMybatisplusApplication { public static void main(String[] args) { SpringApplication.run(SpringBootMybatisplusApplication.class, args); } }
@MapperScan('com.zkb.mapper')一定是扫描到自己mapper的接口类
package com.zkb.controller; import com.zkb.model.User;import com.zkb.service.UserService;import org.springframework.beans.factory.annotation.Autowired;import org.springframework.web.bind.annotation.GetMapping;import org.springframework.web.bind.annotation.PostMapping;import org.springframework.web.bind.annotation.RequestMapping; import org.springframework.web.bind.annotation.RestController; /** * <p> * 前端控制器 * </p> * * @author zkb * @since 2020-11-23 */@RestController@RequestMapping('/user')public class UserController { @Autowired private UserService userService; @GetMapping('/getUser') public User getUser(){ return userService.getById(1231); } }
写了一个get方法来测试自己是否与mybatis-plus整合成功,所以直接调用了mybatis-plus内置的方法
当然数据库我自己手动写了一个id为1231的数据
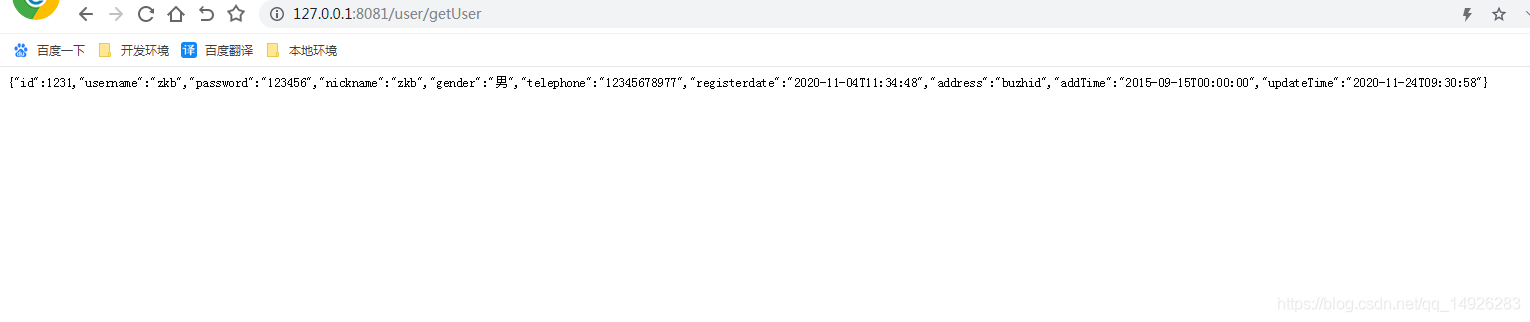
可以看到整合成功了,对吧,真的是超级简单
点击此处demo下载,需要自取
到此这篇关于SpringBoot整合MybatisPlus的文章就介绍到这了,更多相关SpringBoot整合MybatisPlus内容请搜索好吧啦网以前的文章或继续浏览下面的相关文章希望大家以后多多支持好吧啦网!
相关文章:

 网公网安备
网公网安备