SpringBoot2.1.x,创建自己的spring-boot-starter自动配置模块操作
一)spring-boot-starter命名规则
自动配置模块命名规则:xxx-spring-boot,如:aspectlog-spring-boot
启动器命名规则:xxx-spring-boot-starter,如:aspectlog-spring-boot-starter
如两者只有一个模块:建议以xxx-spring-boot-starter方式命名。
springboot建议以xxx前缀的方式对自己的自动配置命名的。
二)spring-boot-starter条件注解
注解 说明 @ConditionalOnClass 指定加载的类 @ConditionalOnMissingClass 指定不加载的类 @ConditionalOnBean 指定需要加载的bean @ConditionalOnMissingBean 指定不需要加载的bean @ConditionalOnProperty 指定加载配置文件中的属性,如yml或properties文件 @ConditionalOnResource 检查特定的资源是否存在,如:file:/home/user/test.dat @ConditionalOnExpression 使用SpEL表达式该文章使用@ConditionalOnProperty注解实现。
三)创建自己的aspectlog-spring-boot-starter日志打印自动配置模块
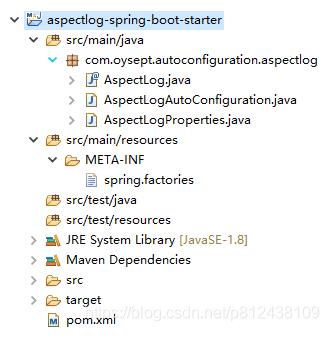
第一步:创建一个aspectlog-spring-boot-starter名称的maven项目
在pom.xml文件中引入springboot相应jar
<project xmlns='http://maven.apache.org/POM/4.0.0' xmlns:xsi='http://www.w3.org/2001/XMLSchema-instance' xsi:schemaLocation='http://maven.apache.org/POM/4.0.0 http://maven.apache.org/xsd/maven-4.0.0.xsd'> <modelVersion>4.0.0</modelVersion> <groupId>com.oysept</groupId> <artifactId>aspectlog-spring-boot-starter</artifactId> <version>0.0.1-SNAPSHOT</version> <!-- springboot版本信息 --> <parent> <groupId>org.springframework.boot</groupId> <artifactId>spring-boot-starter-parent</artifactId> <version>2.1.4.RELEASE</version> </parent> <properties> <java.version>1.8</java.version> </properties> <dependencies> <dependency> <groupId>org.springframework.boot</groupId> <artifactId>spring-boot-autoconfigure</artifactId> </dependency> <dependency> <groupId>org.springframework.boot</groupId> <artifactId>spring-boot-starter-aop</artifactId> </dependency> <!-- 自定义配置 --> <dependency> <groupId>org.springframework.boot</groupId> <artifactId>spring-boot-configuration-processor</artifactId> <optional>true</optional> </dependency> </dependencies></project>
spring-boot-configuration-processor作用:会在源数据文件(META-INF/spring-autoconfigure-metadata.properties)中自动扫描加载和自动配置有关的条件。也就是说,当编写starter时,会读取自动配置的条件,写入源数据文件中。
第二步:定义一个AspectLog注解类
该注解作用于方法上,并在运行时启用
package com.oysept.autoconfiguration.aspectlog; import java.lang.annotation.ElementType;import java.lang.annotation.Retention;import java.lang.annotation.RetentionPolicy;import java.lang.annotation.Target; @Target(ElementType.METHOD)@Retention(RetentionPolicy.RUNTIME)public @interface AspectLog {}
第三步:创建一个AspectLogProperties类,用于加载yml或properties中的属性
package com.oysept.autoconfiguration.aspectlog; import org.springframework.boot.context.properties.ConfigurationProperties; @ConfigurationProperties('aspectlog')public class AspectLogProperties { private boolean enable; public boolean isEnable() { return enable; } public void setEnable(boolean enable) { this.enable = enable; }}
第四步:创建一个AspectLogAutoConfiguration打印日志自动配置类
package com.oysept.autoconfiguration.aspectlog; import org.aspectj.lang.ProceedingJoinPoint;import org.aspectj.lang.annotation.Around;import org.aspectj.lang.annotation.Aspect;import org.slf4j.Logger;import org.slf4j.LoggerFactory;import org.springframework.boot.autoconfigure.condition.ConditionalOnProperty;import org.springframework.context.annotation.Configuration;import org.springframework.context.annotation.EnableAspectJAutoProxy;import org.springframework.core.PriorityOrdered; @Aspect@EnableAspectJAutoProxy(exposeProxy = true, proxyTargetClass = true)@Configuration@ConditionalOnProperty(prefix='aspectlog', name = 'enable', havingValue = 'true', matchIfMissing = true)public class AspectLogAutoConfiguration implements PriorityOrdered { protected Logger logger = LoggerFactory.getLogger(getClass()); @Around('@annotation(com.oysept.autoconfiguration.aspectlog.AspectLog) ') public Object isOpen(ProceedingJoinPoint thisJoinPoint) throws Throwable { //执行方法名称 String taskName = thisJoinPoint.getSignature() .toString().substring( thisJoinPoint.getSignature() .toString().indexOf(' '), thisJoinPoint.getSignature().toString().indexOf('(')); taskName = taskName.trim(); long time = System.currentTimeMillis(); Object result = thisJoinPoint.proceed(); logger.info('==>aspectlog method:{} run :{} ms', taskName, (System.currentTimeMillis() - time)); return result; } @Override public int getOrder() { //保证事务等切面先执行 return Integer.MAX_VALUE; }}
注解说明:
@ConditionalOnProperty(prefix = 'aspectLog', name = 'enable',havingValue = 'true', matchIfMissing = true)
当yml或properties配置文件中有aspectLog.enable=true时开启,如果配置文件没有设置aspectLog.enable也开启。
第五步:创建spring.factories文件,该文件是springboot规定的配置文件,把自动配置类按规则配置
先在src/main/resources下创建一个META-INF文件夹,然后在文件夹下创建spring.factories
org.springframework.boot.autoconfigure.EnableAutoConfiguration=
com.oysept.autoconfiguration.aspectlog.AspectLogAutoConfiguration
META-INF/spring.factories是spring的工厂机制,在这个文件中定义的类,都会被自动加载。多个配置使用逗号分割,换行用
第六步:使用mvn install方式把该模块自动打包
四)测试aspectlog-spring-boot-starter打印日志配置
另外创建一个springboot_starter_test名称的maven项目
在pom中引入aspectlog-spring-boot-starter的jar
<project xmlns='http://maven.apache.org/POM/4.0.0' xmlns:xsi='http://www.w3.org/2001/XMLSchema-instance' xsi:schemaLocation='http://maven.apache.org/POM/4.0.0 http://maven.apache.org/xsd/maven-4.0.0.xsd'> <modelVersion>4.0.0</modelVersion> <groupId>com.oysept</groupId> <artifactId>springboot_starter_test</artifactId> <version>0.0.1-SNAPSHOT</version> <packaging>jar</packaging> <parent> <groupId>org.springframework.boot</groupId> <artifactId>spring-boot-starter-parent</artifactId> <version>2.1.4.RELEASE</version> <relativePath/> </parent> <properties> <java.version>1.8</java.version> </properties> <dependencies> <dependency> <groupId>org.springframework.boot</groupId> <artifactId>spring-boot-starter-web</artifactId> </dependency> <!-- 引入自定义aspectlog-spring-boot-starter 打印日志jar --> <dependency> <groupId>com.oysept</groupId> <artifactId>aspectlog-spring-boot-starter</artifactId> <version>0.0.1-SNAPSHOT</version> </dependency> </dependencies> <!-- maven打包插件,在cmd命令窗口执行,如: mvn install -U --> <build> <plugins> <plugin> <groupId>org.springframework.boot</groupId> <artifactId>spring-boot-maven-plugin</artifactId> </plugin> </plugins> </build></project>
创建一个application.yml,配置启动的端口,默认是8080
server:
port: 8080
创建application启动类
package com.oysept; import org.springframework.boot.SpringApplication;import org.springframework.boot.autoconfigure.SpringBootApplication; @SpringBootApplicationpublic class TestSpringBootStarterApplication { public static void main(String[] args) { SpringApplication.run(TestSpringBootStarterApplication.class, args); }}
创建测试AspectLog功能controller
package com.oysept.controller; import org.springframework.web.bind.annotation.RequestMapping;import org.springframework.web.bind.annotation.RequestMethod;import org.springframework.web.bind.annotation.RequestParam;import org.springframework.web.bind.annotation.RestController; import com.oysept.autoconfiguration.aspectlog.AspectLog; @RestControllerpublic class GetController { /** * 访问地址: http://localhost:8080/test/starter/aspectlog?param=TTTEEESSSTTT * @return */ @AspectLog @RequestMapping(value='/test/starter/aspectlog', method = RequestMethod.GET) public String testStarterAspectLog(@RequestParam(value = 'param') String param) { System.out.println('==>/test/starter/aspectlog, param: ' + param); // 处理业务逻辑 return '/test/starter/aspectlog SUCCESS!'; }}
在想要打印日志的方法上,使用@AspectLog注解
启动TestSpringBootStarterApplication中的main方法
在浏览器中输入:http://localhost:8080/test/starter/aspectlog?param=TTTEEESSSTTT
然后在控制台查看效果:

以上这篇SpringBoot2.1.x,创建自己的spring-boot-starter自动配置模块操作就是小编分享给大家的全部内容了,希望能给大家一个参考,也希望大家多多支持好吧啦网。
 网公网安备
网公网安备