SpringBoot中打war包需要注意事项
最近在做一个项目,遇到了项目打成 war 包的一个问题,项目创建时选择的时 jar 包方式,后因项目部署要求,需要打成 war 包部署,遇到很多坑,在此做一下记录
一、修改打包方式
原:
<version>0.0.1-SNAPSHOT</version><packaging>jar</packaging>
改后:
<version>0.0.1-SNAPSHOT</version><packaging>war</packaging>
二、排除内置 Tomcat
原:
<dependency> <groupId>org.springframework.boot</groupId> <artifactId>spring-boot-starter-web</artifactId></dependency>
改后:
<dependency> <groupId>org.springframework.boot</groupId> <artifactId>spring-boot-starter-web</artifactId> <exclusions> <exclusion> <groupId>org.springframework.boot</groupId> <artifactId>spring-boot-starter-tomcat</artifactId> </exclusion> </exclusions></dependency>
使用 排除内置服务器
三、添加 Tomcat 依赖
用于编译和测试开发,两种方式
1、
<dependency> <groupId>org.springframework.boot</groupId> <artifactId>spring-boot-starter-tomcat</artifactId> <!-- 该包只在编译和测试的时候使用 --> <scope>provided</scope></dependency>
2、
<dependency> <groupId>org.apache.tomcat</groupId> <artifactId>tomcat-servlet-api</artifactId> <version>8.5.34</version> <!-- 该包只在编译和测试的时候使用 --> <scope>provided</scope></dependency>
四、改变项目的构造方式
原:
<build> <plugins> <plugin> <groupId>org.springframework.boot</groupId> <artifactId>spring-boot-maven-plugin</artifactId> </plugin> </plugins></build>
改后:
<build><!-- 一般为你的项目名,与配置文件中的context-path保持一致 --> <finalName>demo</finalName> <plugins> <plugin> <groupId>org.apache.maven.plugins</groupId> <artifactId>maven-compiler-plugin</artifactId> <configuration><source>${java.version}</source><target>${java.version}</target> </configuration> </plugin> <plugin> <groupId>org.apache.maven.plugins</groupId> <artifactId>maven-war-plugin</artifactId> <configuration><webResources> <resource> <directory>src/main/resources/lib</directory> <targetPath>WEB-INF/lib/</targetPath> <includes> <include>**/*.jar</include> </includes> </resource></webResources> </configuration> </plugin> </plugins></build>
五、修改启动类
启动类继承 SpringBootServletInitializer,并实现 configure() 方法原:
import org.springframework.boot.SpringApplication;import org.springframework.boot.autoconfigure.SpringBootApplication;@SpringBootApplicationpublic class DemoApplication { public static void main(String[] args) { SpringApplication.run(DemoApplication.class, args); }}
改后:
import org.springframework.boot.SpringApplication;import org.springframework.boot.autoconfigure.SpringBootApplication;import org.springframework.boot.builder.SpringApplicationBuilder;import org.springframework.boot.web.servlet.support.SpringBootServletInitializer;import org.springframework.scheduling.annotation.EnableScheduling;@SpringBootApplication@EnableSchedulingpublic class DemoApplication extends SpringBootServletInitializer { @Override protected SpringApplicationBuilder configure(SpringApplicationBuilder application) { return application.sources(DemoApplication.class); } public static void main(String[] args) { SpringApplication.run(DemoApplication.class, args); }}
六、修改配置文件
修改 application.yml 文件,标明项目项目上下文路径 context-path
server: servlet: context-path: /demo
七、修改静态资源引入方式
我们使用 thymeleaf 模板引擎,引入 css、js 文件时,需要加上项目上下文路径原:
<link rel='stylesheet' href='https://www.haobala.com/bcjs/layui/css/layui.css' rel='external nofollow' media='all'>
改后:
<link rel='stylesheet' th:href='https://www.haobala.com/bcjs/@{/layui/css/layui.css}' rel='external nofollow' media='all'>
我们需要使用 th:href='https://www.haobala.com/bcjs/@{}' rel='external nofollow' 的方式,去引入静态资源文件
八、测试
我们可以不使用项目的启动类启动项目,我们自己添加一个服务器来启动项目
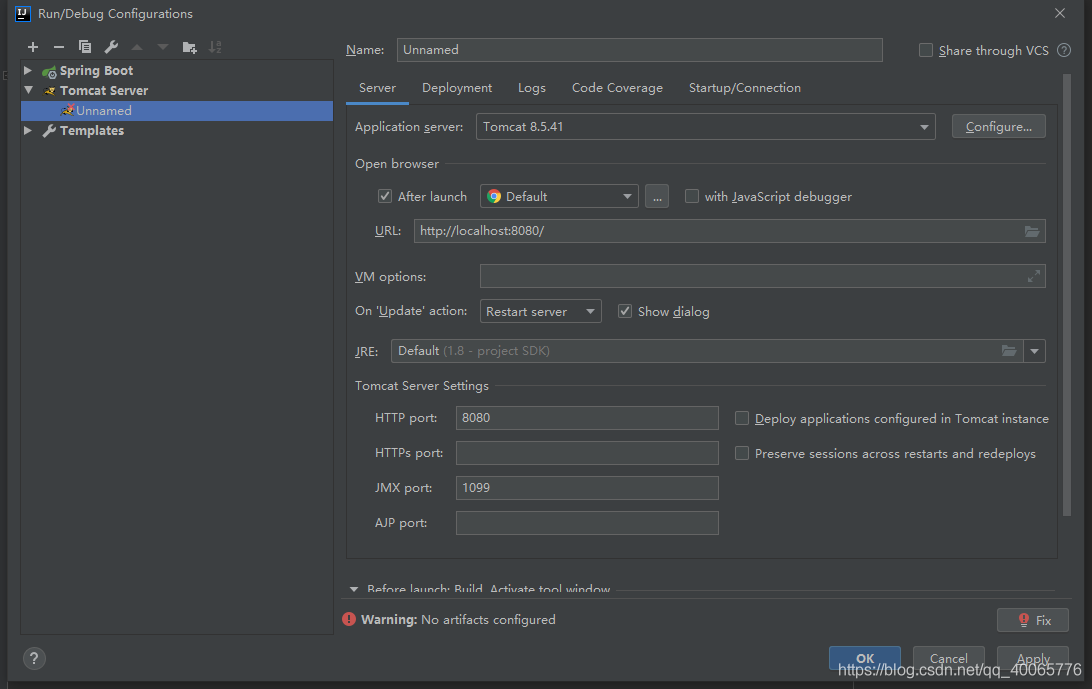
就想普通的 SSM 项目,添加一个 Tomcat 启动项目,如果能够成功启动项目,并能正常访问,那么打成 war 包也能够正常运行
到此这篇关于SpringBoot中打war包需要注意事项的文章就介绍到这了,更多相关SpringBoot打war包内容请搜索好吧啦网以前的文章或继续浏览下面的相关文章希望大家以后多多支持好吧啦网!
相关文章:

 网公网安备
网公网安备