SpringBoot整合FastDFS方法过程详解
一.pom.xml
<?xml version='1.0' encoding='UTF-8'?><project xmlns='http://maven.apache.org/POM/4.0.0' xmlns:xsi='http://www.w3.org/2001/XMLSchema-instance' xsi:schemaLocation='http://maven.apache.org/POM/4.0.0 https://maven.apache.org/xsd/maven-4.0.0.xsd'> <modelVersion>4.0.0</modelVersion> <parent> <groupId>org.springframework.boot</groupId> <artifactId>spring-boot-starter-parent</artifactId> <version>2.2.6.RELEASE</version> <relativePath/> <!-- lookup parent from repository --> </parent> <groupId>com.wj</groupId> <artifactId>fastdsf-boot</artifactId> <version>0.0.1-SNAPSHOT</version> <name>fastdsf-boot</name> <description>Demo project for Spring Boot</description> <properties> <java.version>1.8</java.version> </properties> <dependencies> <dependency> <groupId>org.springframework.boot</groupId> <artifactId>spring-boot-starter</artifactId> </dependency> <dependency> <groupId>org.springframework.boot</groupId> <artifactId>spring-boot-starter-web</artifactId> </dependency> <dependency> <groupId>org.springframework.boot</groupId> <artifactId>spring-boot-starter-thymeleaf</artifactId> </dependency> <dependency> <groupId>com.github.tobato</groupId> <artifactId>fastdfs-client</artifactId> <version>1.26.2</version> </dependency> <dependency> <groupId>org.springframework.boot</groupId> <artifactId>spring-boot-starter-test</artifactId> <scope>test</scope> <exclusions><exclusion> <groupId>org.junit.vintage</groupId> <artifactId>junit-vintage-engine</artifactId></exclusion> </exclusions> </dependency> </dependencies> <build> <plugins> <plugin><groupId>org.springframework.boot</groupId><artifactId>spring-boot-maven-plugin</artifactId> </plugin> </plugins> </build> </project>
二.application.yml
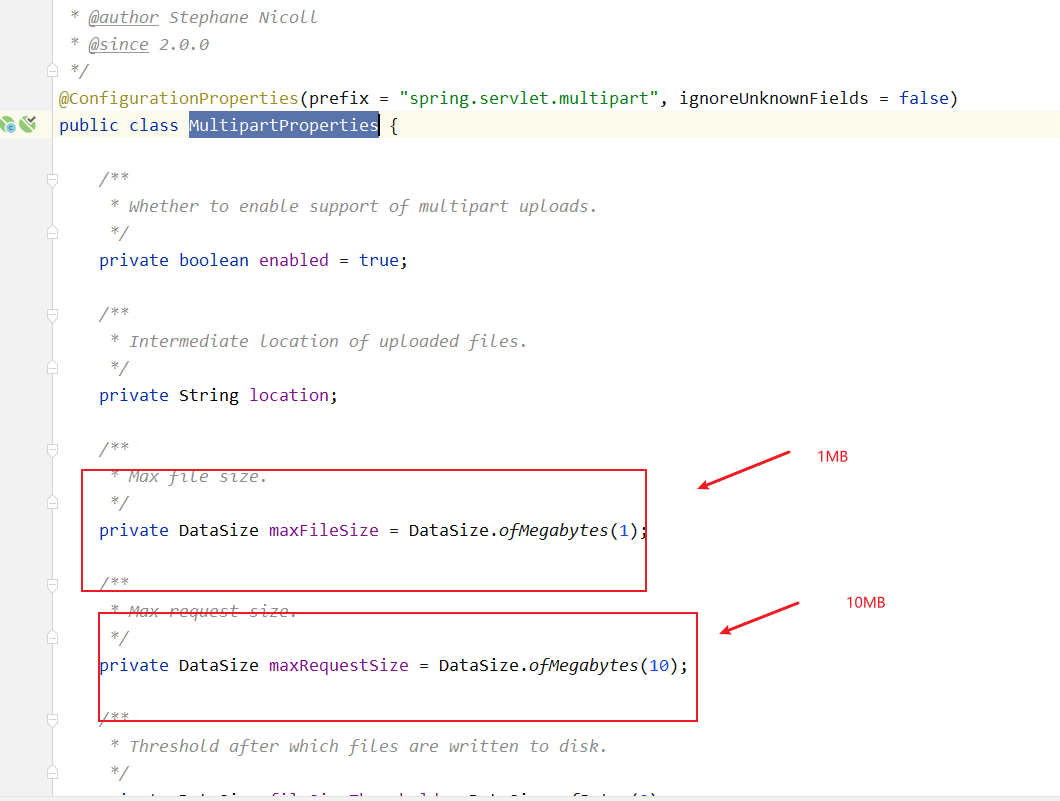
#fastdfs 配置fdfs:so-timeout: 150000connect-timeout: 150000 #超时时间thumb-image:width: 150height: 150tracker-list:- 111.111.111.111:22122 #ip:端口号spring:thymeleaf:prefix: classpath:/templates/servlet:multipart:max-file-size: 50MB #单次单个文件最大大小max-request-size: 50MB #单次上传所有文件的总大小<br>#注意,这里springboot默认配置的大小是1MB和10MB,可能不够用,具体参考MultipartProperties.java
三.FastUtil.java 前提先将Nginx和FastDFS整合
@Componentpublic class FastUtil { private final Logger logger = LoggerFactory.getLogger(FastUtil.class); @Autowired private FastFileStorageClient fastFileStorageClient; /** * 文件上传 * 最后返回fastDFS中的文件名称; * * @param bytes 文件字节 * @param fileSize 文件大小 * @param extension 文件扩展名 * @return fastDfs路径 */ public String uploadFile(byte[] bytes, long fileSize, String extension) { ByteArrayInputStream byteArrayInputStream = new ByteArrayInputStream(bytes); StorePath storePath = fastFileStorageClient.uploadFile(byteArrayInputStream, fileSize, extension, null); return 'http://111.111.111.111/'+storePath.getFullPath(); } public byte[] downloadFile(String group,String path) throws IOException { DownloadByteArray downloadByteArray = new DownloadByteArray(); byte[] bytes = fastFileStorageClient.downloadFile(group, path, downloadByteArray); return bytes; } }
四.配置类 FdfsConfig.java
@Configuration@Import(FdfsClientConfig.class)@EnableMBeanExport(registration = RegistrationPolicy.IGNORE_EXISTING)public class FdfsConfig {}
五.Controller
@RestControllerpublic class FdfsController { @Autowired private FastUtil fastDFSClientWrapper; private final Logger logger = LoggerFactory.getLogger(FdfsController.class); @PostMapping('/upload') @ResponseBody public String upload(MultipartFile file) throws Exception { byte[] bytes = new byte[0]; try { bytes = file.getBytes(); } catch (IOException e) { logger.error('获取文件错误'); e.printStackTrace(); } //获取源文件名称 String originalFileName = file.getOriginalFilename(); //获取文件后缀--.doc String extension = originalFileName.substring(originalFileName.lastIndexOf('.') + 1); String fileName = file.getName(); //获取文件大小 long fileSize = file.getSize(); System.out.println(originalFileName + '==' + fileName + '==' + fileSize + '==' + extension + '==' + bytes.length); String string = fastDFSClientWrapper.uploadFile(bytes, fileSize, extension); return string; }}
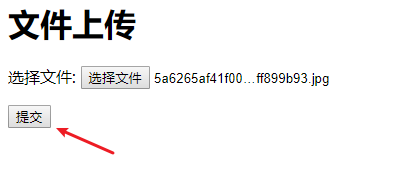
六.前端页面 index.html
<!DOCTYPE html><html xmlns='http://www.w3.org/1999/xhtml' xmlns:th='http://www.thymeleaf.org' xmlns:sec='http://www.thymeleaf.org/thymeleaf-extras-springsecurity3'><head> <meta charset='UTF-8' /> <title>Insert title here</title></head><body><h1 th:inlines='text'>文件上传</h1><form action='upload' method='post' enctype='multipart/form-data'> <p>选择文件: <input type='file' name='file'/></p> <p><input type='submit' value='提交'/></p></form></body></html>
七.开始上传
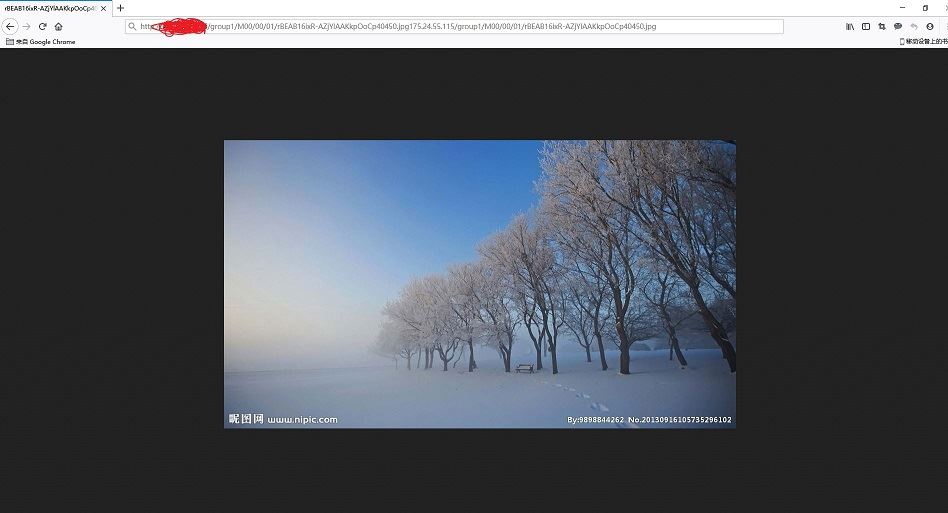
最后在页面上返回一个URL,可以直接访问

以上就是本文的全部内容,希望对大家的学习有所帮助,也希望大家多多支持好吧啦网。
相关文章:
 网公网安备
网公网安备