使用springboot aop来实现读写分离和事物配置
什么事读写分离
读写分离,基本的原理是让主数据库处理事务性增、改、删操作(INSERT、UPDATE、DELETE),而从数据库处理SELECT查询操作。数据库复制被用来把事务性操作导致的变更同步到集群中的从数据库。
为什么要实现读写分离
增加冗余
增加了机器的处理能力
对于读操作为主的应用,使用读写分离是最好的场景,因为可以确保写的服务器压力更小,而读又可以接受点时间上的延迟。
实现
本文介绍利用spring aop来动态切换数据源来实现读写分离。
先建一个maven项目,导入springBoot依赖。
<parent> <groupId>org.springframework.boot</groupId> <artifactId>spring-boot-starter-parent</artifactId> <version>1.5.2.RELEASE</version></parent><dependencies> <dependency> <groupId>org.springframework.boot</groupId> <artifactId>spring-boot-starter-web</artifactId> </dependency> <dependency> <groupId>org.springframework.boot</groupId> <artifactId>spring-boot-starter-aop</artifactId> </dependency> <!--mybatis--> <dependency> <groupId>org.mybatis.spring.boot</groupId> <artifactId>mybatis-spring-boot-starter</artifactId> <version>1.3.1</version> </dependency> <dependency> <groupId>org.springframework.boot</groupId> <artifactId>spring-boot-starter-jdbc</artifactId> </dependency> <!-- druid --> <dependency> <groupId>com.alibaba</groupId> <artifactId>druid</artifactId> <version>${druid.version}</version> </dependency> <!-- mysql connector--> <dependency> <groupId>mysql</groupId> <artifactId>mysql-connector-java</artifactId> <version>${mysql-connector.version}</version> </dependency> <!--test--> <dependency> <groupId>org.springframework.boot</groupId> <artifactId>spring-boot-starter-test</artifactId> <scope>test</scope> </dependency></dependencies>
然后在配置文件application.yml中自定义数据源配置项
server: port: 8080logging: level: org.springframework: INFO com.qiang: DEBUGspring: output: ansi: enabled: always datasource: type: com.alibaba.druid.pool.DruidDataSource driver-class-name: com.mysql.cj.jdbc.Driver url: jdbc:mysql://localhost:3306/db_area?characterEncoding=utf-8&serverTimezone=Asia/Shanghai username: root password: root db: readsize: 2 read0: type: com.alibaba.druid.pool.DruidDataSource driver-class-name: com.mysql.cj.jdbc.Driver url: jdbc:mysql://localhost:3306/db_area?characterEncoding=utf-8&serverTimezone=Asia/Shanghai username: root password: root read1: type: com.alibaba.druid.pool.DruidDataSource driver-class-name: com.mysql.cj.jdbc.Driver url: jdbc:mysql://localhost:3306/db_area?characterEncoding=utf-8&serverTimezone=Asia/Shanghai username: root password: root aop: auto: true proxy-target-class: true
配置Druid
package com.qiang.config;import org.slf4j.Logger;import org.slf4j.LoggerFactory;import org.springframework.boot.autoconfigure.jdbc.DataSourceBuilder;import org.springframework.boot.context.properties.ConfigurationProperties;import org.springframework.context.annotation.Bean;import org.springframework.context.annotation.Configuration;import org.springframework.context.annotation.Primary;import javax.sql.DataSource;/** * @author gengqiang * @date 2018/5/3 */@Configurationpublic class DruidConfig { private Logger logger = LoggerFactory.getLogger(DruidConfig.class /** * 主据源 * @return */ @Primary @Bean(name = 'dataSource') @ConfigurationProperties(prefix = 'spring.datasource') public DataSource dataSource() { return DataSourceBuilder.create().type(com.alibaba.druid.pool.DruidDataSource.class).build(); } /** * 从数据源1 * @return */ @Bean(name = 'readDataSource0') @ConfigurationProperties(prefix = 'spring.db.read0') public DataSource readDataSource0() { return DataSourceBuilder.create().type(com.alibaba.druid.pool.DruidDataSource.class).build(); } /** * 从数据源2 * @return */ @Bean(name = 'readDataSource1') @ConfigurationProperties(prefix = 'spring.db.read1') public DataSource readDataSource1() { return DataSourceBuilder.create().type(com.alibaba.druid.pool.DruidDataSource.class).build(); }}
配置Mybaits
package com.qiang.config;import com.qiang.config.db.DataSourceType;import com.qiang.config.db.RoutingDataSource;import org.mybatis.spring.SqlSessionFactoryBean;import org.mybatis.spring.annotation.MapperScan;import org.mybatis.spring.boot.autoconfigure.SpringBootVFS;import org.springframework.beans.BeansException;import org.springframework.beans.factory.annotation.Autowired;import org.springframework.beans.factory.annotation.Value;import org.springframework.boot.autoconfigure.condition.ConditionalOnMissingBean;import org.springframework.context.ApplicationContext;import org.springframework.context.ApplicationContextAware;import org.springframework.context.annotation.Bean;import org.springframework.context.annotation.Configuration;import org.springframework.core.io.ClassPathResource;import org.springframework.core.io.Resource;import org.springframework.core.io.support.PathMatchingResourcePatternResolver;import org.springframework.core.io.support.ResourcePatternResolver;import org.springframework.jdbc.datasource.DataSourceTransactionManager;import org.springframework.jdbc.datasource.lookup.AbstractRoutingDataSource;import org.springframework.transaction.PlatformTransactionManager;import org.springframework.transaction.annotation.EnableTransactionManagement;import org.springframework.transaction.annotation.TransactionManagementConfigurer;import javax.sql.DataSource;import java.io.IOException;import java.util.HashMap;import java.util.Map;/** * @author gengqiang * @date 2018/5/3 */@Configuration@EnableTransactionManagement(order = 2)@MapperScan(basePackages = {'com.qiang.demo.mapper'})public class MybatisConfig implements TransactionManagementConfigurer, ApplicationContextAware { private static ApplicationContext context; /** * 写库数据源 */ @Autowired private DataSource dataSource; /** * 读数据源数量 */ @Value('${spring.db.readsize}') private Integer readsize; /** * 数据源路由代理 * * @return */ @Bean public AbstractRoutingDataSource routingDataSouceProxy() { RoutingDataSource proxy = new RoutingDataSource(readsize); Map<Object, Object> targetDataSources = new HashMap<>(readsize + 1); targetDataSources.put(DataSourceType.WRITE.getType(), dataSource); for (int i = 0; i < readsize; i++) { DataSource d = context.getBean('readDataSource' + i, DataSource.class); targetDataSources.put(i, d); } proxy.setDefaultTargetDataSource(dataSource); proxy.setTargetDataSources(targetDataSources); return proxy; } @Bean @ConditionalOnMissingBean public SqlSessionFactoryBean sqlSessionFactory() throws IOException { SqlSessionFactoryBean bean = new SqlSessionFactoryBean(); bean.setDataSource(routingDataSouceProxy()); bean.setVfs(SpringBootVFS.class); bean.setTypeAliasesPackage('com.qiang'); Resource configResource = new ClassPathResource('/mybatis-config.xml'); bean.setConfigLocation(configResource); ResourcePatternResolver mapperResource = new PathMatchingResourcePatternResolver(); bean.setMapperLocations(mapperResource.getResources('classpath*:mapper/**/*.xml')); return bean; } @Override public PlatformTransactionManager annotationDrivenTransactionManager() { return new DataSourceTransactionManager(routingDataSouceProxy()); } @Override public void setApplicationContext(ApplicationContext applicationContext) throws BeansException { if (context == null) { context = applicationContext; } }}
其中实现数据源切换的功能就是自定义一个类扩展AbstractRoutingDataSource抽象类,就是代码中的定义的RoutingDataSource,其实该相当于数据源DataSourcer的路由中介,可以实现在项目运行时根据相应key值切换到对应的数据源DataSource上。
RoutingDataSource.class
package com.qiang.config.db;import org.springframework.jdbc.datasource.lookup.AbstractRoutingDataSource;import java.util.concurrent.atomic.AtomicInteger;/** * 数据源路由 * * @author gengqiang */public class RoutingDataSource extends AbstractRoutingDataSource { private AtomicInteger count = new AtomicInteger(0); private int readsize; public RoutingDataSource(int readsize) { this.readsize = readsize; } @Override protected Object determineCurrentLookupKey() { String typeKey = DataSourceContextHolder.getJdbcType(); if (typeKey == null) { logger.error('无法确定数据源'); } if (typeKey.equals(DataSourceType.WRITE.getType())) { return DataSourceType.WRITE.getType(); } //读库进行负载均衡 int a = count.getAndAdd(1); int lookupkey = a % readsize; return lookupkey; }}
其中用到了2个辅助类
package com.qiang.config.db;import org.slf4j.Logger;import org.slf4j.LoggerFactory;/** * 全局数据源 * * @author gengqiang */public class DataSourceContextHolder { private static Logger logger = LoggerFactory.getLogger(DataSourceContextHolder.class); private final static ThreadLocal<String> local = new ThreadLocal<>(); public static ThreadLocal<String> getLocal() { return local; } public static void read() { logger.debug('切换至[读]数据源'); local.set(DataSourceType.READ.getType()); } public static void write() { logger.debug('切换至[写]数据源'); local.set(DataSourceType.WRITE.getType()); } public static String getJdbcType() { return local.get(); }}
package com.qiang.config.db;/** * @author gengqiang */public enum DataSourceType { READ('read', '读库'), WRITE('write', '写库'); private String type; private String name; DataSourceType(String type, String name) { this.type = type; this.name = name; } public String getType() { return type; } public void setType(String type) { this.type = type; } public String getName() { return name; } public void setName(String name) { this.name = name; }}
最后通过aop设置切面,拦截读写来动态的设置数据源
package com.qiang.config.aop;import com.qiang.config.db.DataSourceContextHolder;import org.aspectj.lang.annotation.Aspect;import org.aspectj.lang.annotation.Before;import org.slf4j.Logger;import org.slf4j.LoggerFactory;import org.springframework.core.annotation.Order;import org.springframework.stereotype.Component;/** * 拦截数据库读写 * * @author gengqiang */@Aspect@Component@Order(1)public class DataSourceAspect { Logger logger = LoggerFactory.getLogger(getClass()); @Before('execution(* com.qiang..*.*ServiceImpl.find*(..)) ' + '|| execution(* com.qiang..*.*ServiceImpl.count*(..))' + '|| execution(* com.qiang..*.*ServiceImpl.sel*(..))' + '|| execution(* com.qiang..*.*ServiceImpl.get*(..))' ) public void setReadDataSourceType() { logger.debug('拦截[read]方法'); DataSourceContextHolder.read(); } @Before('execution(* com.qiang..*.*ServiceImpl.insert*(..)) ' + '|| execution(* com.qiang..*.*ServiceImpl.save*(..))' + '|| execution(* com.qiang..*.*ServiceImpl.update*(..))' + '|| execution(* com.qiang..*.*ServiceImpl.set*(..))' + '|| execution(* com.qiang..*.*ServiceImpl.del*(..))') public void setWriteDataSourceType() { logger.debug('拦截[write]操作'); DataSourceContextHolder.write(); }}
主要的代码就写好了,下面来测试一下是否读写分离。
写一个测试类:
package com.qiang;import com.qiang.demo.entity.Area;import com.qiang.demo.service.AreaService;import org.junit.Test;import org.junit.runner.RunWith;import org.springframework.beans.factory.annotation.Autowired;import org.springframework.boot.test.context.SpringBootTest;import org.springframework.test.context.junit4.SpringRunner;/** * @author gengqiang * @date 2018/5/4 */@RunWith(SpringRunner.class)@SpringBootTestpublic class TestApplication { @Autowired private AreaService areaService; @Test public void test() { Area area = new Area(); area.setDistrictId('0000'); area.setName('test'); area.setParentId(0); area.setLevel(1); areaService.insert(area); } @Test public void test2() { areaService.selectByPrimaryKey(1); }}
其中第一个测试插入数据,第二个测试查询。
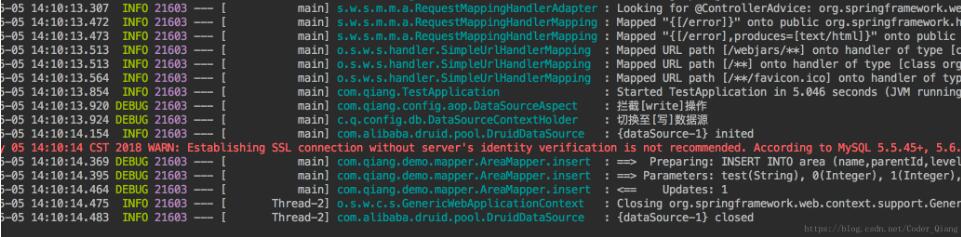
第一测试结果:
第二个测结果:
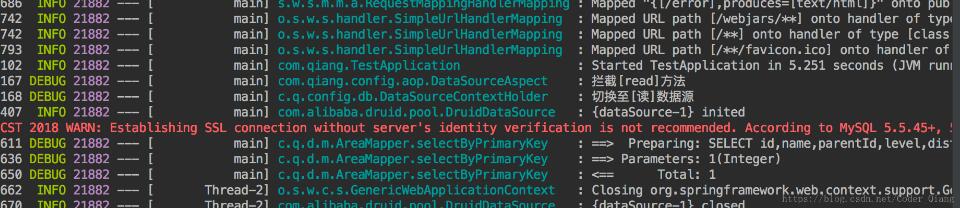
从结果看出来第一个走的写数据源,就是主数据源,第二个的走读数据源,就是从数据源。
然后我们在测试一下事物,看遇到异常是否会滚。
测试:
@Test public void contextLoads() throws Exception { try { areaService.insertBack(); } catch (Exception e) {// e.printStackTrace(); } System.out.println(areaService.count(new Area())); }
其中service:
@Override@Transactional(rollbackFor = Exception.class)public void insertBack() { Area area = new Area(); area.setDistrictId('0000'); area.setName('test'); area.setParentId(0); area.setLevel(1); mapper.insert(area); throw new RuntimeException();}
方法上加@Transactional,声明一个事物。
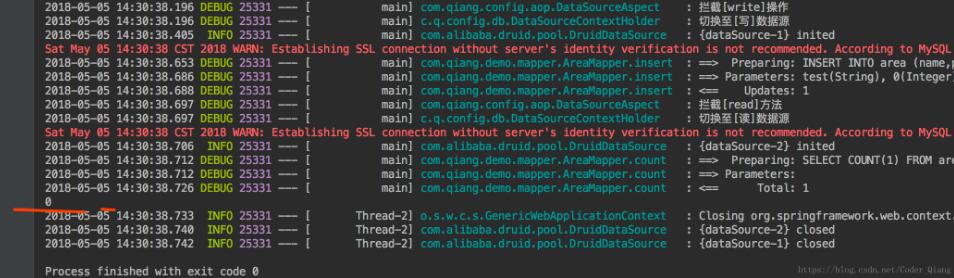
看一下运行结果,虽然运行插入的时候,sql是运行了,但最后查询的时候数量为0,说明会滚了。
配置事物
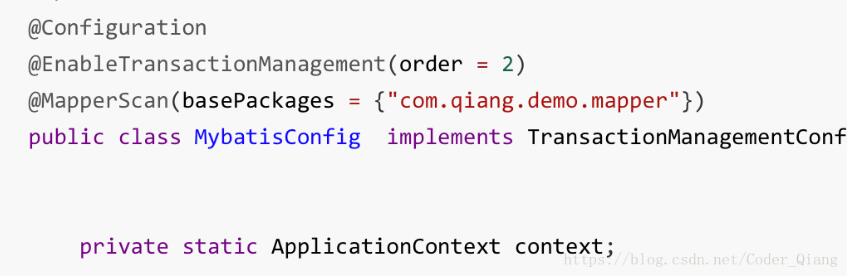
第一步需要加一个注解@EnableTransactionManagement,后面的参数是为了区分aop和事物执行的顺序。
然后在需要会滚的方法上加一个注解@Transactional。
源代码地址
以上这篇使用springboot aop来实现读写分离和事物配置就是小编分享给大家的全部内容了,希望能给大家一个参考,也希望大家多多支持好吧啦网。
相关文章:
1. vue-drag-chart 拖动/缩放图表组件的实例代码2. vue使用moment如何将时间戳转为标准日期时间格式3. Android studio 解决logcat无过滤工具栏的操作4. 什么是Python变量作用域5. js select支持手动输入功能实现代码6. PHP正则表达式函数preg_replace用法实例分析7. Android Studio3.6.+ 插件搜索不到终极解决方案(图文详解)8. bootstrap select2 动态从后台Ajax动态获取数据的代码9. Android 实现彻底退出自己APP 并杀掉所有相关的进程10. 一个 2 年 Android 开发者的 18 条忠告

 网公网安备
网公网安备