javascript实现放大镜功能
本文实例为大家分享了javascript实现放大镜功能的具体代码,供大家参考,具体内容如下
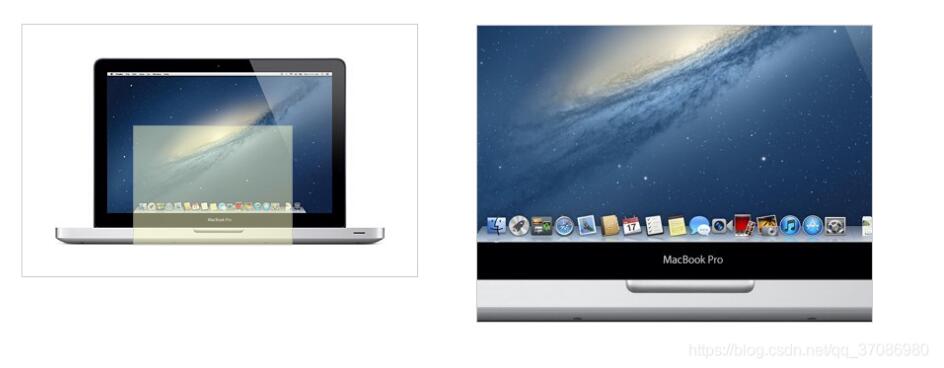
描述:当鼠标在小图片上移动时,通过捕捉鼠标在小图片上的位置, 使放大镜的移动方向与大图的水平和垂直方向相反
如何设计
页面元素 技术要点:事件捕捉和定位 难点:计算涉及技术
onmouseover:当鼠标指针移动到指定的对象上时发生 onmouseout:鼠标指针移出指定对象时发生 onmousemove:鼠标指针移动时发生 offsetLeft | offsetTop | offsetWidth | offsetHeight event.clientX | event.clientY偏移量与style.left
style.left返回字符串,例如30px,而offsetLeft返回数字30。 style.left可以读和写,offsetLeft是只读的。如果我们想改变div的位置,我们可以修改style.left. style.left应事先定义,否则值为空。需要考虑
如何使小画面上的放大镜与大图同步移动 IE兼容性问题代码实现
<!DOCTYPE html><html lang='en'><head> <meta charset='UTF-8'> <meta name='viewport' content='width=device-width, initial-scale=1.0'> <title>Magnifier Effect</title> <style> *{ margin: 0; padding: 0; } #wrap{ width: 400px; height: 255px; margin: 50px; border: 1px solid #ccc; display: block; position: relative; } #small-box{ position: relative; z-index: 1; } #float-box{ width: 160px; height: 120px; position: absolute; background-color: #ffffcc; border:1px solid #ccc; filter: alpha(opacity = 50); opacity: .5; display: none; } #mask{ position: absolute; display: block; width: 400px; height: 255px; z-index: 10; background-color: #ffffff; filter: alpha(opacity = 0); opacity: 0; cursor: move; } #big-box{ position: absolute; top: 0; left: 460px; width: 400px; height: 300px; overflow: hidden; border: 1px solid #ccc; z-index: 1; display: none; } #big-box img{ position: absolute; z-index: 5; } </style></head><script> // 页面加载完毕之后执行 window.onload = function(){ // 获取父元素wrap, 小盒子,遮罩层, 放大镜, 大盒子, 大图片 var wrap = document.getElementById(’wrap’); var smallBox = document.getElementById(’small-box’); var mask = document.getElementById(’mask’); var floatBox = document.getElementById(’float-box’); var bigBox = document.getElementById(’big-box’); var bigImg = bigBox.getElementsByTagName(’img’)[0]; console.log(wrap, smallBox, mask, floatBox, bigBox, bigImg); // 鼠标移动到小盒子上时, 放大镜显示, 大盒子显示 mask.onmouseover = function(){ floatBox.style.display = ’block’; bigBox.style.display = ’block’; } // 鼠标移出小盒子时, 放大镜隐藏, 大盒子隐藏 mask.onmouseout = function(){ floatBox.style.display = ’none’; bigBox.style.display = ’none’; } // 添加鼠标移动事件 mask.onmousemove = function(ev){ // 获取当前鼠标移动的位置并考虑IE兼容性 var _event = ev || window.event; // 获取放大镜向左移动的距离 var left = _event.clientX - wrap.offsetLeft - smallBox.offsetLeft - floatBox.offsetWidth / 2; var top = _event.clientY - wrap.offsetTop - smallBox.offsetTop - floatBox.offsetHeight / 2; // console.log(left, top); // 考虑边界情况 if(left < 0){ left = 0; }else if(left > (mask.offsetWidth - floatBox.offsetWidth)){ left = mask.offsetWidth - floatBox.offsetWidth; } if(top < 0){ top = 0; }else if(top > (mask.offsetHeight - floatBox.offsetHeight)){ top = mask.offsetHeight - floatBox.offsetHeight; } floatBox.style.left = left + ’px’; floatBox.style.top = top + ’px’; // calculate percentage var percentX = left / (mask.offsetWidth - floatBox.offsetWidth); var percentY = top / (mask.offsetHeight - floatBox.offsetHeight); // calculate displacement of big image, big image has opposite direction of magnifying glass bigImg.style.left = -percentX * (bigImg.offsetWidth - bigBox.offsetWidth) + ’px’; bigImg.style.top = -percentY * (bigImg.offsetHeight - bigBox.offsetHeight) + ’px’; } }</script><body> <div id='wrap'> <div id='small-box'> <div id='mask'></div> <div id='float-box'></div> <img src='https://www.haobala.com/bcjs/img/macbook-small.jpg' alt='smallMac'> </div> <div id='big-box'> <img src='https://www.haobala.com/bcjs/img/macbook-big.jpg' alt='bigMac'> </div> </div></body></html>
以上就是本文的全部内容,希望对大家的学习有所帮助,也希望大家多多支持好吧啦网。
相关文章:
 网公网安备
网公网安备