Spring Batch 入门示例
我将向您展示如何使用Spring Boot创建一个的Spring Batch的Hello World示例。
(循序渐进)
因此,如果您是Spring Batch的初学者,您一定会喜欢本指南。
准备好了吗?
如果您想了解更多关于Spring Batch的信息,请访问
Spring Batch教程页面。
1.Spring Batch框架工作原理在深入研究代码之前,让我们先看看Spring Batch框架。它包含以下主要构建块:
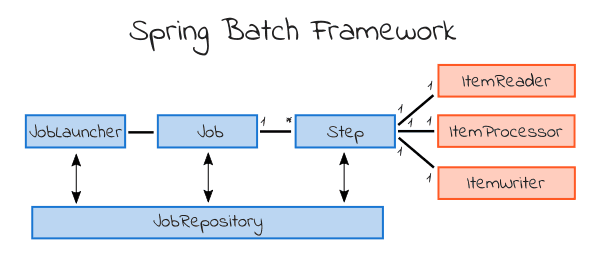
一个Batch(批处理)过程由一个Job(作业)组成。这个实体封装了整个批处理过程。
一个Job(作业)可以由一个或多个Step(步骤)组成。在大多数情况下,一个步骤将读取数据(通过ItemReader),处理数据(使用ItemProcessor),然后写入数据(通过ItemWriter)。
JobLauncher处理启动一个Job(作业)。
最后,JobRepository存储关于配置和执行的Job(作业)的元数据。
为了演示Spring Batch是如何工作的,让我们构建一个简单的Hello World批处理作业。
在本例中,我们从person.csv文件中读取一个人的姓和名。从这些数据生成一个问候语。然后将此问候语写入greeting .txt文件。
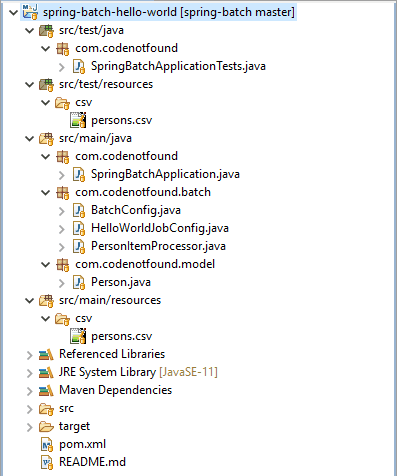
2.示例概述我们会使用以下工具/框架:
Spring Batch 4.1 Spring Boot 2.1 Maven 3.6我们的项目目录结构如下:
我们使用Maven构建并运行示例。如果还没有,下载并安装Apache Maven。
让我们使用Spring Initializr来生成Maven项目。确保选择Batch作为依赖项。
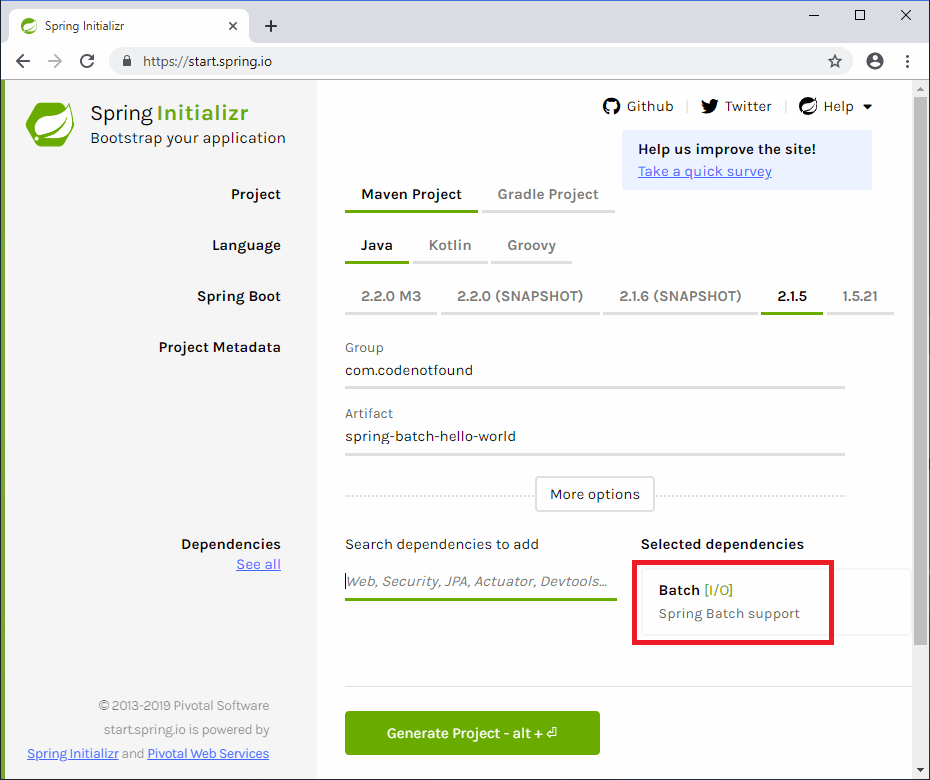
单击Generate Project生成并下载Spring Boot项目模板。在项目的根目录中,您将发现一个pom.xml文件,它是Maven项目的XML配置文件。
为了避免必须管理不同Spring依赖项的版本兼容性,我们将从spring-boot-starter-parent 父POM继承默认配置。
生成的项目包含Spring Boo Starters管理着不同的Spring依赖项。
spring-boot-starter-batch导入Spring Boot和Spring Batch依赖项。
spring-boot-starter-test 包含用于测试Spring引导应用程序的依赖项。它导入了包括JUnit、Hamcrest和Mockito在内的库。
这个也有依赖性spring-batch-test。这个库包含一些帮助类,它们将帮助测试批处理作业。
在plugins部分,您将找到Spring Boot Maven插件:spring-boot-maven- plugin。它帮助我们构建一个单一的、可运行的uber-jar。这是执行和发布代码的一种方便方法。此外,插件允许您通过Maven命令启动示例。
<?xml version='1.0' encoding='UTF-8'?><project xmlns='http://maven.apache.org/POM/4.0.0' xmlns:xsi='http://www.w3.org/2001/XMLSchema-instance' xsi:schemaLocation='http://maven.apache.org/POM/4.0.0 http://maven.apache.org/xsd/maven-4.0.0.xsd'> <modelVersion>4.0.0</modelVersion> <groupId>com.codenotfound</groupId> <artifactId>spring-batch-hello-world</artifactId> <version>0.0.1-SNAPSHOT</version> <packaging>jar</packaging> <name>spring-batch-hello-world</name> <description>Spring Batch Hello World Example</description> <url>https://codenotfound.com/spring-batch-example.html</url> <parent> <groupId>org.springframework.boot</groupId> <artifactId>spring-boot-starter-parent</artifactId> <version>2.1.5.RELEASE</version> <relativePath /> <!-- lookup parent from repository --> </parent> <properties> <java.version>11</java.version> </properties> <dependencies> <dependency> <groupId>org.springframework.boot</groupId> <artifactId>spring-boot-starter-batch</artifactId> </dependency> <dependency> <groupId>org.springframework.boot</groupId> <artifactId>spring-boot-starter-test</artifactId> <scope>test</scope> </dependency> <dependency> <groupId>org.springframework.batch</groupId> <artifactId>spring-batch-test</artifactId> <scope>test</scope> </dependency> </dependencies> <build> <plugins> <plugin><groupId>org.springframework.boot</groupId><artifactId>spring-boot-maven-plugin</artifactId> </plugin> </plugins> </build></project>4. Spring Boot 配置
我们使用Spring Boot,目的是让一个Spring Batch应用程序可以“直接运行”。首先创建一个SpringBatchApplication类。它包含main()方法,该方法使用Spring Boot的SpringApplication.run()启动应用程序。
注意@SpringBootApplication是一个方便的注解,它添加了:@Configuration、@EnableAutoConfiguration和@ComponentScan。
有关Spring Boot的更多信息,请查看Spring Boot入门指南。
默认情况下,Spring Batch使用数据库存储已配置的批处理作业上的元数据。
在本例中,我们不直接使用数据库,而是使用基于内存映射的Map,运行Spring Batch。
spring-boot-starter-batch starter依赖于spring-boot-starter-jdbc,并将尝试实例化数据源。添加 exclude = {DataSourceAutoConfiguration.class}注解中添加@SpringBootApplication。这可以防止Spring Boot为数据库连接自动配置DataSource。
package com.codenotfound;import org.springframework.boot.SpringApplication;import org.springframework.boot.autoconfigure.SpringBootApplication;import org.springframework.boot.autoconfigure.jdbc.DataSourceAutoConfiguration;@SpringBootApplication(exclude = {DataSourceAutoConfiguration.class})public class SpringBatchApplication { public static void main(String[] args) { SpringApplication.run(SpringBatchApplication.class, args); }}5. 创建实体模型
在处理数据之前,通常希望将其映射到实体对象。
在我的示例中,输入数据存储在src/test/resources/csv/persons.csv文件中。
文件中的每一行都包含一个逗号分隔的姓和名。
John, DoeJane, Doe
我们将把这个数据映射到Person对象。这是一个包含姓和名的简单POJO。
package com.codenotfound.model;public class Person { private String firstName; private String lastName; public Person() { // default constructor } public String getFirstName() { return firstName; } public void setFirstName(String firstName) { this.firstName = firstName; } public String getLastName() { return lastName; } public void setLastName(String lastName) { this.lastName = lastName; } @Override public String toString() { return firstName + ' ' + lastName; }}6. 配置 Spring Batch Job
我们首先创建一个BatchConfig类,它将配置Spring Batch。类顶部的@Configuration注解表明Spring可以使用该类作为bean定义的源。
我们添加了@EnableBatchProcessing注解,它支持所有所需Spring Batch特性。它还提供了设置批处理作业的基本配置。
通过添加这个注解会需要很多操作。下面是@EnableBatchProcessing创建的概述:
JobRepository (bean名称 'jobRepository') JobLauncher (bean名称 'jobLauncher') JobRegistry (bean名称 'jobRegistry') JobExplorer (bean名称 'jobExplorer') PlatformTransactionManager (bean名称 'transactionManager') JobBuilderFactory (bean名称'jobBuilders'),它可以方便地防止您必须将作业存储库注入到每个Job(作业)中 StepBuilderFactory (bean名称 'stepBuilders'),以方便您避免将作业存储库和事务管理器注入到每个Step(步骤)中为了使Spring Batch使用基于Map的JobRepository,我们需要扩展DefaultBatchConfigurer。重写setDataSource()方法以不设置DataSource。这将导致自动配置使用基于Map的JobRepository。
package com.codenotfound.batch;import javax.sql.DataSource;import org.springframework.batch.core.configuration.annotation.DefaultBatchConfigurer;import org.springframework.batch.core.configuration.annotation.EnableBatchProcessing;import org.springframework.context.annotation.Configuration;@Configuration@EnableBatchProcessingpublic class BatchConfig extends DefaultBatchConfigurer { @Override public void setDataSource(DataSource dataSource) { // initialize will use a Map based JobRepository (instead of database) }}
现在让我们继续配置Hello World Spring Batch 作业。
创建一个HelloWorldJobConfig配置类,并用添加@Configuration注解。
在HelloWorldJobConfig Bean中,我们使用JobBuilderFactory来创建作业。我们传递Job(作业)的名称和需要运行的Step(步骤)。
注意在helloWorlJob()Bean中,Spring将自动注入 jobBuilders 和 stepBuilders Beans。
在HelloWorldStepBean中定义了我们的步骤执行的不同项。我们使用StepBuilderFactory创建步骤。
首先,我们传入步骤的名称。使用chunk(),我们指定每个事务中处理的项的数量。Chunk还指定步骤的输入(Person)和输出(String)类型。然后,我们将ItemReader (reader)、ItemProcessor (processor)和ItemWriter (writer)添加到步骤中。
我们使用FlatFileItemReader读取person CSV文件。这个类提供了读取和解析CSV文件的基本功能。
有一个FlatFileItemReaderBuilder实现,它允许我们创建一个FlatFileItemReader。我们首先指定读取文件中每一行的结果是Person对象。然后,我们将使用name()方法为FlatFileItemReader添加一个名称,并指定需要读取的资源(在本例中是persons.csv文件)。
为了让FlatFileItemReader处理我们的文件,我们需要指定一些额外的信息。首先,我们定义文件中的数据是带分隔符的(默认为逗号作为分隔符)。
我们还指定了如何将一行中的每个字段映射到Person对象。这是使用names()来完成的,通过将名称与对象上的setter匹配,可以使Spring Batch映射字段。在本文的例子中,一行的第一个字段将使用firstName setter进行映射。为了实现这一点,我们还需要指定targetType,即Person对象。
注意:
names(new String[] {'firstName', 'lastName'})
PersonItemProcessor处理数据。它将一个Person转换成一个问候String。我们将在下面的一个单独的类中定义它。
一旦数据被处理,我们将把它写入一个文本文件。我们使用FlatFileItemWriter来完成这项任务。
我们使用FlatFileItemWriterBuilder实现来创建一个FlatFileItemWriter。我们为writer添加一个名称,并指定需要将数据写入其中的资源(在本例中是greeting.txt文件)。
FlatFileItemWriter需要知道如何将生成的输出转换成可以写入文件的单个字符串。在本例中,我们的输出已经是一个字符串,我们可以使用PassThroughLineAggregator。这是最基本的实现,它假定对象已经是一个字符串。
package com.codenotfound.batch;import org.springframework.batch.core.Job;import org.springframework.batch.core.Step;import org.springframework.batch.core.configuration.annotation.JobBuilderFactory;import org.springframework.batch.core.configuration.annotation.StepBuilderFactory;import org.springframework.batch.item.file.FlatFileItemReader;import org.springframework.batch.item.file.FlatFileItemWriter;import org.springframework.batch.item.file.builder.FlatFileItemReaderBuilder;import org.springframework.batch.item.file.builder.FlatFileItemWriterBuilder;import org.springframework.batch.item.file.transform.PassThroughLineAggregator;import org.springframework.context.annotation.Bean;import org.springframework.context.annotation.Configuration;import org.springframework.core.io.ClassPathResource;import org.springframework.core.io.FileSystemResource;import com.codenotfound.model.Person;@Configurationpublic class HelloWorldJobConfig { @Bean public Job helloWorlJob(JobBuilderFactory jobBuilders, StepBuilderFactory stepBuilders) { return jobBuilders.get('helloWorldJob').start(helloWorldStep(stepBuilders)).build(); } @Bean public Step helloWorldStep(StepBuilderFactory stepBuilders) { return stepBuilders.get('helloWorldStep').<Person, String>chunk(10).reader(reader()).processor(processor()).writer(writer()).build(); } @Bean public FlatFileItemReader<Person> reader() { return new FlatFileItemReaderBuilder<Person>().name('personItemReader').resource(new ClassPathResource('csv/persons.csv')).delimited().names(new String[] {'firstName', 'lastName'}).targetType(Person.class).build(); } @Bean public PersonItemProcessor processor() { return new PersonItemProcessor(); } @Bean public FlatFileItemWriter<String> writer() { return new FlatFileItemWriterBuilder<String>().name('greetingItemWriter').resource(new FileSystemResource( 'target/test-outputs/greetings.txt')).lineAggregator(new PassThroughLineAggregator<>()).build(); }}7. 处理数据
在大多数情况下,您将希望在批处理作业期间应用一些数据处理。可以使用ItemProcessor来操作。
在我们的示例中,我们将Person对象转换为一个简单的问候语String
为此,我们创建一个实现ItemProcessor接口的PersonItemProcessor。我们实现了process()方法,它将人名和姓氏添加到字符串中。
调试的过程中,我们记录日志结果。
package com.codenotfound.batch;import org.slf4j.Logger;import org.slf4j.LoggerFactory;import org.springframework.batch.item.ItemProcessor;import com.codenotfound.model.Person;public class PersonItemProcessor implements ItemProcessor<Person, String> { private static final Logger LOGGER = LoggerFactory.getLogger(PersonItemProcessor.class); @Override public String process(Person person) throws Exception { String greeting = 'Hello ' + person.getFirstName() + ' '+ person.getLastName() + '!'; LOGGER.info('converting ’{}’ into ’{}’', person, greeting); return greeting; }}8.测试Spring Batch 示例
为了测试本的例子,我们创建了一个基本的单元测试用例。它将运行批处理作业并检查是否成功完成。
我们使用@RunWith和@SpringBootTest测试注解告诉JUnit使用Spring的测试支持运行,并使用SpringBoot的支持引导。
Spring Batch附带一个JobLauncherTestUtils实用程序类,用于测试批处理作业。
我们首先创建一个内部BatchTestConfig类,将helloWorld作业添加到JobLauncherTestUtils bean中。然后使用此bean的launchJob()方法运行批处理作业。
如果执行的作业没有任何错误,则ExitCode的值为COMPLETED。
package com.codenotfound;import static org.assertj.core.api.Assertions.assertThat;import org.junit.Test;import org.junit.runner.RunWith;import org.springframework.batch.core.Job;import org.springframework.batch.core.JobExecution;import org.springframework.batch.core.launch.NoSuchJobException;import org.springframework.batch.test.JobLauncherTestUtils;import org.springframework.beans.factory.annotation.Autowired;import org.springframework.boot.test.context.SpringBootTest;import org.springframework.context.annotation.Bean;import org.springframework.context.annotation.Configuration;import org.springframework.context.annotation.Import;import org.springframework.test.context.junit4.SpringRunner;import com.codenotfound.batch.job.BatchConfig;import com.codenotfound.batch.job.HelloWorldJobConfig;@RunWith(SpringRunner.class)@SpringBootTest( classes = {SpringBatchApplicationTests.BatchTestConfig.class})public class SpringBatchApplicationTests { @Autowired private JobLauncherTestUtils jobLauncherTestUtils; @Test public void testHelloWorldJob() throws Exception { JobExecution jobExecution = jobLauncherTestUtils.launchJob(); assertThat(jobExecution.getExitStatus().getExitCode()).isEqualTo('COMPLETED'); } @Configuration @Import({BatchConfig.class, HelloWorldJobConfig.class}) static class BatchTestConfig { @Autowired private Job helloWorlJob; @Bean JobLauncherTestUtils jobLauncherTestUtils()throws NoSuchJobException { JobLauncherTestUtils jobLauncherTestUtils = new JobLauncherTestUtils(); jobLauncherTestUtils.setJob(helloWorlJob); return jobLauncherTestUtils; } }}
要触发上述测试用例,请在项目根文件夹中打开命令提示符,并执行以下Maven命令:
mvn test
结果是构建成功,并在此期间执行批处理作业。
. ____ _ __ _ _/ / ___’_ __ _ _(_)_ __ __ _ ( ( )___ | ’_ | ’_| | ’_ / _` | / ___)| |_)| | | | | || (_| | ) ) ) ) ’ |____| .__|_| |_|_| |___, | / / / /=========|_|==============|___/=/_/_/_/:: Spring Boot ::(v2.1.5.RELEASE)2019-05-30 19:11:12.784 INFO 14588 --- [ main] c.c.SpringBatchApplicationTests : Starting SpringBatchApplicationTests on DESKTOP-2RB3C1U with PID 14588 (started by Codenotfound in C:UsersCodenotfoundreposspring-batchspring-batch-hello-world)2019-05-30 19:11:12.785 INFO 14588 --- [ main] c.c.SpringBatchApplicationTests : No active profile set, falling back to default profiles: default2019-05-30 19:11:13.305 WARN 14588 --- [ main] o.s.b.c.c.a.DefaultBatchConfigurer : No datasource was provided...using a Map based JobRepository2019-05-30 19:11:13.306 WARN 14588 --- [ main] o.s.b.c.c.a.DefaultBatchConfigurer : No transaction manager was provided, using a ResourcelessTransactionManager2019-05-30 19:11:13.328 INFO 14588 --- [ main] o.s.b.c.l.support.SimpleJobLauncher : No TaskExecutor has been set, defaulting to synchronous executor.2019-05-30 19:11:13.350 INFO 14588 --- [ main] c.c.SpringBatchApplicationTests : Started SpringBatchApplicationTests in 0.894 seconds (JVM running for 1.777)2019-05-30 19:11:13.732 INFO 14588 --- [ main] o.s.b.c.l.support.SimpleJobLauncher : Job: [SimpleJob: [name=helloWorldJob]] launched with the following parameters: [{random=459672}]2019-05-30 19:11:13.759 INFO 14588 --- [ main] o.s.batch.core.job.SimpleStepHandler : Executing step: [helloWorldStep]2019-05-30 19:11:13.812 INFO 14588 --- [ main] c.c.batch.PersonItemProcessor : converting ’John Doe’ into ’Hello John Doe!’2019-05-30 19:11:13.822 INFO 14588 --- [ main] c.c.batch.PersonItemProcessor : converting ’Jane Doe’ into ’Hello Jane Doe!’2019-05-30 19:11:13.842 INFO 14588 --- [ main] o.s.b.c.l.support.SimpleJobLauncher : Job: [SimpleJob: [name=helloWorldJob]] completed with the following parameters: [{random=459672}] and the following status: [COMPLETED][INFO] Tests run: 1, Failures: 0, Errors: 0, Skipped: 0, Time elapsed: 1.953 s - in com.codenotfound.SpringBatchApplicationTests[INFO][INFO] Results:[INFO][INFO] Tests run: 1, Failures: 0, Errors: 0, Skipped: 0[INFO][INFO] ------------------------------------------------------------------------[INFO] BUILD SUCCESS[INFO] ------------------------------------------------------------------------[INFO] Total time: 6.852 s[INFO] Finished at: 2019-05-30T19:11:14+02:00[INFO] ------------------------------------------------------------------------
您可以在target/test-output /greeting .txt文件中找到结果:
Hello John Doe!Hello Jane Doe!
如果您想运行上面的代码示例,您可以在这里获得完整的源代码。
在本入门教程中,您学习了如何使用Spring Boot和Maven创建一个简单的Spring Batch示例。
到此这篇关于Spring Batch 入门示例的文章就介绍到这了,更多相关Spring Batch 入门内容请搜索好吧啦网以前的文章或继续浏览下面的相关文章希望大家以后多多支持好吧啦网!
相关文章:

 网公网安备
网公网安备