Spring Boot和Thymeleaf整合结合JPA实现分页效果(实例代码)
在项目里,我需要做一个Spring Boot结合Thymeleaf前端模版,结合JPA实现分页的演示效果。做的时候发现有些问题,也查了现有网上的不少文档,发现能全栈实现的不多,所以这里我就把我的做法,全部代码和步骤贴出来供大家参考。
1 创建项目,用pom.xml引入依赖
这里将创建名为ThymeleafWithDB的Maven,在pom.xml里引入如下的依赖包。
<dependencies> <dependency> <groupId>org.springframework.boot</groupId> <artifactId>spring-boot-starter-web</artifactId> </dependency> <dependency> <groupId>org.springframework.boot</groupId> <artifactId>spring-boot-starter-thymeleaf</artifactId> </dependency> </dependencies>
而在此项目里,对应的Stock库存表如下所示。
字段名
类型
说明
id
int
主键
name
varchar
库存货物名
num
int
库存数量
description
varchar
库存货物的描述
2 编写启动类这个类是中规中矩的,代码如下。
package prj;import org.springframework.boot.SpringApplication;import org.springframework.boot.autoconfigure.SpringBootApplication;@SpringBootApplicationpublic class SpringBootApp { public static void main(String[] args) { SpringApplication.run(SpringBootApp.class, args); }}
3 在控制器类里,添加支持分页的方法
@RequestMapping('/listByPage') public ModelAndView listByPage(@RequestParam(value = 'pageNum', defaultValue = '0') int pageNum,@RequestParam(value = 'pageSize', defaultValue = '3') int pageSize) { Page<Stock> stocks=stockService.getStockListByPage(pageNum, pageSize); System.out.println('total page:' + stocks.getTotalPages()); System.out.println('current Page:' + pageNum); ModelAndView modelAndView = new ModelAndView('listByPage'); //传递参数 modelAndView.addObject('stocks',stocks); return modelAndView; }
在第2行和第3行定义该方法的参数时,由于表示当前页的pageNum和每页数据个数的pageSize参数都是从url请求里以get参数的形式得到,所以在之前要加@RequestParam注解,否则的话就无法从请求里得到这两个参数。
在该方法的第4行里,调用了stockService对象的getStockListByPage方法,在传入分页参数的情况下,得到了当前页面中的数据。同时为了调试,还在第5行和第6行里,输出了当前页和每页个数的信息。
在拿到当前页面的数据后,该方法时通过第9行的方法,把它加到modelAndView对象里,并在第10行里,通过该对象,向listByPage视图返回数据。
4 编写业务逻辑方法
public Page<Stock> getStockListByPage(int pageNum, int pageSize) { Sort sort = new Sort(Sort.Direction.ASC , 'ID'); Pageable pageable = PageRequest.of(pageNum, pageSize, sort); Page<Stock> stocks = stockRepo.findAll(pageable); return stocks; }
在这个方法的第2行里,首先通过Sort对象,定义了“按ID进行升序排列”的排序方式,随后通过第3行的PageRequest对象,定义的分页的方式,这里表示起始数据的pageNum和每页展示数据的pageSize值,都是来自于外部传入的参数。
在确定好排序和分页的方式后,本方法在第4行里,通过调用PagingAndSortingRepository类型对象stockRepo的findAll方法,根据在参数pageable里封装好的分页和排序的方式,向MySQL的stock数据表里请求数据,并把得到的数据通过第5行的return语句返回。
5 编写Repo类
package prj.repo;import org.springframework.data.repository.PagingAndSortingRepository;import org.springframework.stereotype.Component;import prj.model.Stock;@Componentpublic interface StockRepo extends PagingAndSortingRepository<Stock, Integer> { }
从第6行的代码里大家能看到,该Repo类实现( implements)了JPA里包含分页和排序功能的PagingAndSortingRepository接口,由于在StockService里调用的findAll方法已经封装在该JPA接口里了,所以这里在StockRepo类里,甚至不需要再写代码。
6 在application.yml文件里编写JPA和Thymeleaf的配置参数
spring: jpa: show-sql: true hibernate: dll-auto: validate datasource: url: jdbc:mysql://localhost:3306/stock?serverTimezone=GMT username: root password: 123456 driver-class-name: com.mysql.jdbc.Driver thymeleaf: enabled: true content-type: text/html check-template-location: true cache: false prefix: classpath:/templates/ suffix: .html
其中在第1行到第10行的代码里,给出了JPA和MySQL的相关定义,而在第11行到第17行的代码里,给出了Thymeleaf模板的参数。
这里用到的配置参数,其实在前文里都已经说明过,不过请注意第2行和第11行的缩进,根据yml配置文件的缩进格式,第11行的thymeleaf其实是和第2行的jpa同级,它们均属于第1行的spring的子级配置。
7 添加listByPage.html页面,实现分页的效果
根据配置,该文件是需要放在resources/templates目录里,具体代码如下。
<!DOCTYPE html><html lang='en' xmlns:th='http://www.thymeleaf.org'><head> <meta charset='UTF-8'> <title>库存列表</title></head><body><table border='2'> <tr> <td>库存编号</td> <td>库存货物</td> <td>数量</td> <td>描述</td> </tr> <tr th:each='stock : ${stocks}'> <td th:text='${stock.ID}'></td> <td th:text='${stock.name}'></td> <td th:text='${stock.num}'></td> <td th:text='${stock.description}'></td> </tr></table><div> <ul> <li> <a th:href='https://www.haobala.com/bcjs/’/listByPage?pageNum=0’' rel='external nofollow' rel='external nofollow' >首页</a> </li> <li th:if='${stocks.hasPrevious()}'> <a th:href='https://www.haobala.com/bcjs/’/listByPage?pageNum=’ + ${stocks.previousPageable().getPageNumber()}' rel='external nofollow' th:text='上一页'></a> </li> <li th:if='${stocks.hasNext()}'> <a th:href='https://www.haobala.com/bcjs/’/listByPage?pageNum=’ + ${stocks.nextPageable().getPageNumber()}' rel='external nofollow' th:text='下一页'></a> </li> <li> <a th:href='https://www.haobala.com/bcjs/’/listByPage?pageNum=’ + ${stocks.getTotalPages() - 1}' rel='external nofollow' rel='external nofollow' >尾页</a> </li> </ul></div></body></html>
在第22行到第37行的<div>属性元素里,加入了分页的效果,具体说明如下。
在第25行的代码,通过th:href='https://www.haobala.com/bcjs/’/listByPage?pageNum=0’' rel='external nofollow' rel='external nofollow' 代码,以url参数的形式,向控制器类的listByPage方法,传递了pageNum为0的参数,以展示首页数据。 在显示“上一页”的效果前,先需要通过第27行的th:if代码判断stocks对象里是否包含了上一页的数据,如果是,则通过第28行的代码展示“上一页”链接,请注意这里“上一页”链接所对应的参数,这样就能通过该链接,得到上一页的数据。 展示“下一页”的方法和展示“上一页”的很相似,都是先通过th:if判断是否有下一页数据,然后再通过链接得到下一页的数据。 在第34行的代码里,通过th:href='https://www.haobala.com/bcjs/’/listByPage?pageNum=’ + ${stocks.getTotalPages() - 1}' rel='external nofollow' rel='external nofollow' 的代码得到了尾页的数据,请注意这里是用url中pageNum的参数值,得到尾页的数据。8 观察效果
编写完成后,启动该项目,此时如果在浏览器里输入http://localhost:8080/listByPage,就能看到如下图所示的效果。
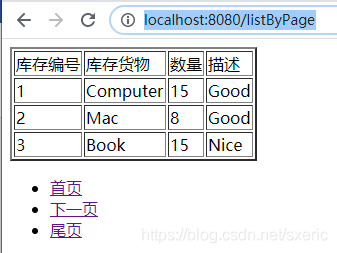
从中大家能看到,上图里每页的数据是3条,而且在数据下方展示了对应的分页链接,由于是第一页,所以没有包含“上一页”的链接。如果点击上图里的“下一页”链接,就能看到页面跳转的效果,如下图所示。
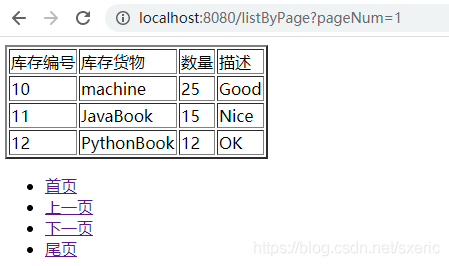
从中大家不仅能看到页面上的数据变化,而且还能看到在url里,通过携带pageNum参数的方式,取到了下一页数据。并且,由于参数stocks里已经包含了“上一页”的数据,所以还能看到对应的链接。同样地,大家还能自行点击“首页”、“下一页”和“尾页”等链接,以观察对应的效果。
到此这篇关于Spring Boot和Thymeleaf整合结合JPA实现分页效果的文章就介绍到这了,更多相关Spring Boot和Thymeleaf实现分页内容请搜索好吧啦网以前的文章或继续浏览下面的相关文章希望大家以后多多支持好吧啦网!
相关文章:

 网公网安备
网公网安备