spring boot 实现配置多个DispatcherServlet最简单方式
传统的web项目,只需要在web.xml里配置多个即可,并且支持多个url-pattern
在spring boot中,我们默认无需配置,系统会自动装配一个,感兴趣的可以看下源码
org.springframework.boot.autoconfigure.web.servlet.DispatcherServletAutoConfiguration
里面有个 DispatcherServletRegistrationBean,关键是这里只能指定一个path,如下的源码截图
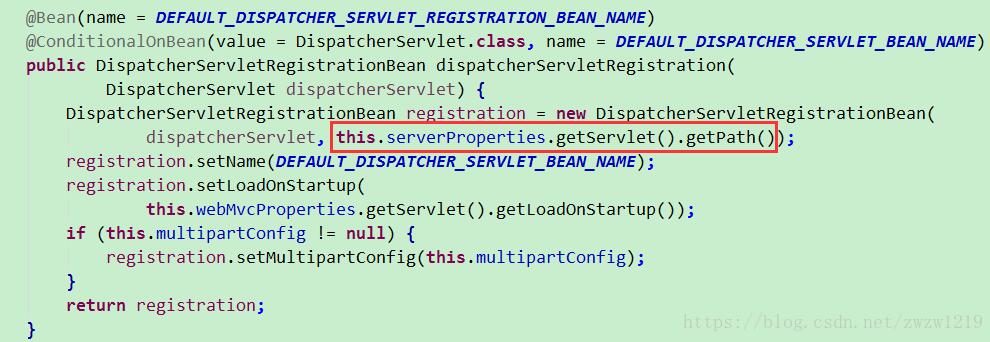

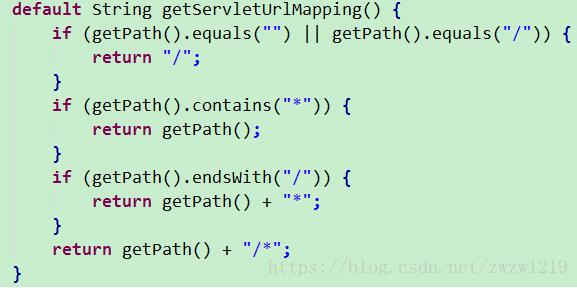
如果想要指定多个,我们只能自己写DispatcherServletRegistrationBean这个Bean了,那么系统就不会实例化内置的那个了,如下代码
@Autowired
private WebMvcProperties webMvcProperties;@Autowiredprivate MultipartConfigElement multipartConfig;
@Bean @Primary
public DispatcherServletRegistrationBean dispatcherServlet1(DispatcherServlet dispatcherServlet) { DispatcherServletRegistrationBean registration = new DispatcherServletRegistrationBean( dispatcherServlet, '/*'); registration.setName('dispatcherServlet1'); registration.setLoadOnStartup( this.webMvcProperties.getServlet().getLoadOnStartup()); if (this.multipartConfig != null) { registration.setMultipartConfig(this.multipartConfig); } return registration;}
@Bean
public DispatcherServletRegistrationBean dispatcherServlet2(DispatcherServlet dispatcherServlet) { DispatcherServletRegistrationBean registration = new DispatcherServletRegistrationBean( dispatcherServlet, '/aaa/*'); registration.setName('dispatcherServlet2'); registration.setLoadOnStartup( this.webMvcProperties.getServlet().getLoadOnStartup()); if (this.multipartConfig != null) { registration.setMultipartConfig(this.multipartConfig); } return registration;}
@Bean
public DispatcherServletRegistrationBean dispatcherServlet3(DispatcherServlet dispatcherServlet) { DispatcherServletRegistrationBean registration = new DispatcherServletRegistrationBean( dispatcherServlet, '/bbb/*'); registration.setName('dispatcherServlet3'); registration.setLoadOnStartup( this.webMvcProperties.getServlet().getLoadOnStartup()); if (this.multipartConfig != null) { registration.setMultipartConfig(this.multipartConfig); } return registration;}
这样我们参考底层源码,我们做了三个Bean,注意有一个一定要加上@Primary注解,否则启动会有报错。
如果我们系统有一个接口url是/api/test,那么通过/aaa/api/test或者/bbb/api/test也都可以访问了。
不建议的写法、、、
@Bean public ServletRegistrationBean apiDispatcherServlet(){ AnnotationConfigWebApplicationContext applicationContext = new AnnotationConfigWebApplicationContext(); applicationContext.scan('com.be.edge.asset.web.api'); DispatcherServlet apiDispatcherServlet = new DispatcherServlet(applicationContext); ServletRegistrationBean registrationBean = new ServletRegistrationBean(apiDispatcherServlet); registrationBean.addInitParameter('throwExceptionIfNoHandlerFound', 'true'); registrationBean.setLoadOnStartup(1); registrationBean.addUrlMappings('/api/*'); registrationBean.setName('apiDispatcherServlet'); return registrationBean; } @Bean public ServletRegistrationBean mgmtDispatcherServlet(){ AnnotationConfigWebApplicationContext applicationContext = new AnnotationConfigWebApplicationContext(); applicationContext.scan('com.be.edge.asset.web.controller'); DispatcherServlet apiDispatcherServlet = new DispatcherServlet(applicationContext); ServletRegistrationBean registrationBean = new ServletRegistrationBean(apiDispatcherServlet); registrationBean.setLoadOnStartup(2); registrationBean.addInitParameter('throwExceptionIfNoHandlerFound', 'true'); registrationBean.addUrlMappings('/mgmt/*'); registrationBean.setName('mngDispatcherServlet'); return registrationBean; }
以上为个人经验,希望能给大家一个参考,也希望大家多多支持好吧啦网。如有错误或未考虑完全的地方,望不吝赐教。
相关文章:

 网公网安备
网公网安备