这一次搞懂Spring事务注解的解析方式
前言
事务我们都知道是什么,而Spring事务就是在数据库之上利用AOP提供声明式事务和编程式事务帮助我们简化开发,解耦业务逻辑和系统逻辑。但是Spring事务原理是怎样?事务在方法间是如何传播的?为什么有时候事务会失效?接下来几篇文章将重点分析Spring事务源码,让我们彻底搞懂Spring事务的原理。
正文
XML标签的解析
<tx:annotation-driven transaction-manager='transactionManager'/>
配置过事务的应该都不陌生,上面这个配置就是Spring开启事务注解(@Transactional)支持的配置,而看过我之前文章的应该知道,这个带前缀的标签叫自定义标签,我在之前的文章也分析过自定义标签的解析过程,所以这里我直接找到对应的handler:
public class TxNamespaceHandler extends NamespaceHandlerSupport { static final String TRANSACTION_MANAGER_ATTRIBUTE = 'transaction-manager'; static final String DEFAULT_TRANSACTION_MANAGER_BEAN_NAME = 'transactionManager'; static String getTransactionManagerName(Element element) { return (element.hasAttribute(TRANSACTION_MANAGER_ATTRIBUTE) ? element.getAttribute(TRANSACTION_MANAGER_ATTRIBUTE) : DEFAULT_TRANSACTION_MANAGER_BEAN_NAME); } @Override public void init() { registerBeanDefinitionParser('advice', new TxAdviceBeanDefinitionParser()); registerBeanDefinitionParser('annotation-driven', new AnnotationDrivenBeanDefinitionParser()); registerBeanDefinitionParser('jta-transaction-manager', new JtaTransactionManagerBeanDefinitionParser()); }}
可以看到对应的注解解析器就是AnnotationDrivenBeanDefinitionParser类,在该类中一定会有一个parse方法:
public BeanDefinition parse(Element element, ParserContext parserContext) { registerTransactionalEventListenerFactory(parserContext); String mode = element.getAttribute('mode'); if ('aspectj'.equals(mode)) { // mode='aspectj' registerTransactionAspect(element, parserContext); if (ClassUtils.isPresent('javax.transaction.Transactional', getClass().getClassLoader())) { registerJtaTransactionAspect(element, parserContext); } } else { // mode='proxy' AopAutoProxyConfigurer.configureAutoProxyCreator(element, parserContext); } return null; }
首先拿到mode属性的值判断是使用AspectJ生成代理还是JDK生成代理,这里我们主要看proxy模式,进入configureAutoProxyCreator方法:
public static void configureAutoProxyCreator(Element element, ParserContext parserContext) { // 注册AOP的入口类 AopNamespaceUtils.registerAutoProxyCreatorIfNecessary(parserContext, element); String txAdvisorBeanName = TransactionManagementConfigUtils.TRANSACTION_ADVISOR_BEAN_NAME; if (!parserContext.getRegistry().containsBeanDefinition(txAdvisorBeanName)) { Object eleSource = parserContext.extractSource(element); // Create the TransactionAttributeSource definition. // @Transactional注解的属性封装 RootBeanDefinition sourceDef = new RootBeanDefinition( 'org.springframework.transaction.annotation.AnnotationTransactionAttributeSource'); sourceDef.setSource(eleSource); sourceDef.setRole(BeanDefinition.ROLE_INFRASTRUCTURE); String sourceName = parserContext.getReaderContext().registerWithGeneratedName(sourceDef); // Create the TransactionInterceptor definition. // AOP执行链 RootBeanDefinition interceptorDef = new RootBeanDefinition(TransactionInterceptor.class); interceptorDef.setSource(eleSource); interceptorDef.setRole(BeanDefinition.ROLE_INFRASTRUCTURE); // 拿到transaction-manager属性的值 registerTransactionManager(element, interceptorDef); interceptorDef.getPropertyValues().add('transactionAttributeSource', new RuntimeBeanReference(sourceName)); String interceptorName = parserContext.getReaderContext().registerWithGeneratedName(interceptorDef); // Create the TransactionAttributeSourceAdvisor definition. RootBeanDefinition advisorDef = new RootBeanDefinition(BeanFactoryTransactionAttributeSourceAdvisor.class); advisorDef.setSource(eleSource); advisorDef.setRole(BeanDefinition.ROLE_INFRASTRUCTURE); advisorDef.getPropertyValues().add('transactionAttributeSource', new RuntimeBeanReference(sourceName)); advisorDef.getPropertyValues().add('adviceBeanName', interceptorName); if (element.hasAttribute('order')) { advisorDef.getPropertyValues().add('order', element.getAttribute('order')); } parserContext.getRegistry().registerBeanDefinition(txAdvisorBeanName, advisorDef); CompositeComponentDefinition compositeDef = new CompositeComponentDefinition(element.getTagName(), eleSource); compositeDef.addNestedComponent(new BeanComponentDefinition(sourceDef, sourceName)); compositeDef.addNestedComponent(new BeanComponentDefinition(interceptorDef, interceptorName)); compositeDef.addNestedComponent(new BeanComponentDefinition(advisorDef, txAdvisorBeanName)); parserContext.registerComponent(compositeDef); } }
这里的流程比较长,但逻辑很简单。首先来看注册事务AOP入口类是哪个:
public static void registerAutoProxyCreatorIfNecessary( ParserContext parserContext, Element sourceElement) { // 将优先级更高的AOP入口类放入到IOC容器中 BeanDefinition beanDefinition = AopConfigUtils.registerAutoProxyCreatorIfNecessary( parserContext.getRegistry(), parserContext.extractSource(sourceElement)); // 设置代理生成的方式以及是否缓存代理类到当前线程 useClassProxyingIfNecessary(parserContext.getRegistry(), sourceElement); registerComponentIfNecessary(beanDefinition, parserContext); }
主要看registerAutoProxyCreatorIfNecessary方法:
public static BeanDefinition registerAutoProxyCreatorIfNecessary( BeanDefinitionRegistry registry, @Nullable Object source) { return registerOrEscalateApcAsRequired(InfrastructureAdvisorAutoProxyCreator.class, registry, source); } private static BeanDefinition registerOrEscalateApcAsRequired( Class<?> cls, BeanDefinitionRegistry registry, @Nullable Object source) { Assert.notNull(registry, 'BeanDefinitionRegistry must not be null'); // 判断传进来的类和ICO中当前存在的类哪个优先级更高,将更高的放入IOC中 if (registry.containsBeanDefinition(AUTO_PROXY_CREATOR_BEAN_NAME)) { BeanDefinition apcDefinition = registry.getBeanDefinition(AUTO_PROXY_CREATOR_BEAN_NAME); if (!cls.getName().equals(apcDefinition.getBeanClassName())) { int currentPriority = findPriorityForClass(apcDefinition.getBeanClassName()); int requiredPriority = findPriorityForClass(cls); if (currentPriority < requiredPriority) { apcDefinition.setBeanClassName(cls.getName()); } } return null; } //把AOP入口类封装成beanDefinition对象,要实例化 RootBeanDefinition beanDefinition = new RootBeanDefinition(cls); beanDefinition.setSource(source); beanDefinition.getPropertyValues().add('order', Ordered.HIGHEST_PRECEDENCE); beanDefinition.setRole(BeanDefinition.ROLE_INFRASTRUCTURE); //注解aop入口类的beanName名称 AopConfigUtils.AUTO_PROXY_CREATOR_BEAN_NAME registry.registerBeanDefinition(AUTO_PROXY_CREATOR_BEAN_NAME, beanDefinition); return beanDefinition; }
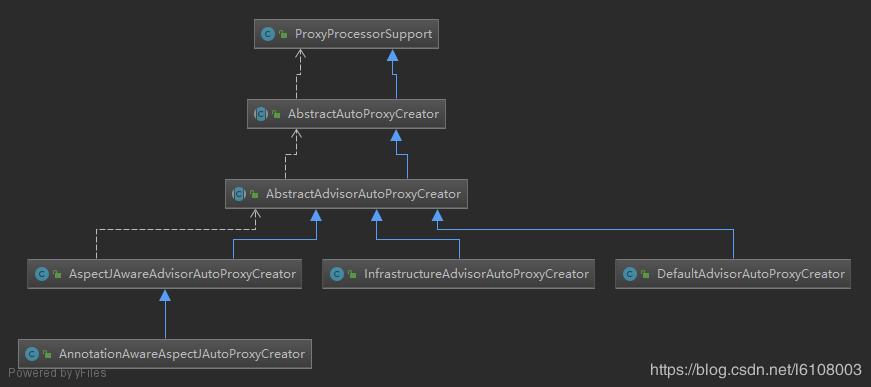
首先判断容器中是否已经存在AOP入口类,如果不存在则直接创建InfrastructureAdvisorAutoProxyCreator的BeanDefinition对象注册到容器中,这个类也是我上一篇文章分析的AOP入口类AbstractAutoProxyCreator的子类,再来看看其继承关系:

你会不会疑惑,这么多子类,到底会使用哪一个呢?回到刚刚的代码中,可以看到如果已经存在一个入口类了,就会通过findPriorityForClass获取两个类的优先级,最终就会使用优先级更大的那个,那么它们的优先级顺序是怎样的呢?
private static final List<Class<?>> APC_PRIORITY_LIST = new ArrayList<>(3); static { // Set up the escalation list... APC_PRIORITY_LIST.add(InfrastructureAdvisorAutoProxyCreator.class); APC_PRIORITY_LIST.add(AspectJAwareAdvisorAutoProxyCreator.class); APC_PRIORITY_LIST.add(AnnotationAwareAspectJAutoProxyCreator.class); } private static int findPriorityForClass(@Nullable String className) { // 索引即是优先级,越大优先级越高,IOC中只会存在一个事务AOP入口类 for (int i = 0; i < APC_PRIORITY_LIST.size(); i++) { Class<?> clazz = APC_PRIORITY_LIST.get(i); if (clazz.getName().equals(className)) { return i; } } throw new IllegalArgumentException( 'Class name [' + className + '] is not a known auto-proxy creator class'); }
可以看到,InfrastructureAdvisorAutoProxyCreator是优先级最低的,基本上不会起作用;AspectJAwareAdvisorAutoProxyCreator是当我们配置了<aop:config>标签时会注册,也就是xml配置的AOP的入口类;而AnnotationAwareAspectJAutoProxyCreator是当我们配置了<aop:aspectj-autoproxy>或使用@EnableAspectJAutoProxy注解时注册,因此大部分情况下都是使用的AnnotationAwareAspectJAutoProxyCreator。
注册完AOP的入口类后,回到configureAutoProxyCreator方法:
RootBeanDefinition sourceDef = new RootBeanDefinition( 'org.springframework.transaction.annotation.AnnotationTransactionAttributeSource');sourceDef.setSource(eleSource);sourceDef.setRole(BeanDefinition.ROLE_INFRASTRUCTURE);String sourceName =parserContext.getReaderContext().registerWithGeneratedName(sourceDef);
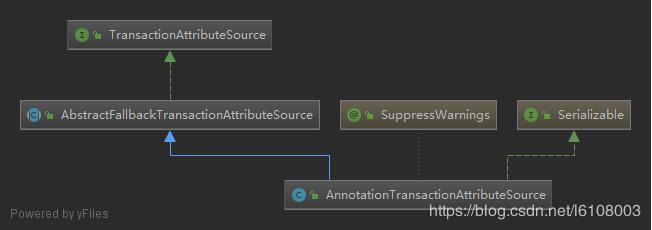
AnnotationTransactionAttributeSource类的作用就是封装事务注解@Transactional的属性,这里需要记住其继承体系以及熟悉该类和其父类的属性和方法,对后面分析事物切面执行原理有帮助:

紧接着就是创建了TransactionInterceptor对象,专门的事务拦截器,并且该类是MethodInterceptor的子类,看到这个应该不陌生了,我们知道AOP调用链在执行过程中主要就是调用该类的invoke的方法,因此它是事务切面执行的入口。既然有了Interceptor,那么必不可少的还应该有Advisor,而Advisor又是由Advice和Poincut组成的,这样才能构成一个完整的切面,所以该方法后面就是创建这两个对象。以上就是xml配置AOP注解支持的原理,很简单,下面再来看看零配置又是如何实现的。
AOP零配置原理
使用过SpringBoot的都知道,如果需要开启事务注解的支持,只需要一个注解就能搞定:@EnableTransactionManagement,不用再配置xml文件,这个又是怎么做到的呢?不多说,我们直接来看其源码:
@Import(TransactionManagementConfigurationSelector.class)public @interface EnableTransactionManagement { boolean proxyTargetClass() default false; AdviceMode mode() default AdviceMode.PROXY; int order() default Ordered.LOWEST_PRECEDENCE;}
在该注解下使用@Import导入了一个类TransactionManagementConfigurationSelector,首先该注解的作用就是导入一个类的实例到IOC容器中,你可能会说不是在类上加@Component注解就行了么,但是有些类它并不在你扫描的路径下,而该注解依然可以将其导入进来,所以我么主要看TransactionManagementConfigurationSelector类中做了些啥:
public class TransactionManagementConfigurationSelector extends AdviceModeImportSelector<EnableTransactionManagement> { @Override protected String[] selectImports(AdviceMode adviceMode) { switch (adviceMode) { case PROXY: return new String[] {AutoProxyRegistrar.class.getName(), ProxyTransactionManagementConfiguration.class.getName()}; case ASPECTJ: return new String[] {determineTransactionAspectClass()}; default: return null; } } private String determineTransactionAspectClass() { return (ClassUtils.isPresent('javax.transaction.Transactional', getClass().getClassLoader()) ? TransactionManagementConfigUtils.JTA_TRANSACTION_ASPECT_CONFIGURATION_CLASS_NAME : TransactionManagementConfigUtils.TRANSACTION_ASPECT_CONFIGURATION_CLASS_NAME); }}
可以看到在selectImports方法中返回了AutoProxyRegistrar和ProxyTransactionManagementConfiguration类,返回后会被封装为BeanDefinition对象,那这个方法是在哪里调用的呢?这个在之前的文章中也分析过,ConfigurationClassPostProcessor类中会调用ConfigurationClassParser类的parse方法解析@Configuration、@Import、@ImportSource等注解,具体过程这里就不再赘述了。我们继续来分别看看AutoProxyRegistrar和ProxyTransactionManagementConfiguration类:
public class AutoProxyRegistrar implements ImportBeanDefinitionRegistrar { private final Log logger = LogFactory.getLog(getClass()); @Override public void registerBeanDefinitions(AnnotationMetadata importingClassMetadata, BeanDefinitionRegistry registry) { boolean candidateFound = false; Set<String> annoTypes = importingClassMetadata.getAnnotationTypes(); for (String annoType : annoTypes) { AnnotationAttributes candidate = AnnotationConfigUtils.attributesFor(importingClassMetadata, annoType); if (candidate == null) { continue; } Object mode = candidate.get('mode'); Object proxyTargetClass = candidate.get('proxyTargetClass'); if (mode != null && proxyTargetClass != null && AdviceMode.class == mode.getClass() && Boolean.class == proxyTargetClass.getClass()) { candidateFound = true; if (mode == AdviceMode.PROXY) { //注册事务AOP的入口类InfrastructureAdvisorAutoProxyCreator,实际上这个AOP入口类起不了作用 AopConfigUtils.registerAutoProxyCreatorIfNecessary(registry); if ((Boolean) proxyTargetClass) { AopConfigUtils.forceAutoProxyCreatorToUseClassProxying(registry); return; } } } } }}public class ProxyTransactionManagementConfiguration extends AbstractTransactionManagementConfiguration { /* * 明显是创建事务切面实例 * BeanFactoryTransactionAttributeSourceAdvisor * * */ @Bean(name = TransactionManagementConfigUtils.TRANSACTION_ADVISOR_BEAN_NAME) @Role(BeanDefinition.ROLE_INFRASTRUCTURE) public BeanFactoryTransactionAttributeSourceAdvisor transactionAdvisor() { BeanFactoryTransactionAttributeSourceAdvisor advisor = new BeanFactoryTransactionAttributeSourceAdvisor(); advisor.setTransactionAttributeSource(transactionAttributeSource()); //设置通知类 advisor.setAdvice(transactionInterceptor()); if (this.enableTx != null) { advisor.setOrder(this.enableTx.<Integer>getNumber('order')); } return advisor; } @Bean @Role(BeanDefinition.ROLE_INFRASTRUCTURE) public TransactionAttributeSource transactionAttributeSource() { return new AnnotationTransactionAttributeSource(); } /* * 创建事务advice * TransactionInterceptor * */ @Bean @Role(BeanDefinition.ROLE_INFRASTRUCTURE) public TransactionInterceptor transactionInterceptor() { TransactionInterceptor interceptor = new TransactionInterceptor(); interceptor.setTransactionAttributeSource(transactionAttributeSource()); //事务管理器要跟数据源挂钩,所以需要自己定义 if (this.txManager != null) { interceptor.setTransactionManager(this.txManager); } return interceptor; }}
看到这就很清楚了,前者是注册AOP的入口类(这里注册的入口类依然是InfrastructureAdvisorAutoProxyCreator),后者则是创建事务AOP的组件的实例到IOC中,到这里相信不仅仅是对于事务的零配置,而是整个SpringBoot的零配置实现原理都心中有数了。
总结
本篇结合之前所学分析了事务配置解析的原理,也带出了SpringBoot零配置实现的原理,下一篇就是事务的执行调用过程。我们需要在脑海将加载、解析和调用串联起来,从微观到宏观整体把握Spring,才能真正的理解Spring。
以上这篇这一次搞懂Spring事务注解的解析方式就是小编分享给大家的全部内容了,希望能给大家一个参考,也希望大家多多支持好吧啦网。
相关文章:

 网公网安备
网公网安备