Spring框架花式创建Bean的n种方法(小结)
常用的从容器中获取bean实例使用这样的方式:
@Testpublic void test() {Persion p = (Persion) ioc.getBean('p1');System.out.println(p);}
常用的在容器中配置组件使用这样的方式:
<bean class='com.gql.bean.Persion'><property name='name' value='张三'></property><property name='age' value='18'></property><property name='email' value='zs@163.com'></property><property name='gender' value='男'></property></bean>
下面的实验介绍一些Spring容器中注册组件对象的其他方法。
实验1:根据bean的类型从ioc容器中获取实例
@Testpublic void test01() {Persion p = ioc.getBean(Persion.class);System.out.println(p);}
这种方法查找的好处是不需要类型转换,但是如果ioc容器中要找的bean有多个,使用这种方法查找就会报错。可以改用下面的方式:
@Testpublic void test01() {Persion p = ioc.getBean('p1', Persion.class);System.out.println(p);}
实验2:通过有参构造器为bean的属性赋值
需要提前在bean中添加有参构造器,才能进行下面的测试。
<bean class='com.gql.bean.Persion'><constructor-arg name='name' value='李四'></constructor-arg><constructor-arg name='age' value='22'></constructor-arg><constructor-arg name='email' value='ls@163.com'></constructor-arg><constructor-arg name='gender' value='男'></constructor-arg></bean>
使用这种有参构造器为bean的属性赋值,可以省略name,但是value的顺序必须与bean中的顺序一致。(若再使用index和type进行索引,可以不按顺序)
通过名称空间为bean赋值:
添加p命名空间标签头:xmlns:p=“http://www.springframework.org/schema/p”
<bean p:name='小王' p:age='22'p:gender='男' p:email='wang@163.com'></bean>
实验3:为各种属性赋值
引用类型、集合类型、级联类型。
如题,给出一个赋值的Bean对象,为其在容器中注册。此时所有复杂的赋值都在property标签体内。
public class Persion {private String name;private String gender;private Integer age;private String email;private Car car;private List<Book> book;private Map<String, Object> maps;private Properties properties;//省略setter与getter方法}
普通属性赋值:
<!-- 普通属性赋值 --><property name='name' value='张三'></property><property name='gender' value='男'></property><property name='age' value='20'></property><property name='email'><null /></property>
引用类型赋值:
<bean class='com.gql.bean.Persion'><!-- 引用外部bean --><!-- <property name='car' ref='c1'></property> --><!-- 引用内部bean(内部bean不能被获取到) --><property name='car'><bean class='com.gql.bean.Car'><property name='carName' value='自行车'></property><property name='color' value='黑色'></property><property name='price' value='400'></property></bean></property></bean><bean class='com.gql.bean.Car'><property name='carName' value='宝马'></property><property name='color' value='白色'></property><property name='price' value='30000'></property></bean>
集合类型赋值:
list
<bean class='com.gql.bean.Persion'><property name='book'><list><bean p:bookName='西游?' p:author='吴承恩'></bean><ref bean='book01' /></list></property></bean><bean class='com.gql.bean.Book'><property name='bookName' value='水浒传'></property><property name='author' value='施耐庵'></property></bean>
map
<property name='maps'><map><entry key='k01' value='v01'></entry><entry key='k02' value='v02'></entry><entry key='k03' value-ref='book01'></entry><entry key='k04'><bean class='com.gql.bean.Car'><property name='carName' value='捷豹'></property><property name='color' value='红色'></property><property name='price' value='50000'></property></bean></entry></map></property>
properties
<property name='properties'><props><prop key='username'>root</prop><prop key='password'>123456</prop></props></property>
实验4:通过继承实现bean配置信息的重用
下面的代码中p4继承了p3,需要改动的属性在property标签中修改即可,其余的全部原样继承。
<bean class='com.gql.bean.Persion'><property name='name' value='张三'></property><property name='age' value='20'></property><property name='gender' value='男'></property><property name='email' value='zs@163.com'></property></bean><bean parent='p3'><property name='name' value='李四'></property></bean>
实验5:单实例singleton和多实例prototype
单实例singleton 多实例prototype ①容器启动时创建好对象并保存在容器中 ①获取Bean时才会创建这个对象 ②调用初始化方法 ②调用初始化方法 ③容器关闭时调用销毁方法 ③容器销毁时不调用销毁方法 任何时间获取都是获取之前创建好的那个对象 每次获取都会创建一个新的对象
详情可参照博客:通过工厂创建Bean的三种方式
实验6:创建带有生命周期的Bean
ioc容器中注册的组件:
单实例:容器启动的时候就会创建好,容器关闭也会销毁创建的bean。 多实例:获取的时候才创建。可以为bean自定义一些生命周期方法,spring在创建或销毁的时候就会调用指定的方法。
(1)单实例Singleton测试
在Book类中创建方法:
package com.gql.bean;public class Book {private String bookName;private String author;public void myInit() {System.out.println('Book的初始化方法...');}public void myDestory() {System.out.println('Book的销毁方法...');}public Book() {super();// TODO Auto-generated constructor stubSystem.out.println('Book创建...');}}
在xml中注册组件:
<bean destroy-method='myDestory' init-method='myInit'></bean>
测试:
在ApplicationContext中没有close方法,需要将容器类型转换为ConfigurableApplicationContext 。
public class IoCTest {ConfigurableApplicationContext ioc = new ClassPathXmlApplicationContext('ApplicationContext.xml');@Testpublic void test10() {System.out.println('容器关闭了');ioc.close();}}

(2)多实例prototype测试
只需要改变xml中注册组件为多实例:
<bean destroy-method='myDestory' init-method='myInit' scope='prototype'></bean>
仍然使用上面的方法进行测试:

可以看到容器的创建销毁一系列都没有进行,这是因为多实例在获取bean的时候才创建实例。
多实例测试中增加获取bean:
@Testpublic void test10() {Object bean = ioc.getBean('book01');System.out.println(bean);System.out.println('容器关闭了');ioc.close();}

测试结果中,成功创建了实例,但是容器关闭并没有销毁Bean。
实验7:测试Bean的后置处理器
后置处理器有一点代理对象的意思,使用后置处理器,Bean的生命周期变成下面的样子:
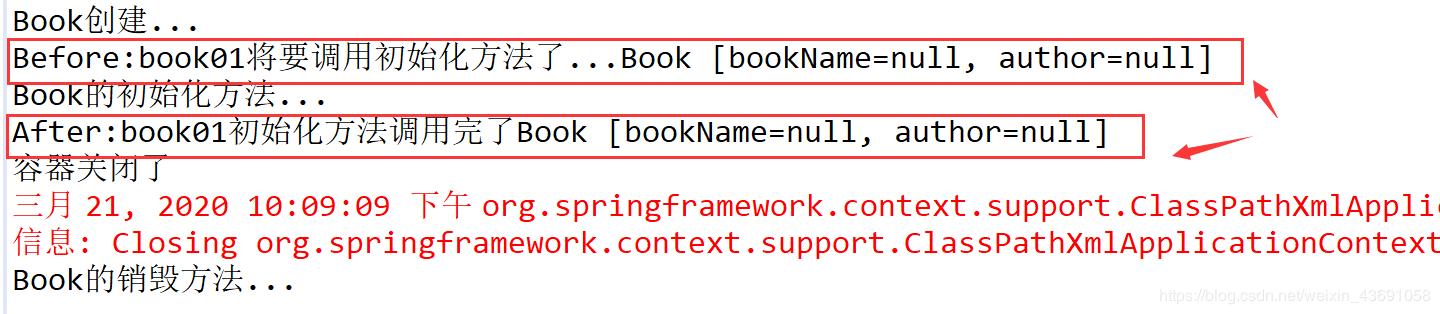
容器启动—>后置处理器Before—>初始化方法—>后置处理器After—>容器关闭(调用销毁方法)
不管有没有初始化方法,后置处理器都会默认其有,继续工作。
后置处理器:
package com.gql.bean;import org.springframework.beans.BeansException;import org.springframework.beans.factory.config.BeanPostProcessor;/** * 1.编写后置处理器 * 2.将后置处理器注册在配置文件 * @author guoqianliang * */public class MyBeanPostProcessor implements BeanPostProcessor {/** * 初始化前调用 */@Overridepublic Object postProcessBeforeInitialization(Object bean, String beanName) throws BeansException {// TODO Auto-generated method stubSystem.out.println('Before:' + beanName + '将要调用初始化方法了...' + bean);return bean;}/** * 初始化后调用 */@Overridepublic Object postProcessAfterInitialization(Object bean, String beanName) throws BeansException {// TODO Auto-generated method stubSystem.out.println('After:' + beanName + '初始化方法调用完了' + bean);return bean;}}
将后置处理器注册在配置文件:
<?xml version='1.0' encoding='UTF-8'?><beans xmlns='http://www.springframework.org/schema/beans'xmlns:xsi='http://www.w3.org/2001/XMLSchema-instance'xsi:schemaLocation='http://www.springframework.org/schema/beans http://www.springframework.org/schema/beans/spring-beans.xsd'><bean destroy-method='myDestory' init-method='myInit' scope='singleton'></bean><!-- 后置处理器:可以在bean的初始化前后调用方法 --><bean class='com.gql.bean.MyBeanPostProcessor'></bean></beans>
测试:
@Testpublic void test11() {Object bean = ioc.getBean('book01');System.out.println('容器关闭了');ioc.close();}
实验8:引用外部文件
在Spring中bean默认都是单实例的,而数据库作为单实例是最好不过的,一个项目就是一个连接池,连接池里面管理很多连接,连接是直接从连接池中拿。可以让Spring帮我们创建连接池对象,管理连接池。
注册连接池第一代
在配置中注册连接池:
<bean class='com.mchange.v2.c3p0.ComboPooledDataSource'><property name='user' value='root'></property><property name='password' value='Hudie'></property><property name='jdbcUrl' value='jdbc:mysql://localhost:3306/test'></property><property name='driverClass' value='com.mysql.jdbc.Driver'></property></bean>
测试:
@Testpublic void test12() throws SQLException {// 从容器中拿到连接// DataSource bean = (DataSource) ioc.getBean('dataSource');DataSource bean2 = ioc.getBean(DataSource.class);System.out.println(bean2.getConnection());}
成功获取到了这个连接:

注册连接池第二代
在config包下创建一个dbconfig.properties用来保存数据库连接信息。
为了防止配置文件中的key与Spring自己的关键字冲突。可以为key加一个前缀,业内通用的做法是使用jabc.xxx
jdbc.username:rootjdbc.password:Hudiejdbc.jdbcUrl:jdbc:mysql://localhost:3306/testjdbc.driverClass:com.mysql.jdbc.Driver
注册数据库连接池:
<bean id='dataSource'class='com.mchange.v2.c3p0.ComboPooledDataSource'><property name='user' value='${jdbc.username}'></property><property name='password' value='${jdbc.password}'></property><property name='jdbcUrl' value='${jdbc.jdbcUrl}'></property><property name='driverClass' value='${jdbc.driverClass}'></property></bean>
测试:
@Testpublic void test12() throws SQLException {DataSource bean2 = ioc.getBean(DataSource.class);System.out.println(bean2.getConnection());}

到此这篇关于Spring框架花式创建Bean的n种方法的文章就介绍到这了,更多相关Spring 创建Bean内容请搜索好吧啦网以前的文章或继续浏览下面的相关文章希望大家以后多多支持好吧啦网!
相关文章:

 网公网安备
网公网安备