Lombok为啥这么牛逼?SpringBoot和IDEA官方都要支持它
最近 IDEA 2020最后一个版本发布了 ,已经内置了Lombok插件,SpringBoot 2.1.x之后的版本也在Starter中内置了Lombok依赖。为什么他们都要支持Lombok呢?今天我来讲讲Lombok的使用,看看它有何神奇之处!
Lombok简介Lombok是一款Java代码功能增强库,在Github上已有9.8k+Star。它会自动集成到你的编辑器和构建工具中,从而使你的Java代码更加生动有趣。通过Lombok的注解,你可以不用再写getter、setter、equals等方法,Lombok将在编译时为你自动生成。
Lombok集成首先我们需要在IDEA中安装好Lombok插件,如果你使用的是最新版IDEA 2020.3,则Lombok插件已经内置,无需安装。

之后在项目的pom.xml文件中添加Lombok依赖,SpringBoot 2.1.x版本后无需指定Lombok版本,SpringBoot在 spring-boot-dependencies 中已经内置。
<!--lombok依赖--><dependency> <groupId>org.projectlombok</groupId> <artifactId>lombok</artifactId> <optional>true</optional></dependency>Lombok使用
Lombok中有很多注解,这些注解使得我们可以更加方便的编写Java代码,下面介绍下这些注解的使用。
val
使用val注解可以取代任意类型作为局部变量,这样我们就不用写复杂的ArrayList和Map.Entry类型了,具体例子如下。
/** * Created by macro on 2020/12/16. */public class ValExample { public static void example() { //val代替ArrayList<String>和String类型 val example = new ArrayList<String>(); example.add('Hello World!'); val foo = example.get(0); System.out.println(foo.toLowerCase()); } public static void example2() { //val代替Map.Entry<Integer,String>类型 val map = new HashMap<Integer, String>(); map.put(0, 'zero'); map.put(5, 'five'); for (val entry : map.entrySet()) { System.out.printf('%d: %sn', entry.getKey(), entry.getValue()); } } public static void main(String[] args) { example(); example2(); }}
当我们使用了val注解后,Lombok会从局部变量的初始化表达式推断出具体类型,编译后会生成如下代码。
public class ValExample { public ValExample() { } public static void example() { ArrayList<String> example = new ArrayList(); example.add('Hello World!'); String foo = (String)example.get(0); System.out.println(foo.toLowerCase()); } public static void example2() { HashMap<Integer, String> map = new HashMap(); map.put(0, 'zero'); map.put(5, 'five'); Iterator var1 = map.entrySet().iterator(); while(var1.hasNext()) { Entry<Integer, String> entry = (Entry)var1.next(); System.out.printf('%d: %sn', entry.getKey(), entry.getValue()); } }}
@NonNull
在方法上使用@NonNull注解可以做非空判断,如果传入空值的话会直接抛出NullPointerException。
/** * Created by macro on 2020/12/16. */public class NonNullExample { private String name; public NonNullExample(@NonNull String name){ this.name = name; } public static void main(String[] args) { new NonNullExample('test'); //会抛出NullPointerException new NonNullExample(null); }}
编译后会在构造器中添加非空判断,具体代码如下。
public class NonNullExample { private String name; public NonNullExample(@NonNull String name) { if (name == null) { throw new NullPointerException('name is marked non-null but is null'); } else { this.name = name; } } public static void main(String[] args) { new NonNullExample('test'); new NonNullExample((String)null); }}
@Cleanup
当我们在Java中使用资源时,不可避免地需要在使用后关闭资源。使用@Cleanup注解可以自动关闭资源。
/** * Created by macro on 2020/12/16. */public class CleanupExample { public static void main(String[] args) throws IOException { String inStr = 'Hello World!'; //使用输入输出流自动关闭,无需编写try catch和调用close()方法 @Cleanup ByteArrayInputStream in = new ByteArrayInputStream(inStr.getBytes('UTF-8')); @Cleanup ByteArrayOutputStream out = new ByteArrayOutputStream(); byte[] b = new byte[1024]; while (true) { int r = in.read(b); if (r == -1) break; out.write(b, 0, r); } String outStr = out.toString('UTF-8'); System.out.println(outStr); }}
编译后Lombok会生成如下代码。
public class CleanupExample { public CleanupExample() { } public static void main(String[] args) throws IOException { String inStr = 'Hello World!'; ByteArrayInputStream in = new ByteArrayInputStream(inStr.getBytes('UTF-8')); try { ByteArrayOutputStream out = new ByteArrayOutputStream(); try { byte[] b = new byte[1024]; while(true) { int r = in.read(b); if (r == -1) { String outStr = out.toString('UTF-8'); System.out.println(outStr); return; } out.write(b, 0, r); } } finally { if (Collections.singletonList(out).get(0) != null) { out.close(); } } } finally { if (Collections.singletonList(in).get(0) != null) { in.close(); } } }}
@Getter/@Setter
有了@Getter/@Setter注解,我们再也不用编写getter/setter方法了。试想下之前即使我们使用IDEA自动生成getter/setter方法,如果类属性的类型和名称改了,又要重新生成getter/setter方法也是一件很麻烦的事情。
/** * Created by macro on 2020/12/17. */public class GetterSetterExample { @Getter @Setter private String name; @Getter @Setter(AccessLevel.PROTECTED) private Integer age; public static void main(String[] args) { GetterSetterExample example = new GetterSetterExample(); example.setName('test'); example.setAge(20); System.out.printf('name:%s age:%d',example.getName(),example.getAge()); }}
编译后Lombok会生成如下代码。
public class GetterSetterExample { private String name; private Integer age; public GetterSetterExample() { } public String getName() { return this.name; } public void setName(final String name) { this.name = name; } public Integer getAge() { return this.age; } protected void setAge(final Integer age) { this.age = age; }}
@ToString
把所有类属性都编写到toString方法中方便打印日志,是一件多么枯燥无味的事情。使用@ToString注解可以自动生成toString方法,默认会包含所有类属性,使用@ToString.Exclude注解可以排除属性的生成。
/** * Created by macro on 2020/12/17. */@ToStringpublic class ToStringExample { @ToString.Exclude private Long id; private String name; private Integer age; public ToStringExample(Long id,String name,Integer age){ this.id =id; this.name = name; this.age = age; } public static void main(String[] args) { ToStringExample example = new ToStringExample(1L,'test',20); //自动实现toString方法,输出ToStringExample(name=test, age=20) System.out.println(example); }}
编译后Lombok会生成如下代码。
public class ToStringExample { private Long id; private String name; private Integer age; public ToStringExample(Long id, String name, Integer age) { this.id = id; this.name = name; this.age = age; } public String toString() { return 'ToStringExample(name=' + this.name + ', age=' + this.age + ')'; }}
@EqualsAndHashCode
使用@EqualsAndHashCode注解可以自动生成hashCode和equals方法,默认包含所有类属性,使用@EqualsAndHashCode.Exclude可以排除属性的生成。
/** * Created by macro on 2020/12/17. */@Getter@Setter@EqualsAndHashCodepublic class EqualsAndHashCodeExample { private Long id; @EqualsAndHashCode.Exclude private String name; @EqualsAndHashCode.Exclude private Integer age; public static void main(String[] args) { EqualsAndHashCodeExample example1 = new EqualsAndHashCodeExample(); example1.setId(1L); example1.setName('test'); example1.setAge(20); EqualsAndHashCodeExample example2 = new EqualsAndHashCodeExample(); example2.setId(1L); //equals方法只对比id,返回true System.out.println(example1.equals(example2)); }}
编译后Lombok会生成如下代码。
public class EqualsAndHashCodeExample { private Long id; private String name; private Integer age; public EqualsAndHashCodeExample() { } public boolean equals(final Object o) { if (o == this) { return true; } else if (!(o instanceof EqualsAndHashCodeExample)) { return false; } else { EqualsAndHashCodeExample other = (EqualsAndHashCodeExample)o; if (!other.canEqual(this)) { return false; } else { Object this$id = this.getId(); Object other$id = other.getId(); if (this$id == null) { if (other$id != null) { return false; } } else if (!this$id.equals(other$id)) { return false; } return true; } } } protected boolean canEqual(final Object other) { return other instanceof EqualsAndHashCodeExample; } public int hashCode() { int PRIME = true; int result = 1; Object $id = this.getId(); int result = result * 59 + ($id == null ? 43 : $id.hashCode()); return result; }}
@XxConstructor
使用@XxConstructor注解可以自动生成构造方法,有@NoArgsConstructor、@RequiredArgsConstructor和@AllArgsConstructor三个注解可以使用。
@NoArgsConstructor:生成无参构造函数。 @RequiredArgsConstructor:生成包含必须参数的构造函数,使用@NonNull注解的类属性为必须参数。 @AllArgsConstructor:生成包含所有参数的构造函数。/** * Created by macro on 2020/12/17. */@NoArgsConstructor@RequiredArgsConstructor(staticName = 'of')@AllArgsConstructorpublic class ConstructorExample { @NonNull private Long id; private String name; private Integer age; public static void main(String[] args) { //无参构造器 ConstructorExample example1 = new ConstructorExample(); //全部参数构造器 ConstructorExample example2 = new ConstructorExample(1L,'test',20); //@NonNull注解的必须参数构造器 ConstructorExample example3 = ConstructorExample.of(1L); }}
编译后Lombok会生成如下代码。
public class ConstructorExample { @NonNull private Long id; private String name; private Integer age; public ConstructorExample() { } private ConstructorExample(@NonNull final Long id) { if (id == null) { throw new NullPointerException('id is marked non-null but is null'); } else { this.id = id; } } public static ConstructorExample of(@NonNull final Long id) { return new ConstructorExample(id); } public ConstructorExample(@NonNull final Long id, final String name, final Integer age) { if (id == null) { throw new NullPointerException('id is marked non-null but is null'); } else { this.id = id; this.name = name; this.age = age; } }}
@Data
@Data是一个方便使用的组合注解,是@ToString、@EqualsAndHashCode、@Getter、@Setter和@RequiredArgsConstructor的组合体。
/** * Created by macro on 2020/12/17. */@Datapublic class DataExample { @NonNull private Long id; @EqualsAndHashCode.Exclude private String name; @EqualsAndHashCode.Exclude private Integer age; public static void main(String[] args) { //@RequiredArgsConstructor已生效 DataExample example1 = new DataExample(1L); //@Getter @Setter已生效 example1.setName('test'); example1.setAge(20); //@ToString已生效 System.out.println(example1); DataExample example2 = new DataExample(1L); //@EqualsAndHashCode已生效 System.out.println(example1.equals(example2)); }}
编译后Lombok会生成如下代码。
public class DataExample { @NonNull private Long id; private String name; private Integer age; public DataExample(@NonNull final Long id) { if (id == null) { throw new NullPointerException('id is marked non-null but is null'); } else { this.id = id; } } @NonNull public Long getId() { return this.id; } public String getName() { return this.name; } public Integer getAge() { return this.age; } public void setId(@NonNull final Long id) { if (id == null) { throw new NullPointerException('id is marked non-null but is null'); } else { this.id = id; } } public void setName(final String name) { this.name = name; } public void setAge(final Integer age) { this.age = age; } public boolean equals(final Object o) { if (o == this) { return true; } else if (!(o instanceof DataExample)) { return false; } else { DataExample other = (DataExample)o; if (!other.canEqual(this)) { return false; } else { Object this$id = this.getId(); Object other$id = other.getId(); if (this$id == null) { if (other$id != null) { return false; } } else if (!this$id.equals(other$id)) { return false; } return true; } } } protected boolean canEqual(final Object other) { return other instanceof DataExample; } public int hashCode() { int PRIME = true; int result = 1; Object $id = this.getId(); int result = result * 59 + ($id == null ? 43 : $id.hashCode()); return result; } public String toString() { return 'DataExample(id=' + this.getId() + ', name=' + this.getName() + ', age=' + this.getAge() + ')'; }}
@Value
使用@Value注解可以把类声明为不可变的,声明后此类相当于final类,无法被继承,其属性也会变成final属性。
/** * Created by macro on 2020/12/17. */@Valuepublic class ValueExample { private Long id; private String name; private Integer age; public static void main(String[] args) { //只能使用全参构造器 ValueExample example = new ValueExample(1L,'test',20); // example.setName('andy') //没有生成setter方法,会报错 // example.name='andy' //字段被设置为final类型,会报错 }}
编译后Lombok会生成如下代码。
public final class ValueExample { private final Long id; private final String name; private final Integer age; public static void main(String[] args) { new ValueExample(1L, 'test', 20); } public ValueExample(final Long id, final String name, final Integer age) { this.id = id; this.name = name; this.age = age; } public Long getId() { return this.id; } public String getName() { return this.name; } public Integer getAge() { return this.age; }}
@Builder
使用@Builder注解可以通过建造者模式来创建对象,建造者模式加链式调用,创建对象太方便了!
/** * Created by macro on 2020/12/17. */@Builder@ToStringpublic class BuilderExample { private Long id; private String name; private Integer age; public static void main(String[] args) { BuilderExample example = BuilderExample.builder() .id(1L) .name('test') .age(20) .build(); System.out.println(example); }}
编译后Lombok会生成如下代码。
public class BuilderExample { private Long id; private String name; private Integer age; BuilderExample(final Long id, final String name, final Integer age) { this.id = id; this.name = name; this.age = age; } public static BuilderExample.BuilderExampleBuilder builder() { return new BuilderExample.BuilderExampleBuilder(); } public String toString() { return 'BuilderExample(id=' + this.id + ', name=' + this.name + ', age=' + this.age + ')'; } public static class BuilderExampleBuilder { private Long id; private String name; private Integer age; BuilderExampleBuilder() { } public BuilderExample.BuilderExampleBuilder id(final Long id) { this.id = id; return this; } public BuilderExample.BuilderExampleBuilder name(final String name) { this.name = name; return this; } public BuilderExample.BuilderExampleBuilder age(final Integer age) { this.age = age; return this; } public BuilderExample build() { return new BuilderExample(this.id, this.name, this.age); } public String toString() { return 'BuilderExample.BuilderExampleBuilder(id=' + this.id + ', name=' + this.name + ', age=' + this.age + ')'; } }}
@SneakyThrows
还在手动捕获并抛出异常?使用@SneakyThrows注解自动实现试试!
/** * Created by macro on 2020/12/17. */public class SneakyThrowsExample { //自动抛出异常,无需处理 @SneakyThrows(UnsupportedEncodingException.class) public static byte[] str2byte(String str){ return str.getBytes('UTF-8'); } public static void main(String[] args) { String str = 'Hello World!'; System.out.println(str2byte(str).length); }}
编译后Lombok会生成如下代码。
public class SneakyThrowsExample { public SneakyThrowsExample() { } public static byte[] str2byte(String str) { try { return str.getBytes('UTF-8'); } catch (UnsupportedEncodingException var2) { throw var2; } }}
@Synchronized
当我们在多个线程中访问同一资源时,往往会出现线程安全问题,以前我们往往使用synchronized关键字修饰方法来实现同步访问。使用@Synchronized注解同样可以实现同步访问。
package com.macro.mall.tiny.example;import lombok.*;/** * Created by macro on 2020/12/17. */@Datapublic class SynchronizedExample { @NonNull private Integer count; @Synchronized @SneakyThrows public void reduceCount(Integer id) { if (count > 0) { Thread.sleep(500); count--; System.out.println(String.format('thread-%d count:%d', id, count)); } } public static void main(String[] args) { //添加@Synchronized三个线程可以同步调用reduceCount方法 SynchronizedExample example = new SynchronizedExample(20); new ReduceThread(1, example).start(); new ReduceThread(2, example).start(); new ReduceThread(3, example).start(); } @RequiredArgsConstructor static class ReduceThread extends Thread { @NonNull private Integer id; @NonNull private SynchronizedExample example; @Override public void run() { while (example.getCount() > 0) { example.reduceCount(id); } } }}
编译后Lombok会生成如下代码。
public class SynchronizedExample { private final Object $lock = new Object[0]; @NonNull private Integer count; public void reduceCount(Integer id) { try { synchronized(this.$lock) { if (this.count > 0) { Thread.sleep(500L); Integer var3 = this.count; Integer var4 = this.count = this.count - 1; System.out.println(String.format('thread-%d count:%d', id, this.count)); } } } catch (Throwable var7) { throw var7; } }}
@With
使用@With注解可以实现对原对象进行克隆,并改变其一个属性,使用时需要指定全参构造方法。
@With@AllArgsConstructorpublic class WithExample { private Long id; private String name; private Integer age; public static void main(String[] args) { WithExample example1 = new WithExample(1L, 'test', 20); WithExample example2 = example1.withAge(22); //将原对象进行clone并设置age,返回false System.out.println(example1.equals(example2)); }}
编译后Lombok会生成如下代码。
public class WithExample { private Long id; private String name; private Integer age; public WithExample withId(final Long id) { return this.id == id ? this : new WithExample(id, this.name, this.age); } public WithExample withName(final String name) { return this.name == name ? this : new WithExample(this.id, name, this.age); } public WithExample withAge(final Integer age) { return this.age == age ? this : new WithExample(this.id, this.name, age); } public WithExample(final Long id, final String name, final Integer age) { this.id = id; this.name = name; this.age = age; }}
@Getter(lazy=true)
当我们获取某一个属性比较消耗资源时,可以给@Getter添加 lazy=true 属性实现懒加载,会生成Double Check Lock 样板代码对属性进行懒加载。
/** * Created by macro on 2020/12/17. */public class GetterLazyExample { @Getter(lazy = true) private final double[] cached = expensive(); private double[] expensive() { double[] result = new double[1000000]; for (int i = 0; i < result.length; i++) { result[i] = Math.asin(i); } return result; } public static void main(String[] args) { //使用Double Check Lock 样板代码对属性进行懒加载 GetterLazyExample example = new GetterLazyExample(); System.out.println(example.getCached().length); }}
编译后Lombok会生成如下代码。
public class GetterLazyExample { private final AtomicReference<Object> cached = new AtomicReference(); public GetterLazyExample() { } private double[] expensive() { double[] result = new double[1000000]; for(int i = 0; i < result.length; ++i) { result[i] = Math.asin((double)i); } return result; } public double[] getCached() { Object value = this.cached.get(); if (value == null) { synchronized(this.cached) { value = this.cached.get(); if (value == null) { double[] actualValue = this.expensive(); value = actualValue == null ? this.cached : actualValue; this.cached.set(value); } } } return (double[])((double[])(value == this.cached ? null : value)); }}
@Log
使用@Log注解,可以直接生成日志对象log,通过log对象可以直接打印日志。
/** * Created by macro on 2020/12/17. */@Logpublic class LogExample { public static void main(String[] args) { log.info('level info'); log.warning('level warning'); log.severe('level severe'); }}
编译后Lombok会生成如下代码。
public class LogExample { private static final Logger log = Logger.getLogger(LogExample.class.getName()); public LogExample() { } public static void main(String[] args) { log.info('level info'); log.warning('level warning'); log.severe('level severe'); }}
@Slf4j
使用Lombok生成日志对象时,根据使用日志实现的不同,有多种注解可以使用。比如@Log、@Log4j、@Log4j2、@Slf4j等。
/** * Created by macro on 2020/12/17. */@Slf4jpublic class LogSlf4jExample { public static void main(String[] args) { log.info('level:{}','info'); log.warn('level:{}','warn'); log.error('level:{}', 'error'); }}
编译后Lombok会生成如下代码。
public class LogSlf4jExample { private static final Logger log = LoggerFactory.getLogger(LogSlf4jExample.class); public LogSlf4jExample() { } public static void main(String[] args) { log.info('level:{}', 'info'); log.warn('level:{}', 'warn'); log.error('level:{}', 'error'); }}Lombok原理
如果IDEA不安装Lombok插件的话,我们打开使用Lombok的项目是无法通过编译的。装了以后IDEA才会提示我们Lombok为我们生成的方法和属性。
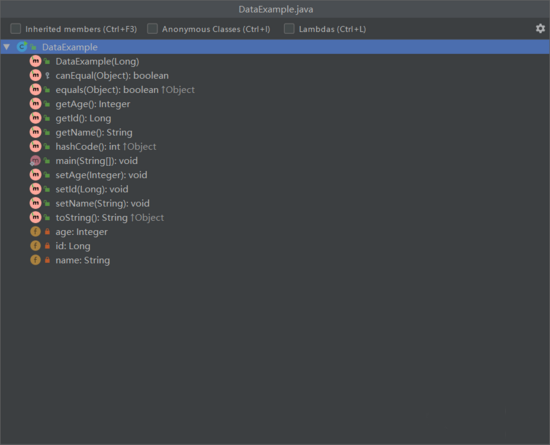
使用了@Data注解以后,查看类结构可以发现getter、setter、toString等方法。
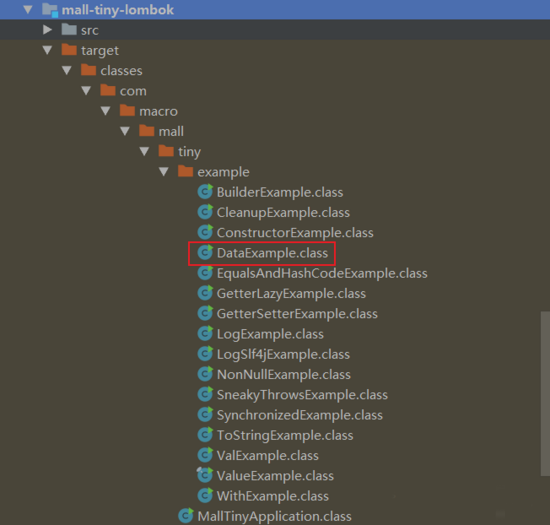
打开target目录下的 .class 文件,我们可以看到Lombok为我们生成的代码,可见Lombok是通过解析注解,然后在编译时生成代码来实现Java代码的功能增强的。
参考资料
官方文档:https://projectlombok.org/features/all
项目源码地址
https://github.com/macrozheng/mall-learning/tree/master/mall-tiny-lombok
到此这篇关于Lombok为啥这么牛逼?SpringBoot和IDEA官方都要支持它的文章就介绍到这了,更多相关Lombok SpringBoot和IDEA内容请搜索好吧啦网以前的文章或继续浏览下面的相关文章希望大家以后多多支持好吧啦网!
相关文章:
 网公网安备
网公网安备