Android Handler消息机制分析
Handler 是一个可以实现多线程间切换的类,通过 Handler 可以轻松地将一个任务切换到 Handler 所在的线程中去执行。我们最常用的使用的场景就是更新 UI 了,比如我们在子线程中访问网络,拿到数据后我们 UI 要做一些改变,如果此时我们直接访问 UI 控件,就会触发异常了。这个时候我们往往会通过 Handler 将更新 UI 的操作切换到主线程中。
Handler 的基本使用用法一:通过 send 方法public class MainActivity extends AppCompatActivity { private static final String TAG = 'MainActivity'; private MyHandler mMyHandler = new MyHandler(); @Override protected void onCreate(Bundle savedInstanceState) {super.onCreate(savedInstanceState);setContentView(R.layout.activity_main);new Thread(new Runnable() { @Override public void run() {Message message = Message.obtain(mMyHandler,0,'通过 send 方法');mMyHandler.sendMessage(message); }}).start(); } private static class MyHandler extends Handler{@Overridepublic void handleMessage(Message msg) { switch (msg.what){case 0: Toast.makeText(MainActivity.this,msg.obj.toString(),Toast.LENGTH_SHORT).show(); break; }} }}用法二:通过 post 方法
public class MainActivity extends AppCompatActivity { private static final String TAG = 'MainActivity'; private Handler mMyHandler = new Handler(); @Override protected void onCreate(Bundle savedInstanceState) {super.onCreate(savedInstanceState);setContentView(R.layout.activity_main);new Thread(new Runnable() { @Override public void run() {mMyHandler.post(new Runnable() { @Override public void run() {Toast.makeText(MainActivity.this,'通过post方法',Toast.LENGTH_SHORT).show(); }}); }}).start(); }}
其实,通过 post 方法最后通过 send 方法来完成的。这个我们稍后会分析。讲到 Handler,我们不得不提起 MessageQueue 类 和 Looper 类。 Handler 通过 send 方法 发送一个消息,会调用 MessageQueue 的 enqueueMessage 方法 将这个消息插入到 MessageQueue 中,然后 Looper 发现有消息来临时,通过一系列的方法调用后,Handler 如果是通过 post 方法就会执行 post 方法里面的 Runnable ,如果是通过 send 方法就会执行 Handler 的 handleMessage 。这么说感觉有点云里雾里的,让我们仔细的来看下 Handler 类、MessageQueue 类和 Looper 类。
Handler 类我们先来看下 Handler 类的结构
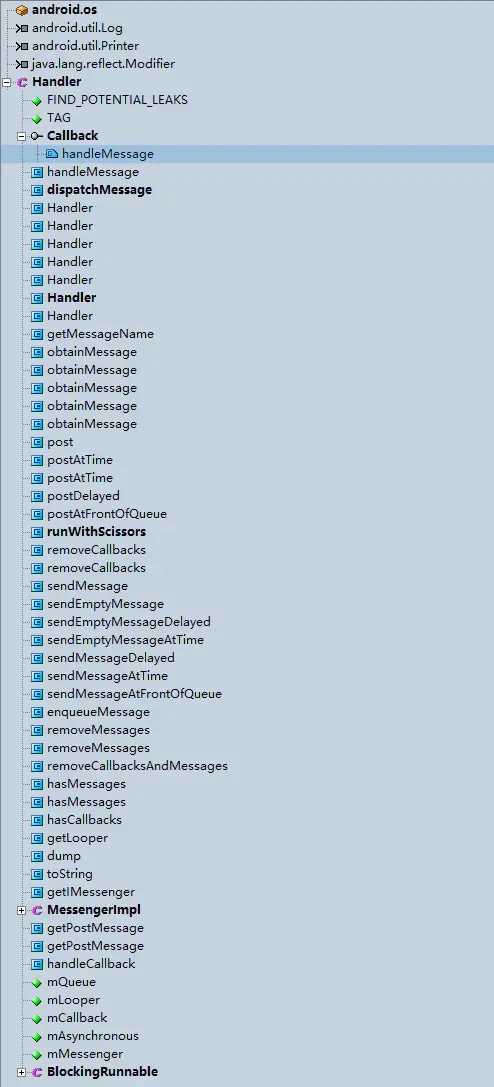 Handler 类结构.png
Handler 的工作主要包括消息的发送和接收过程。一般来说,消息的发送和消息的接收是位于不同的线程。我们首先来看 post 方法。
/** * Causes the Runnable r to be added to the message queue. * The runnable will be run on the thread to which this handler is * attached. * * @param r The Runnable that will be executed. * * @return Returns true if the Runnable was successfully placed in to the * message queue. Returns false on failure, usually because the * looper processing the message queue is exiting. */public final boolean post(Runnable r){ return sendMessageDelayed(getPostMessage(r), 0);}
这里调用了 sendMessageDelayed 方法
/** * Enqueue a message into the message queue after all pending messages * before (current time + delayMillis). You will receive it in * {@link #handleMessage}, in the thread attached to this handler. * * @return Returns true if the message was successfully placed in to the * message queue. Returns false on failure, usually because the * looper processing the message queue is exiting. Note that a * result of true does not mean the message will be processed -- if * the looper is quit before the delivery time of the message * occurs then the message will be dropped. */public final boolean sendMessageDelayed(Message msg, long delayMillis){ if (delayMillis < 0) {delayMillis = 0; } return sendMessageAtTime(msg, SystemClock.uptimeMillis() + delayMillis);}
而 sendMessageDelayed 又调用了 sendMessageAtTime() 方法
/** * Enqueue a message into the message queue after all pending messages * before the absolute time (in milliseconds) <var>uptimeMillis</var>. * <b>The time-base is {@link android.os.SystemClock#uptimeMillis}.</b> * Time spent in deep sleep will add an additional delay to execution. * You will receive it in {@link #handleMessage}, in the thread attached * to this handler. * * @param uptimeMillis The absolute time at which the message should be * delivered, using the * {@link android.os.SystemClock#uptimeMillis} time-base. * * @return Returns true if the message was successfully placed in to the * message queue. Returns false on failure, usually because the * looper processing the message queue is exiting. Note that a * result of true does not mean the message will be processed -- if * the looper is quit before the delivery time of the message * occurs then the message will be dropped. */public boolean sendMessageAtTime(Message msg, long uptimeMillis) { MessageQueue queue = mQueue; if (queue == null) {RuntimeException e = new RuntimeException(this + ' sendMessageAtTime() called with no mQueue');Log.w('Looper', e.getMessage(), e);return false; } return enqueueMessage(queue, msg, uptimeMillis);}
千呼万唤始出来,在 sendMessageAtTime 这个方法我们终于看到了 MessageQueue 类,这里的逻辑主要向 MessageQueue 中插入了一条消息(Message)。咦?我们不是通过 post 方法传进来的 Runnable 么?什么时候变成 Message 了?其实刚才我们忽略了一个方法。
public final boolean post(Runnable r){ return sendMessageDelayed(getPostMessage(r), 0);}
没错,就是 getPostMessage 方法
private static Message getPostMessage(Runnable r) { Message m = Message.obtain(); m.callback = r; return m;}
从这里看到,系统通过调用 Message.obtain() 创建一个 Message,并把我们通过 post 方法传进来的 Runnable 赋值给 Message 的 callback。这里的 callback 需要留意,这个在我们之后的分析会用到。接下里我们看 Handler 的 send 方法。
/** * Pushes a message onto the end of the message queue after all pending messages * before the current time. It will be received in {@link #handleMessage}, * in the thread attached to this handler. * * @return Returns true if the message was successfully placed in to the * message queue. Returns false on failure, usually because the * looper processing the message queue is exiting. */public final boolean sendMessage(Message msg){ return sendMessageDelayed(msg, 0);}
是不是很熟悉?post 方法也是调用这个 sendMessageDelayed 方法,这也是为什么我们之前说 post 方法 也是通过 send 方法来执行的。到此为止,我们已经弄懂 Handler 的消息发送过程。总结的来说,通过 post 方法系统会把 我们传进来的 Runnable 转变成 Message,然后就和 send 方法一样,通过一系列的方法调用之后把 Message 插入到 MessageQueue 当中。至于 Handler 的消息接收过程,我们暂且放一下,先来看 MessageQueue 类。
MessageQueue 类前面说到,Handler 发送消息的过程就是往 MessageQueue 中插入 一个 Message,即调用 MessageQueue 的 enqueueMessage 方法。首先,我们来看下 MessageQueue 的类结构
MessageQueue类结构.png
我们看到 MessageQueue 是比较简单的。其实,MessageQueue 主要包含两个操作:插入和读取。
插入方法:enqueueMessage
boolean enqueueMessage(Message msg, long when) { if (msg.target == null) {throw new IllegalArgumentException('Message must have a target.'); } if (msg.isInUse()) {throw new IllegalStateException(msg + ' This message is already in use.'); } synchronized (this) {if (mQuitting) { IllegalStateException e = new IllegalStateException( msg.target + ' sending message to a Handler on a dead thread'); Log.w('MessageQueue', e.getMessage(), e); msg.recycle(); return false;}msg.markInUse();msg.when = when;Message p = mMessages;boolean needWake;if (p == null || when == 0 || when < p.when) { // New head, wake up the event queue if blocked. msg.next = p; mMessages = msg; needWake = mBlocked;} else { // Inserted within the middle of the queue. Usually we don’t have to wake // up the event queue unless there is a barrier at the head of the queue // and the message is the earliest asynchronous message in the queue. needWake = mBlocked && p.target == null && msg.isAsynchronous(); Message prev; for (;;) {prev = p;p = p.next;if (p == null || when < p.when) { break;}if (needWake && p.isAsynchronous()) { needWake = false;} } msg.next = p; // invariant: p == prev.next prev.next = msg;}// We can assume mPtr != 0 because mQuitting is false.if (needWake) { nativeWake(mPtr);} } return true;}
读取方法:next
需要注意的是:读取操作本身会伴随着删除操作
Message next() { // Return here if the message loop has already quit and been disposed. // This can happen if the application tries to restart a looper after quit // which is not supported. final long ptr = mPtr; if (ptr == 0) {return null; } int pendingIdleHandlerCount = -1; // -1 only during first iteration int nextPollTimeoutMillis = 0; for (;;) {if (nextPollTimeoutMillis != 0) { Binder.flushPendingCommands();}nativePollOnce(ptr, nextPollTimeoutMillis);synchronized (this) { // Try to retrieve the next message. Return if found. final long now = SystemClock.uptimeMillis(); Message prevMsg = null; Message msg = mMessages; if (msg != null && msg.target == null) {// Stalled by a barrier. Find the next asynchronous message in the queue.do { prevMsg = msg; msg = msg.next;} while (msg != null && !msg.isAsynchronous()); } if (msg != null) {if (now < msg.when) { // Next message is not ready. Set a timeout to wake up when it is ready. nextPollTimeoutMillis = (int) Math.min(msg.when - now, Integer.MAX_VALUE);} else { // Got a message. mBlocked = false; if (prevMsg != null) {prevMsg.next = msg.next; } else {mMessages = msg.next; } msg.next = null; if (false) Log.v('MessageQueue', 'Returning message: ' + msg); return msg;} } else {// No more messages.nextPollTimeoutMillis = -1; } // Process the quit message now that all pending messages have been handled. if (mQuitting) {dispose();return null; } // If first time idle, then get the number of idlers to run. // Idle handles only run if the queue is empty or if the first message // in the queue (possibly a barrier) is due to be handled in the future. if (pendingIdleHandlerCount < 0 && (mMessages == null || now < mMessages.when)) {pendingIdleHandlerCount = mIdleHandlers.size(); } if (pendingIdleHandlerCount <= 0) {// No idle handlers to run. Loop and wait some more.mBlocked = true;continue; } if (mPendingIdleHandlers == null) {mPendingIdleHandlers = new IdleHandler[Math.max(pendingIdleHandlerCount, 4)]; } mPendingIdleHandlers = mIdleHandlers.toArray(mPendingIdleHandlers);}// Run the idle handlers.// We only ever reach this code block during the first iteration.for (int i = 0; i < pendingIdleHandlerCount; i++) { final IdleHandler idler = mPendingIdleHandlers[i]; mPendingIdleHandlers[i] = null; // release the reference to the handler boolean keep = false; try {keep = idler.queueIdle(); } catch (Throwable t) {Log.wtf('MessageQueue', 'IdleHandler threw exception', t); } if (!keep) {synchronized (this) { mIdleHandlers.remove(idler);} }}// Reset the idle handler count to 0 so we do not run them again.pendingIdleHandlerCount = 0;// While calling an idle handler, a new message could have been delivered// so go back and look again for a pending message without waiting.nextPollTimeoutMillis = 0; }}Looper 类
首先,我们也来看下 Looper 的类结构
Looper类结构.png
关于 Looper ,我们首先要明确一点,Looper 是线程相关的,即每个线程的 Looper 是不一样的,但是线程默认是没有 Looper 的。可能会有点绕,要理清这里面的逻辑的关系,我们首先要了解 ThreadLocal,关于 ThreadLocal 网上的资料挺多的。简单地来说,ThreadLocal 是一个线程内部的数据存储类,比如有有一个 int 类型的 x,在线程 A 的值是 1,在线程 B 的值可以是 0,1,2,..,在线程 C 的值可以是 0,1,2... 我们来看下 Looper 相关的源码
// sThreadLocal.get() will return null unless you’ve called prepare().static final ThreadLocal<Looper> sThreadLocal = new ThreadLocal<Looper>();private static void prepare(boolean quitAllowed) { if (sThreadLocal.get() != null) {throw new RuntimeException('Only one Looper may be created per thread'); } sThreadLocal.set(new Looper(quitAllowed));}/** * Return the Looper object associated with the current thread. Returns * null if the calling thread is not associated with a Looper. */public static Looper myLooper() { return sThreadLocal.get();}
我们为什么要明确 Looper 是线程相关的呢?因为 Handler 创建的时候会采用当前线程的 Looper 来构造消息循环系统的。Handler 创建的时候要先创建 Looper,这时候疑问就来了?我们平常创建 Handler 的时候直接就创建了啊,没有创建什么 Looper 啊。这是因为我们通常是在主线程 ActivityThread 中创建 Handler。我们看到 Loop 类中有个 prepareMainLooper 方法。
/** * Initialize the current thread as a looper, marking it as an * application’s main looper. The main looper for your application * is created by the Android environment, so you should never need * to call this function yourself. See also: {@link #prepare()} */public static void prepareMainLooper() { prepare(false); synchronized (Looper.class) {if (sMainLooper != null) { throw new IllegalStateException('The main Looper has already been prepared.');}sMainLooper = myLooper(); }}
主线程在创建时,就会调用这个方法创建 Looper。但是如果我们在子线程(如下代码)直接创建 Handler 就会抛出异常
new Thread(new Runnable() { @Override public void run() {//Looper.prepare();Handler handler = new Handler(); // Looper.loop(); }}).start();
这时只要我们把注释去掉就不会报异常了。通过源码我们知道 Looper.prepare() 主要是为当前线程一个 Looper 对象。
/** Initialize the current thread as a looper. * This gives you a chance to create handlers that then reference * this looper, before actually starting the loop. Be sure to call * {@link #loop()} after calling this method, and end it by calling * {@link #quit()}. */public static void prepare() { prepare(true);}private static void prepare(boolean quitAllowed) { if (sThreadLocal.get() != null) {throw new RuntimeException('Only one Looper may be created per thread'); } sThreadLocal.set(new Looper(quitAllowed));}
那么,Looper.loop()方法是干什么的呢?其实,Looper 最重要的一个方法就是 loop 方法了。只有调用 loop 后,消息系统才会真正地起作用。我们来看 loop 方法
/** * Run the message queue in this thread. Be sure to call * {@link #quit()} to end the loop. */public static void loop() { final Looper me = myLooper(); if (me == null) {throw new RuntimeException('No Looper; Looper.prepare() wasn’t called on this thread.'); } final MessageQueue queue = me.mQueue; // Make sure the identity of this thread is that of the local process, // and keep track of what that identity token actually is. Binder.clearCallingIdentity(); final long ident = Binder.clearCallingIdentity(); for (;;) {Message msg = queue.next(); // might blockif (msg == null) { // No message indicates that the message queue is quitting. return;}// This must be in a local variable, in case a UI event sets the loggerPrinter logging = me.mLogging;if (logging != null) { logging.println('>>>>> Dispatching to ' + msg.target + ' ' + msg.callback + ': ' + msg.what);}msg.target.dispatchMessage(msg);if (logging != null) { logging.println('<<<<< Finished to ' + msg.target + ' ' + msg.callback);}// Make sure that during the course of dispatching the// identity of the thread wasn’t corrupted.final long newIdent = Binder.clearCallingIdentity();if (ident != newIdent) { Log.wtf(TAG, 'Thread identity changed from 0x' + Long.toHexString(ident) + ' to 0x' + Long.toHexString(newIdent) + ' while dispatching to ' + msg.target.getClass().getName() + ' ' + msg.callback + ' what=' + msg.what);}msg.recycleUnchecked(); }}
我们可以看到 loop 方法是一个死循环,在这个死循环方法里面会调用 MessageQueue 的 next 方法来获取新消息。但是如果 next 方法返回了 null,loop 就退出循环。这种情况发生在 Loop 的 quit 方法被调用时,Looper 会 调用 MessageQueue 的 quit 方法来通知消息队列退出,当消息队列被标记退出状态时,它的 next 方法就会返回 null。由于 next 是一个阻塞方法,所以 loop 也会一直阻塞在那里,如果有消息到来, msg.target.dispatchMessage(msg)。这个 msg.target 就是发送这个消息的 Handler 对象啦。这样 Handler 发送的消息最终又交给自己的 dispatchMessage 方法来处理了。因为 Handler 的 dispatchMessage 方法是创建 Handler 时使用的 Looper 中执行的,这样就成功地完成线程切换了。
Handler 的消息接收过程经过跋山涉水,通过 Handler 发送的消息最终又会回到自己的 diapatchMessage 中来,那就让我们来看下 diapatchMessage 方法。
/** * Handle system messages here. */public void dispatchMessage(Message msg) { if (msg.callback != null) {handleCallback(msg); } else {if (mCallback != null) { if (mCallback.handleMessage(msg)) {return; }}handleMessage(msg); }}
首先,检查 Messgae 的 callback 是否为 null,不为 null 就调用 handleCallback 方法,这个 Message 的 callback 就是我们之前post的。其次,检查 mCallback 是否为 null ,不为 null 就调用 mCallback 的 handleMessage 方法来处理消息。如果我们是通过继承 Handler 来实现逻辑的话,此时的mCallback 是为空的,即会调用 handleMessage(msg),也就是我们重写的 handleMessage 方法。至此,完成了完美的闭环。
有的同学可能会疑问 mCallback 是什么?什么时候会为空?
/** * Callback interface you can use when instantiating a Handler to avoid * having to implement your own subclass of Handler. * * @param msg A {@link android.os.Message Message} object * @return True if no further handling is desired */public interface Callback { public boolean handleMessage(Message msg);} /** * Constructor associates this handler with the {@link Looper} for the * current thread and takes a callback interface in which you can handle * messages. * * If this thread does not have a looper, this handler won’t be able to receive messages * so an exception is thrown. * * @param callback The callback interface in which to handle messages, or null. */public Handler(Callback callback) { this(callback, false);}
通过源码可以看出,我们也可以采用 Handler handler = new Handler(callback) 来创建 Handler,这时dispatchMessage 里面就会走 mCallback 不为空的逻辑。
到此这篇关于Android Handler消息机制分析的文章就介绍到这了,更多相关Android Handler消息机制内容请搜索好吧啦网以前的文章或继续浏览下面的相关文章希望大家以后多多支持好吧啦网!
相关文章:

 网公网安备
网公网安备