js canvas实现滑块验证
本文实例为大家分享了js canvas实现滑块验证的具体代码,供大家参考,具体内容如下
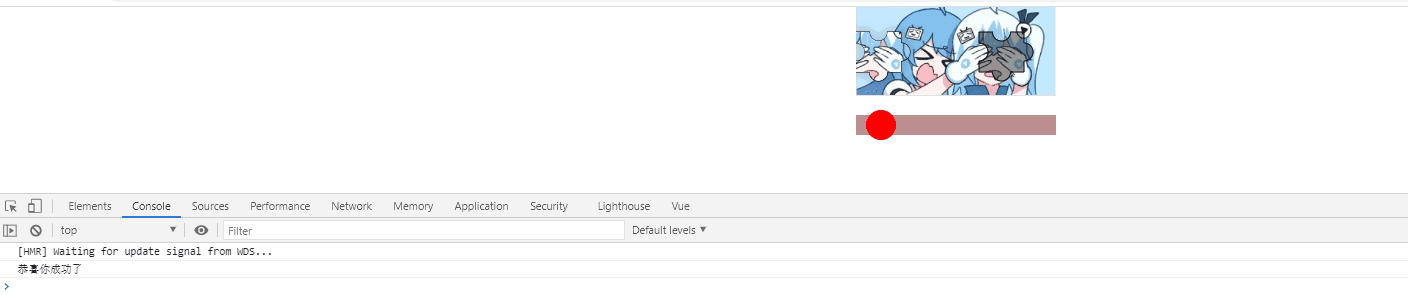
滑块验证
话不多说先上代码想用的小伙伴可以直接使用,想了解的我后面会说下我的思路
<template> <div class='sliderContent'> <div :style='’width:’ + width + ’px;’'> <canvas : : :height='height'></canvas> <canvas : : : : ></canvas> </div> <div :style='’width:’ + width + ’px’'> <div @mousedown.stop='moveBall($event)'> <div : ></div> </div> </div> </div></template><script>export default { data() { return { width: 200,//盒子的宽度 height: 200,//盒子的高度,当设置图片原比例显示的时候这个参数就不好使了 id: new Date().getTime(), r: 9, //半圆的半径 w: 40, //滑块的宽度 imgOriginalScale: true, //图片是否显示原来比例 sliderLeft: 0,//滑块的初始位置 rangeValue:4,//当滑块到什么范围内算正确 imgsrc:require('../assets/img/ver-2.png')//引入你想要的背景图片 }; }, mounted() { this.init(); }, methods: { init() { this.loadImage(); }, loadImage() {//加载图片 let mainDom = document.getElementById(this.id); let bg = mainDom.getContext('2d'); let blockDom = document.getElementById(this.id + 'sliderBlock'); let block = blockDom.getContext('2d'); let imgsrc = this.imgsrc; let img = document.createElement('img'); img.style.objectFit = 'scale-down'; img.src = imgsrc; img.onload = () => { if (this.imgOriginalScale) { //根据图片的尺寸变化计算一下图片原来的比例 mainDom.height = (img.height / img.width) * mainDom.width; blockDom.height = (img.height / img.width) * blockDom.width; } bg.drawImage(img, 0, 0, mainDom.width, mainDom.height); this.drawBlock(bg, mainDom.width, mainDom.height, 'fill'); //绘制滑块部分 this.drawBlock(block, blockDom.width, blockDom.height, 'clip', img); //绘制滑块部分 这里注意一定要先剪裁然后在绘制图片(这里图片要传进去不然没有办法控制) }; }, drawBlock(ctx, width, height, type, img) {//这里是二合一函数,可以画出阴影部分也切割出拼图形状的函数 let { w, r, sliderLeft } = this; //这地方用随机数每次显示的位置都不同 var x = this.random(30, width - w - r - 1); //这里最大值为了不让滑块进入隐藏所以要减去滑块的宽度 有个半圆所以要减去半圆位置 var y = this.random(10, height - w - r - 1); if (type == 'clip') {//这里要保证在两个东西要在同一个y值上 x = sliderLeft; y = this.y; } else { this.x = x; this.y = y; } let PI = Math.PI; //绘制 ctx.beginPath(); //left ctx.moveTo(x, y); //top ctx.arc(x + (w + 5) / 2, y, r, -PI, 0, true); ctx.lineTo(x + w + 5, y); //right ctx.arc(x + w + 5, y + w / 2, r, 1.5 * PI, 0.5 * PI, false); ctx.lineTo(x + w + 5, y + w); //bottom ctx.arc(x + (w + 5) / 2, y + w, r, 0, PI, false); ctx.lineTo(x, y + w); ctx.arc(x, y + w / 2, r, 0.5 * PI, 1.5 * PI, true); ctx.lineTo(x, y); if (type == 'clip') { ctx.shadowBlur = 10; ctx.shadowColor = 'black'; } ctx.lineWidth = 1; ctx.fillStyle = 'rgba(0, 0, 0, 0.4)'; //设置背景颜色 ctx.stroke(); ctx[type](); if (img) { ctx.drawImage(img, -this.x, 0, width, height); } ctx.globalCompositeOperation = 'xor'; }, random(min, max) { return parseInt(Math.floor(Math.random() * (max - min)) + min); }, moveBall(e) {//当点击小红球的时候 var oldx = e.pageX; document.onmousemove = (e) => {//这里要绑定document对象不然你离开的他就不动了 var x = e.pageX; if(this.sliderLeft+x-oldx<=0){//这里判断左边界 this.sliderLeft = 0; }else if(this.sliderLeft+x-oldx>=this.width-this.r*2-this.w){//这里判断右边界 this.sliderLeft = this.width-this.r*2-this.w; }else{ this.sliderLeft += x - oldx; } oldx = x; }; this.laveBall(); }, laveBall() {//鼠标松开的时候清空状态 document.onmouseup = ()=> { document.onmousemove = null; if(this.sliderLeft<(this.x+this.rangeValue)&&this.sliderLeft>(this.x-this.rangeValue)){ console.log('恭喜你成功了') }else{//当没用选中的时候重置一下滑块的位置 this.sliderLeft = 0; } }; }, },};</script><style lang='scss' scoped>.moveSLider { position: relative; margin: 0 auto; height: 50px; .react { .yuan { position: absolute; left: 0; top: 50%; transform: translate(0, -50%); width: 30px; height: 30px; background-color: red; border-radius: 50%; cursor: pointer; } position: absolute; left: 0; top: 50%; transform: translate(0, -50%); width: 100%; height: 20px; background-color: rosybrown; }}.imgDev { position: relative; margin: 0 auto; .slider { position: absolute; left: 0; top: 0; background-color: transparent; }}</style>
这里我总结了下我遇到的难点
1.在开始的时候我不知道怎么画这个拼图的形状,后来百度发现其实很简单,就是用半圆和线拼接起来形成的图形就是拼图的形状
2.怎么能把一个图片只显示拼图那一块呢,这也非常简单就是用ctx.clip()这个函数就可以实现,这里需要注意的是,你要先剪裁然后再加载图片在canvas中不然他就无法剪裁。
关键代码
drawBlock(ctx, width, height, type, img) {//这里是二合一函数,可以画出阴影部分也切割出拼图形状的函数 let { w, r, sliderLeft } = this;//w宽度,r圆的半径sliderLeft是滑块的初始位置 //这地方用随机数每次显示的位置都不同 var x = this.random(30, width - w - r - 1); //这里最大值为了不让滑块进入隐藏所以要减去滑块的宽度 有个半圆所以要减去半圆位置 var y = this.random(10, height - w - r - 1); if (type == 'clip') {//这里要保证在两个东西要在同一个y值上 x = sliderLeft; y = this.y; } else { this.x = x; this.y = y; } let PI = Math.PI; //绘制 ctx.beginPath(); //left ctx.moveTo(x, y); //top ctx.arc(x + (w + 5) / 2, y, r, -PI, 0, true); ctx.lineTo(x + w + 5, y); //right ctx.arc(x + w + 5, y + w / 2, r, 1.5 * PI, 0.5 * PI, false); ctx.lineTo(x + w + 5, y + w); //bottom ctx.arc(x + (w + 5) / 2, y + w, r, 0, PI, false); ctx.lineTo(x, y + w); ctx.arc(x, y + w / 2, r, 0.5 * PI, 1.5 * PI, true); ctx.lineTo(x, y); if (type == 'clip') { ctx.shadowBlur = 10; ctx.shadowColor = 'black'; } ctx.lineWidth = 1; ctx.fillStyle = 'rgba(0, 0, 0, 0.4)'; //设置背景颜色 ctx.stroke(); ctx[type](); if (img) {//这里为什么要在这里加载图片呢,因为这个高度是动态的必须计算完之后在放进去 //还有个原因是你要先剪裁在加载图片 ctx.drawImage(img, -this.x, 0, width, height); }},
以上就是本文的全部内容,希望对大家的学习有所帮助,也希望大家多多支持好吧啦网。
相关文章:
 网公网安备
网公网安备