IDEA MyBatis Plugins自动生成实体类和mapper.xml
前言
如何下载和使用MyBatis Generator 插件,只说代码,不讲感情。如果有问题还请多多指点。
开发环境
开发工具:IntelliJ IDEA 2018.1.1 x64 dk版本:1.8.0_171 工程构建工具:maven 版本3.2.5 数据库 mysqlIDEA 下载MyBatis Generator 插件
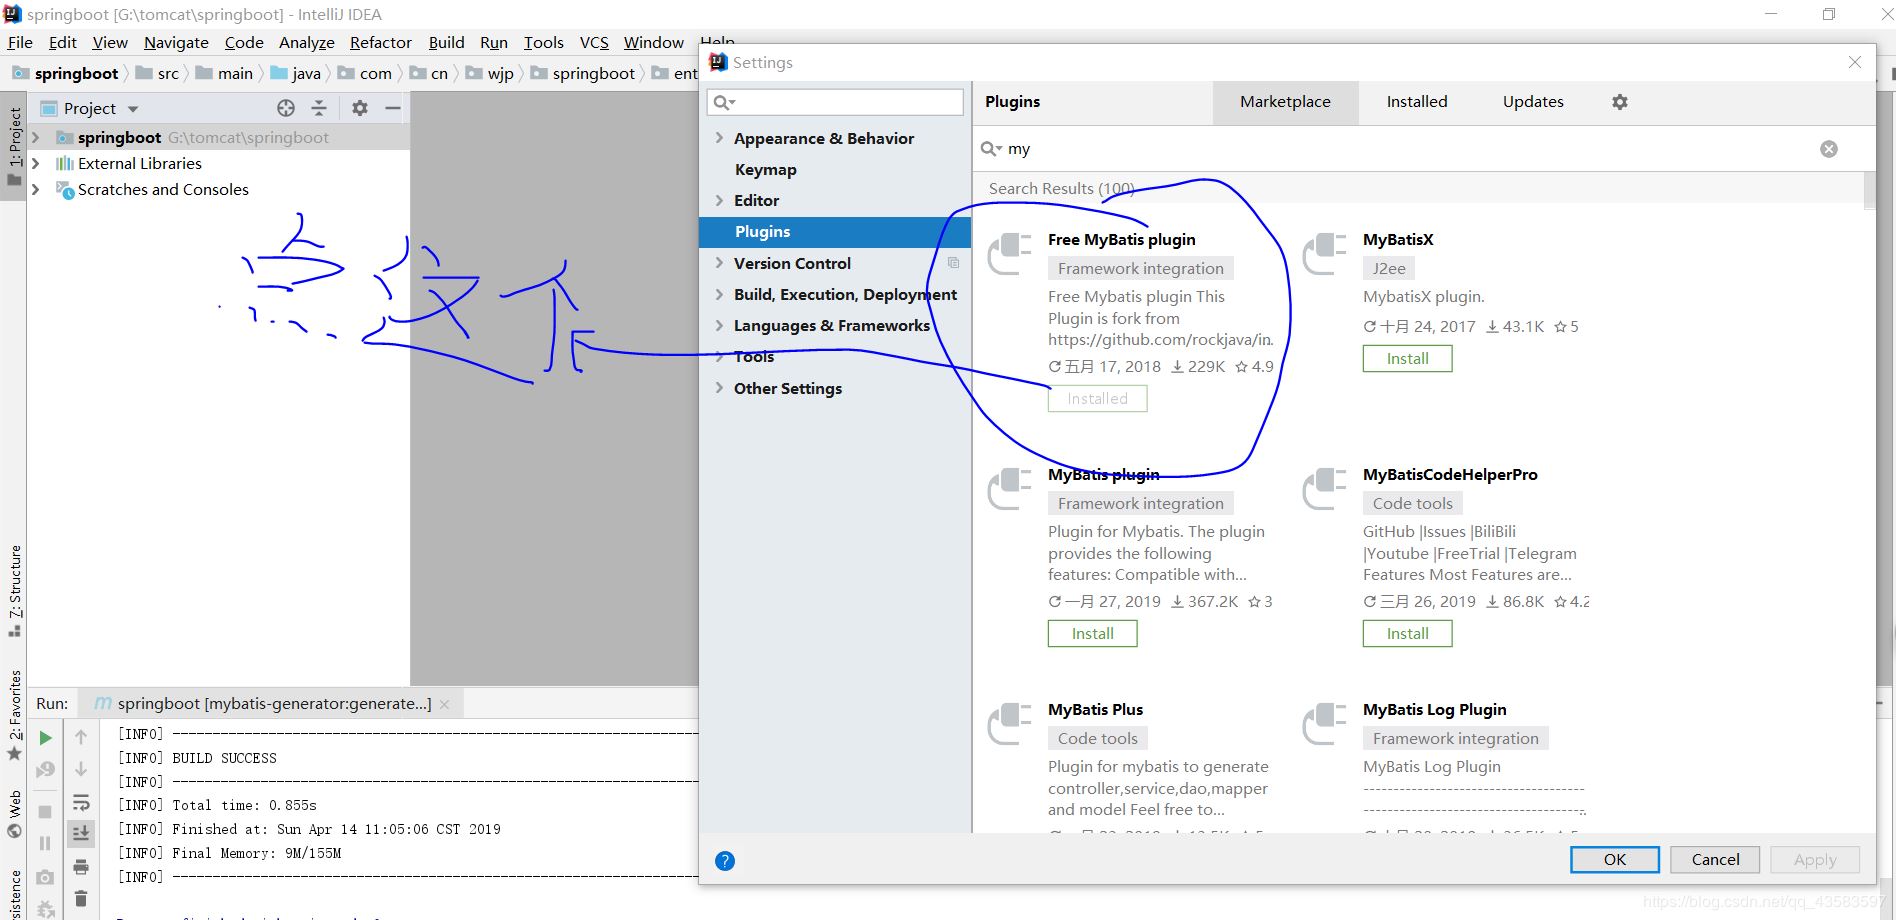
1.首先在File——Settings——点击Plugins,搜索框中搜索mybatis,选择mybatis-plugins,点击安装(由于我的已经安装过,所以没有绿色的Install按钮,而变成了instleaed,)安装完成后点击图片上那个位置的按钮(我忘了他叫什么了)之后会让你重启IDEA :
修改maven的pom文件
(注意此处是以plugin的方式,要放在plugins /plugins 里面)
<plugins> <!-- mybatis generator 自动生成代码插件 --> <plugin><groupId>org.mybatis.generator</groupId><artifactId>mybatis-generator-maven-plugin</artifactId><version>1.3.5</version><configuration> <!--配置文件的位置--> <configurationFile>src/main/resources/generatorConfig.xml</configurationFile> <overwrite>true</overwrite> <verbose>true</verbose></configuration> </plugin> </plugins>
新建一个generatorConfig.xml
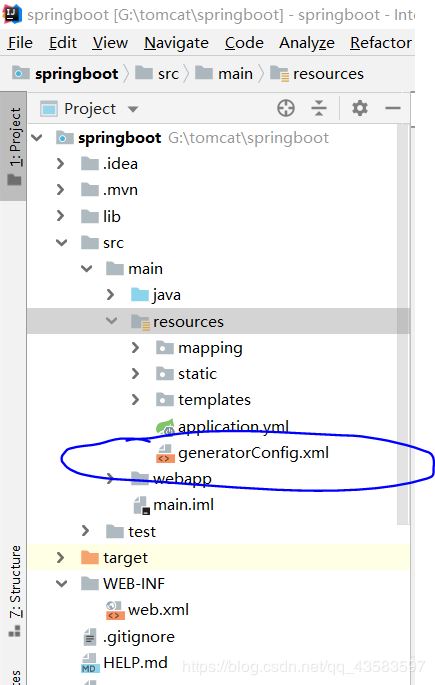
放入下方代码,报错的话请往下看
<?xml version='1.0' encoding='UTF-8'?><!DOCTYPE generatorConfiguration PUBLIC '-//mybatis.org//DTD MyBatis Generator Configuration 1.0//EN' 'http://mybatis.org/dtd/mybatis-generator-config_1_0.dtd'><generatorConfiguration> <!-- 数据库驱动:选择你的本地硬盘上面的数据库驱动包--> <classPathEntry location='G:lianjieshujukuqudonglibmysql-connector-java-5.1.45-bin.jar'/> <context targetRuntime='MyBatis3'> <commentGenerator> <property name='suppressDate' value='true'/> <!-- 是否去除自动生成的注释 true:是 : false:否 --> <property name='suppressAllComments' value='true'/> </commentGenerator> <!--数据库链接URL,用户名、密码 --> <jdbcConnection driverClass='com.mysql.jdbc.Driver' connectionURL='jdbc:mysql://127.0.0.1/xx' userId='root' password='root'> </jdbcConnection> <javaTypeResolver> <property name='forceBigDecimals' value='false'/> </javaTypeResolver> <!-- 生成模型的包名和位置--> <javaModelGenerator targetPackage='com.cn.wjp.springboot.entity' targetProject='src/main/java'> <property name='enableSubPackages' value='true'/> <property name='trimStrings' value='true'/> </javaModelGenerator> <!-- 生成映射文件的包名和位置--> <sqlMapGenerator targetPackage='main.resources.mapping' targetProject='src'> <!-- enableSubPackages:是否让schema作为包的后缀 --> <property name='enableSubPackages' value='false' /> </sqlMapGenerator> <!-- 生成DAO的包名和位置--> <javaClientGenerator type='XMLMAPPER' targetPackage='com.cn.wjp.springboot.dao' targetProject='src/main/java'> <property name='enableSubPackages' value='true'/> </javaClientGenerator> <!-- 要生成的表 tableName是数据库中的表名或视图名 domainObjectName是实体类名--> <table tableName='sc'domainObjectName='sc'enableCountByExample='false'enableUpdateByExample='false'enableDeleteByExample='false'enableSelectByExample='false'selectByExampleQueryId='false'> </table> </context></generatorConfiguration>
generatorConfig.xml中的注意事项xmlns报红报错

解决办法如下
file?>settings…?>languages & frameworks?>Schemas and DTDs?>点击右边的加号
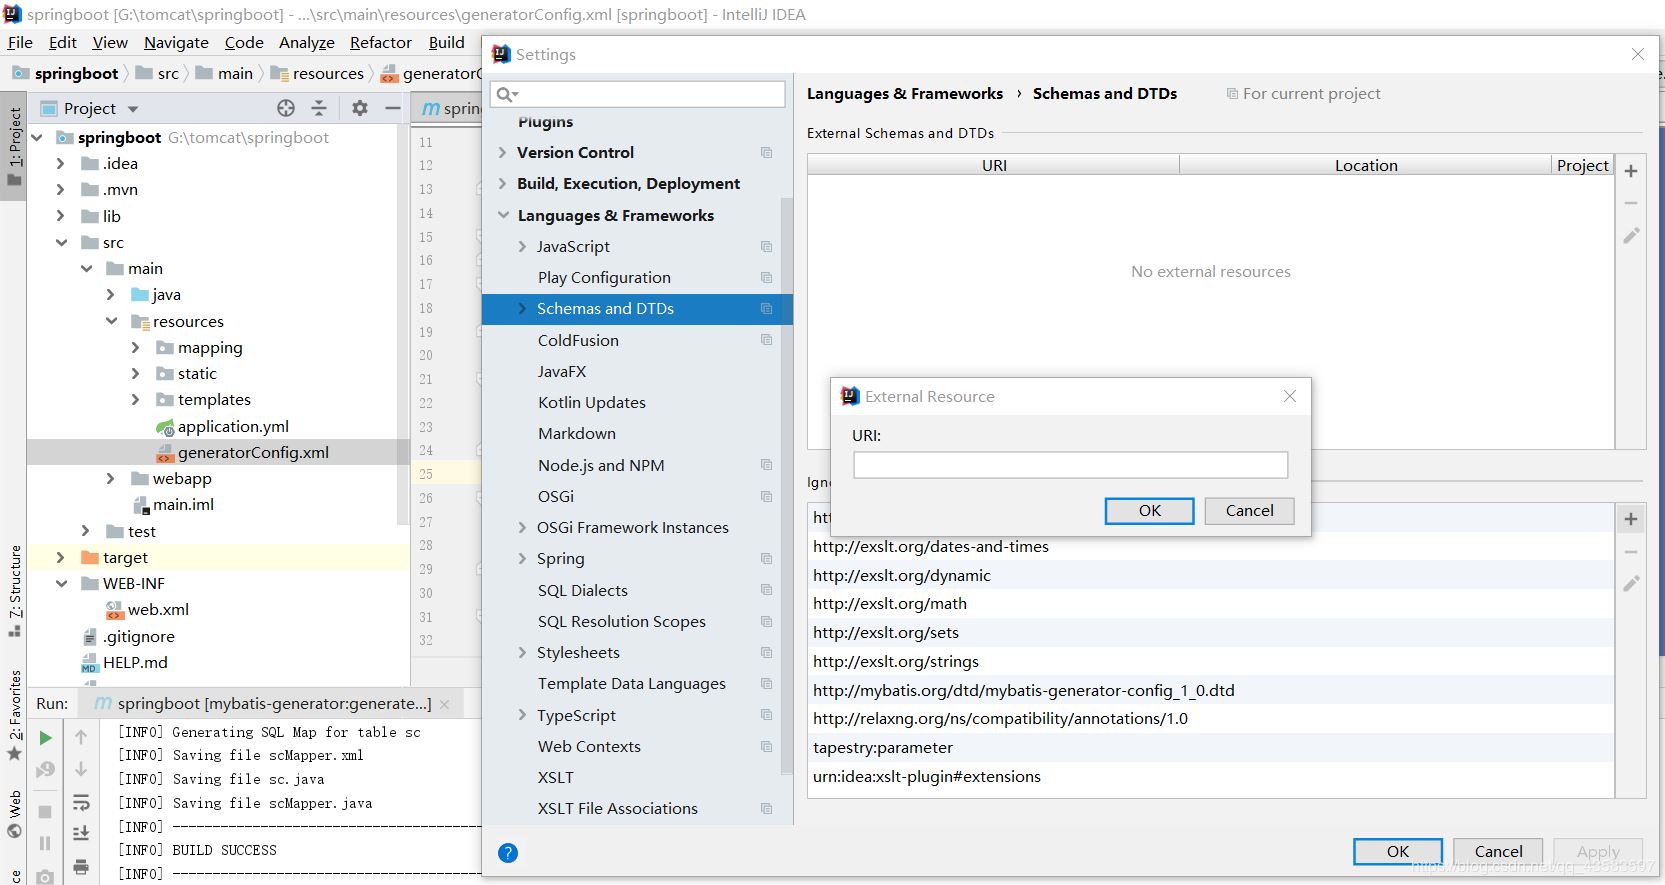
那个xmlns报红就添加那个URl数据库驱动:选择你的本地硬盘上面的数据库驱动包
数据驱动包找不到在哪里的话在下载一个,放到哪里看你心情喽。这里只要这个驱动包的位置真的找不到的话,这里有一个。
https://www.jb51.net/softs/214141.html
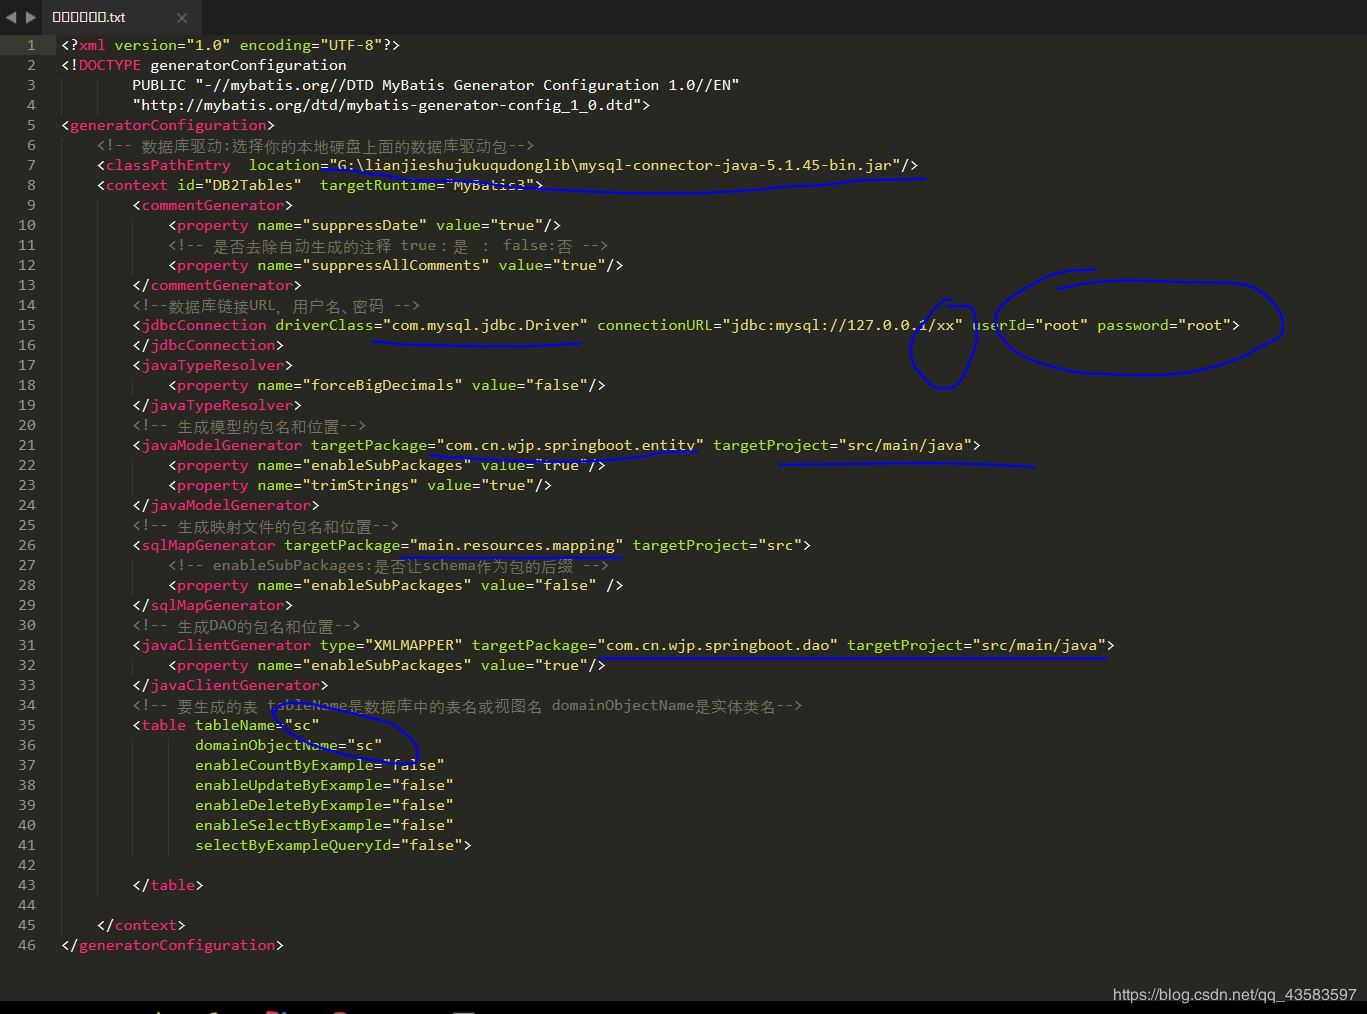
3.配置文件中需要修改的地方
运行

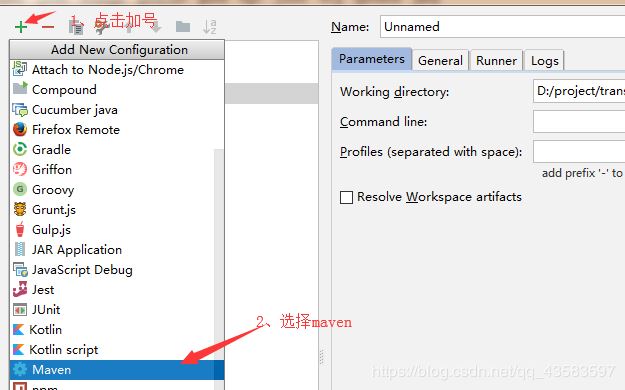
Commang line:中的命令要输入进去
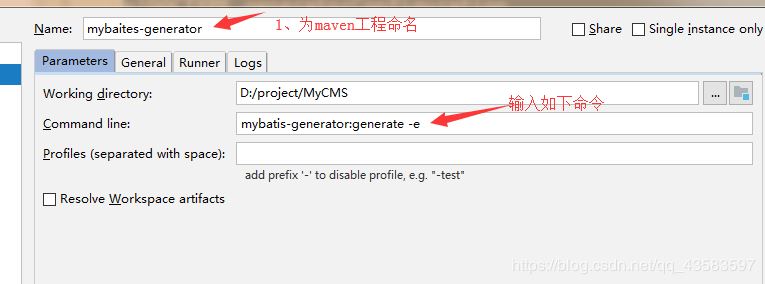

到此这篇关于IDEA MyBatis Plugins自动生成实体类和mapper.xml的文章就介绍到这了,更多相关IDEA MyBatis Plugins自动生成 内容请搜索好吧啦网以前的文章或继续浏览下面的相关文章希望大家以后多多支持好吧啦网!
相关文章:

 网公网安备
网公网安备