Django实现分页功能
Django 分页功能的实现,供大家参考,具体内容如下
创建项目创建APP,添加APP这些就不在多说我们这次重点来看到视图函数
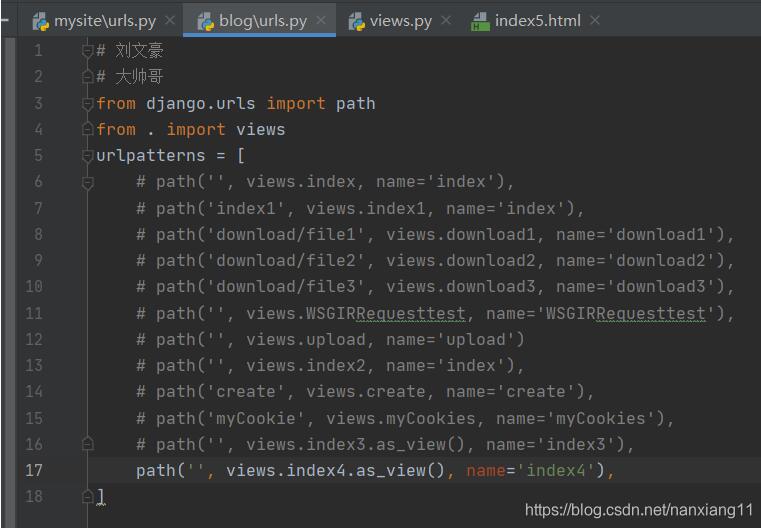
下面是路由设置
视图函数继承TemplateView
views.py
class index4(ListView): template_name = ’index5.html’ # 设置模板文件以至于找到该模板文件 extra_context = {’title’: ’人员信息表’} # 设置响应内容 queryset = PersonInfo.objects.all() # 设置查询模型查询所有信息 paginate_by = 1 # 每页展示的数据 context_object_name = ’personInfo’ # 设置模板名称
接下来就是HTML模板的编写
index5.py
<!DOCTYPE html><html lang='en'><head> <meta charset='UTF-8'> <title>{{ title }}</title></head><body><h1>{{ title }}</h1><table border='8'> {% for i in personInfo %} <tr> <th>{{ i.name }}</th> <th>{{ i.age }}</th> </tr> {%endfor%}</table><br>{% if is_paginated %}<div class='pagination'> <span class='page-links'> {% if page_obj.has_previous %} <a href='https://www.haobala.com/?page={{ page_obj.previous_page_number }}' >上一页</a> {% endif %} {% if page_obj.has_next %} <a href='https://www.haobala.com/?page={{ page_obj.next_page_number }}' >下一页</a> {% endif %} <br> <br> <span class='page-current'> 第{{ page_obj.number }}页 共{{ page_obj.paginator.num_pages }}页 </span> </span></div>{% endif %}</body></html>
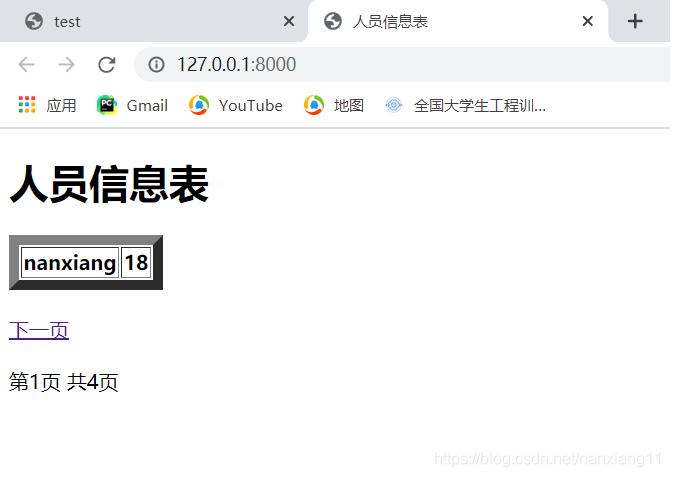
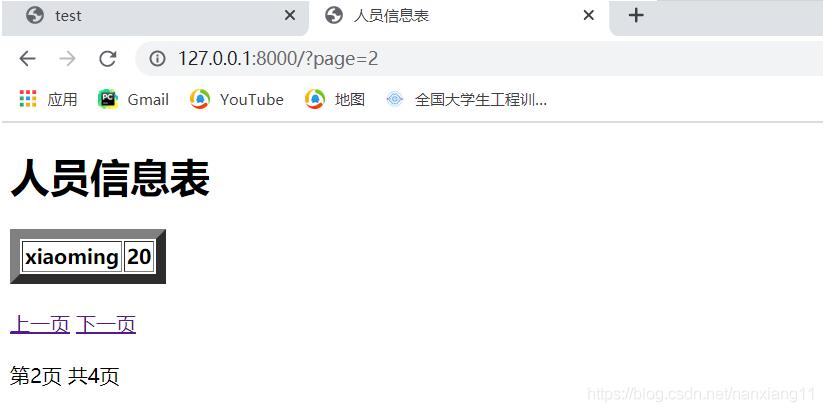
运行功能图片

以上就是本文的全部内容,希望对大家的学习有所帮助,也希望大家多多支持好吧啦网。
相关文章:
 网公网安备
网公网安备