Django celery异步任务实现代码示例
最近项目中用到celery很多,Django快速接入celery,这里给份教程。
准备
pip安装celery、flower、eventlet
快速接入
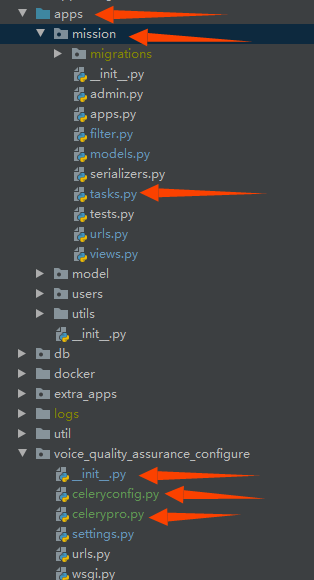
1.项目目录的__init__文件
from __future__ import absolute_import# This will make sure the app is always imported when# Django starts so that shared_task will use this app.from .celerypro import app as celery_app
2.celerypro.py文件
from __future__ import absolute_importimport osfrom celery import Celeryfrom django.conf import settings# set the default Django settings module for the ’celery’ program.os.environ.setdefault(’DJANGO_SETTINGS_MODULE’, ’voice_quality_assurance_configure.settings’) #修改项目配置文件的地址app = Celery(’voice_quality_assurance_configure’) #修改项目目录名称# Using a string here means the worker will not have to# pickle the object when using Windows.app.config_from_object(’voice_quality_assurance_configure.celeryconfig’) #修改celery配置文件的地址app.autodiscover_tasks(lambda: settings.INSTALLED_APPS)
3.celeryconfig.py文件,更多配置项,可以查看官方文档。
from kombu import QueueBROKER_URL = ’amqp://用户名:密码@ip:5672’# 指定 BrokerCELERY_RESULT_BACKEND = ’rpc://用户名:密码@ip:5672’# 指定 BackendCELERY_TIMEZONE=’Asia/Shanghai’# 指定时区,默认是 UTCCELERY_TASK_SERIALIZER = ’pickle’CELERY_RESULT_SERIALIZER = ’pickle’CELERY_ACCEPT_CONTENT = [’pickle’, ’json’]CELERY_IGNORE_RESULT = True# CELERY_TIMEZONE=’UTC’CELERY_IMPORTS = ( # 指定导入的任务模块 ’apps.mission.tasks’)CELERY_QUEUES = ( Queue(’default’, routing_key=’default’), #声明队列和对应路由键 Queue(’worker_queue’, routing_key=’worker’), #声明队列和对应路由键)CELERY_ROUTES = { ’apps.mission.tasks.createsingletask’: {’queue’: ’worker_queue’, ’routing_key’: ’worker’},}
app代码如何使用
app下新建tasks.py文件,名字一定要是tasks。(我这里是mission app下的tasks.py)
from celery import shared_task@shared_task()def createsingletask(): print(test)
app下views调用如下:(我这里是mission app下的views.py)
from .tasks import createsingletask
createsingletask.apply_async(())
快速测试和监控
启动多个celery worker,-A 指定项目目录, -P 指定方式,我这里以协程方式运行, -n指定name
celery worker -A voice_quality_assurance_configure --loglevel=info -P eventlet -n worker1celery worker -A voice_quality_assurance_configure --loglevel=info -P eventlet -n worker2celery worker -A voice_quality_assurance_configure --loglevel=info -P eventlet -n worker3celery worker -A voice_quality_assurance_configure --loglevel=info -P eventlet -n worker4celery worker -A voice_quality_assurance_configure --loglevel=info -P eventlet -n worker5
启动flower监控
celery flower --broker=amqp://用户名:密码@ip:5672 --broker-api=http://用户名:密码@ip:15672/api/
查看监控,注意这里的监控数据是不持久化的。
以上就是本文的全部内容,希望对大家的学习有所帮助,也希望大家多多支持好吧啦网。
相关文章:
 网公网安备
网公网安备