您的位置:首页技术文章
文章详情页

MySQL数据读写分离MaxScale相关配置

浏览:2日期:2023-06-28 19:41:17
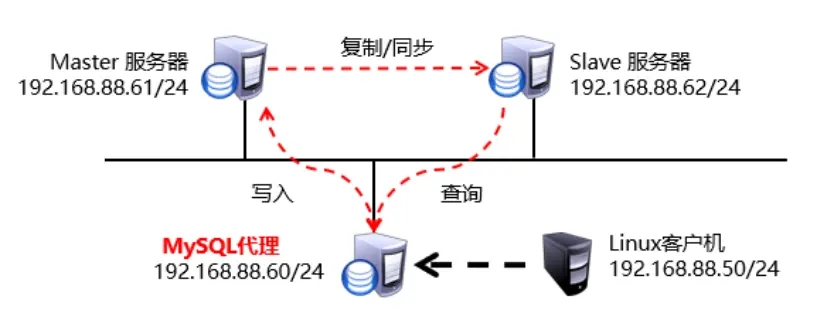
目录一、概念:二、实现读写分离的拓扑图:三、MaxScale相关配置:四、读写分离的配置流程:五、实操:第一步:配置Mysql服务器一主一从第二步:配置代理服务器(读写分离服务器)第三步:启动读写分离服务第四步:测试配置读写分离服务的配置第五步:验证补充说明一、概念:MySQL数据读写分离是存储数据的一种服务架构执行select命令必须连接 slave角色服务器执行insert命令必须连接 maste角色服务器提供数据读写分离功能的中间件软件有: mysql-proxy maxscale mycat拓扑架构只支持一主一从或者一主多从架构二、实现读写分离的拓扑图:

三、MaxScale相关配置:指令/路径/...说明maxscale-2.1.2-1.rhel.7.x86_64.rpm软件包/etc/maxscale.cnf主配置文件maxscale /etc/maxscale.cnf启动服务/var/log/maxscale/maxscale.log日志路径(可查看报错信息)4006读写分离服务使用端口号4016管理服务使用端口号四、读写分离的配置流程:配置Mysql服务器一主一从配置代理服务器(读写分离服务器)启动读写分离服务客户机50测试配置读写分离服务的配置五、实操:第一步:配置Mysql服务器一主一从把host61配置为master数据库服务器[root@host61 ~]# vim /etc/my.cnf[mysqld]Server_id = 61log_bin=master61:wq[root@host61 ~]# systemctl restart mysqld[root@host61 ~]# mysql -uroot –p123qqq...AMysql> grant replication slave on *.* to repluser@'%' identified by '123qqq...A';Mysql> show master status ;+-----------------+----------+--------------+------------------+-------------------+| File | Position | Binlog_Do_DB | Binlog_Ignore_DB | Executed_Gtid_Set |+-----------------+----------+--------------+------------------+-------------------+| master61.000001 | 441 | | | |+-----------------+----------+--------------+------------------+-------------------+1 row in set (0.00 sec)把host62 配置为slave数据库服务器[root@host62 ~]# vim /etc/my.cnf[mysqld]Server_id = 62:wq[root@host62 ~]# systemctl restart mysqld[root@host62 ~]# mysql -uroot -p密码Mysql> change master to master_host='192.168.88.61' ,Master_user='repluser' , Master_password='123qqq...A' ,Master_log_file='master61.000001' ,Master_log_pos=441 ;Mysql> start slave;Mysql> show slave status \G Slave_IO_Running: Yes Slave_SQL_Running: Yes第二步:配置代理服务器(读写分离服务器)安装软件[root@host60 ~]# yum -y install maxscale-2.1.2-1.rhel.7.x86_64.rpm 修改主配置文件[root@host60 ~]# cp /etc/maxscale.cnf /root/ 备份主配置文件[root@host60 ~]# vim /etc/maxscale.cnf[maxscale]threads=auto # 服务启动后线程的数量,根据CPU 核数创建[server1] type=serveraddress=192.168.88.61 # 指定第1台数据库服务器的ip地址port=3306protocol=MySQLBackend[server2] type=serveraddress=192.168.88.62 # 指定第2台数据库服务器的ip地址port=3306protocol=MySQLBackend[MySQL Monitor] # 定义监视的数据库服务器type=monitormodule=mysqlmonservers=server1,server2 # 监视server1和server2user=mysqla # 监控用户账号passwd=123qqq...A # 监控用户连接密码monitor_interval=10000#禁止只读服务(注释)#[Read-Only Service]#type=service#router=readconnroute#servers=server1#user=myuser#passwd=mypwd#router_options=slave[Read-Write Service] # 启用读写分离服务type=servicerouter=readwritesplitservers=server1,server2 # 读写分离在server1和server2服务器之间进行user=mysqlb # 路由用户passwd=123qqq...A # 连接密码max_slave_connections=100%[MaxAdmin Service] # 管理服务(通过访问管理服务可以查看监控信息)type=servicerouter=cli# 因为只读服务没有启用 ,不需要定义服务使用的端口号(注释)#[Read-Only Listener]#type=listener#service=Read-Only Service#protocol=MySQLClient#port=4008[Read-Write Listener] # 定义读写分离服务使用端口号type=listenerservice=Read-Write Serviceprotocol=MySQLClientport=4006 # 端口号[MaxAdmin Listener] # 定义管理服务使用端口号type=listenerservice=MaxAdmin Serviceprotocol=maxscaledsocket=defaultport=4016 # 端口号:wq配置数据库服务器(在数据库服务器上添加监控用户和路由用户)注意:因为是主从结构 ,所以只需要在主服务器添加,从服务器会自动同步[root@host61 ~]# mysql -uroot -p123qqq...A # 添加监控用户 mysqla 用户mysql> grant replication slave , replication client on *.* to mysqla@'%' identified by '123qqq...A';# 权限说明:# replication client 监视数据库服务的运行状态 # replication slave 数据库服务器的主从角色 # 添加路由用户 mysqlb 用户mysql> grant select on mysql.* to mysqlb@'%' identified by '123qqq...A'; # 对授权库下的表有查询权限# 在从服务器查看用户是否同步[root@host62 ~]# mysql -uroot -p123qqq...A select user from mysql.user where user='mysqla';select user from mysql.user where user='mysqlb';第三步:启动读写分离服务验证数据库服务器的授权用户 mysqla 和 mysqlb# 安装提供mysql命令的软件[root@host60 ~]# which mysql || yum -y install mariadb [root@host60 ~]# mysql -h192.168.88.61 -umysqla -p123qqq...A[root@host60 ~]# mysql -h192.168.88.62 -umysqla -p123qqq...A[root@host60 ~]# mysql -h192.168.88.61 -umysqlb -p123qqq...A[root@host60 ~]# mysql -h192.168.88.62 -umysqlb -p123qqq...A# 说明:能连接成功才是对的,如果连接失败:执行如下操作# 在主数据库服务器host61 把添加 mysqla用户 和 mysqlb 用户的命令再执行一遍# 启动服务 [root@host60 ~]# maxscale /etc/maxscale.cnf # 查看日志文件[root@host60 ~]# ls /var/log/maxscale/ maxscale.log # 查看读写分离服务端口号[root@host60 ~]# netstat -utnlp | grep 4006 tcp6 0 0 :::4006 :::* LISTEN 1580/maxscale # 查看读写分离服务端口号[root@host60 ~]# netstat -utnlp | grep 4016 tcp6 0 0 :::4016 :::*LISTEN 1580/maxscale #把服务杀死 再启动 相当于重启服务 (修改了配置文件后要重启服务使其配置生效)# 通过杀进程的方式停止服务 [root@host60 ~]# killall -9 maxscale # 启动服务[root@host60 ~]# maxscale /etc/maxscale.cnf # 在host60本机访问管理服务查看数据库服务的监控信息[root@host60 ~]# maxadmin -uadmin -pmariadb -P4016MaxScale> list serversServers.-------------------+-----------------+-------+-------------+--------------------Server | Address | Port | Connections | Status -------------------+-----------------+-------+-------------+--------------------server1 | 192.168.88.61 | 3306 | 0 | Master, Runningserver2 | 192.168.88.62 | 3306 | 0 | Slave, Running-------------------+-----------------+-------+-------------+--------------------MaxScale> exit 排错方法 : 查看日志里的报错信息 vim /var/log/maxscale/maxscale.log第四步:测试配置读写分离服务的配置客户端能够连接读写分离服务器访问数据库服务# 首先在主数据库服务器host61 添加客户端连接使用的用户[root@host61 ~]# mysql -uroot -p密码 create database bbsdb;create table bbsdb.a(id int);grant select,insert on bbsdb.* to yaya@'%' identified by '123qqq...A';# 在从服务器host62查看存储数据库表和添加用户[root@host62 ~]# mysql -uroot -p密码desc bbsdb.a;select user from mysql.user where user='yaya';# 客户端host50连接读写分离服务器host60访问数据库服务mysql -h读写分离服务器的ip -P读写分离服务的端口号 -u数据库授权用户名 -p密码 [root@host50 ~]# mysql -h192.168.88.60 -P4006 -uyaya -p123qqq...A 连接读写分离服务后,可以对数据做查询和存储操作mysql> select * from bbsdb.a;Empty set (0.00 sec)mysql> insert into bbsdb.a values(8888);Query OK, 1 row affected (0.06 sec)mysql> select * from bbsdb.a;+------+| id |+------+| 8888 |+------+1 row in set (0.00 sec)第五步:验证怎么验证查询select 访问就在host62从服务器获取的数据呢?在从服务本机向表里添加1条记录(在从服务添加的新数据主服务器不会同步)# 从服务器插入1条数据[root@host62 ~]# mysql -uroot -p123qqq...A -e 'insert into bbsdb.a values(6262)'[root@host62 ~]# mysql -uroot -p123qqq...A -e 'select * from bbsdb.a'mysql: [Warning] Using a password on the command line interface can be insecure.+------+| id |+------+| 8888 || 6262 |+------+# 主服务器查询[root@host11 ~]# mysql -uroot -p123qqq...a -e 'select * from bbsdb.a'mysql: [Warning] Using a password on the command line interface can be insecure.+------+| id |+------+| 8888 |+------+# 客户端访问读写分离服务器查询数据(查询结果为从服务器数据源)[root@host50 ~]# mysql -h192.168.88.60 -P4006 -uyaya -p123qqq...A -e 'select * from bbsdb.a'mysql: [Warning] Using a password on the command line interface can be insecure.+------+| id |+------+| 8888 || 6262 |+------+怎么验证存储数据insert 访问 就是存储在了主机服务器host61上?# 客户端机插入数据[root@host50 ~]# mysql -h192.168.88.60 -P4006 -uyaya -p123qqq...A -e 'insert into bbsdb.a values(666)' # 在主服务器本机查看数据[root@host61 ~]# mysql -uroot -p123qqq...a -e 'select * from bbsdb.a'mysql: [Warning] Using a password on the command line interface can be insecure.+------+| id |+------+| 8888 || 666 |+------+[root@host50 ~]# mysql -h192.168.88.60 -P4006 -uyaya -p123qqq...A -e 'select * from bbsdb.a'mysql: [Warning] Using a password on the command line interface can be insecure.+------+| id |+------+| 8888 || 6262 || 666 |+------+还可以通过查看主服务器的position是否在客户端服务器插入数据后改动来确定是不是在主服务器中进行操作过数据补充说明如果主从结构中的从服务器宕机了,就实现不了读写分离了,会把读写请求都给主服务器处理。如果主从结构中的主服务器宕机了,读写分离服务无法访问

以上就是MySQL数据读写分离MaxScale相关配置的详细内容,更多关于MySQL数据读写分离MaxScale的资料请关注好吧啦网其它相关文章!

标签: MySQL 数据库