Java spring boot 实现支付宝支付功能的示例代码
一、准备工作:
1、登陆支付宝开发者中心,申请一个开发者账号。
地址:https://openhome.alipay.com/
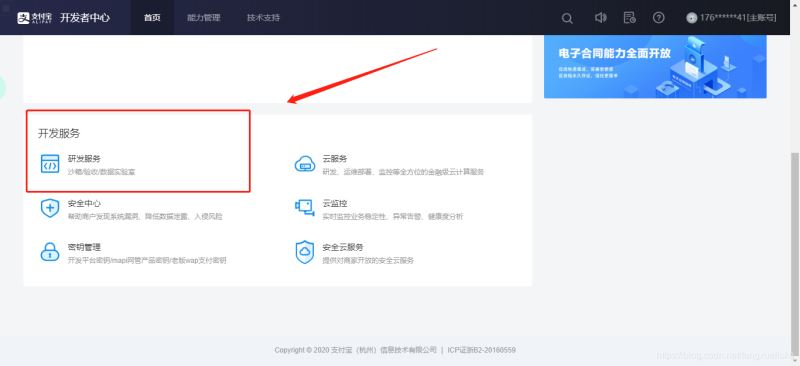
2、进入研发服务:
3、点击链接进入工具下载页面:
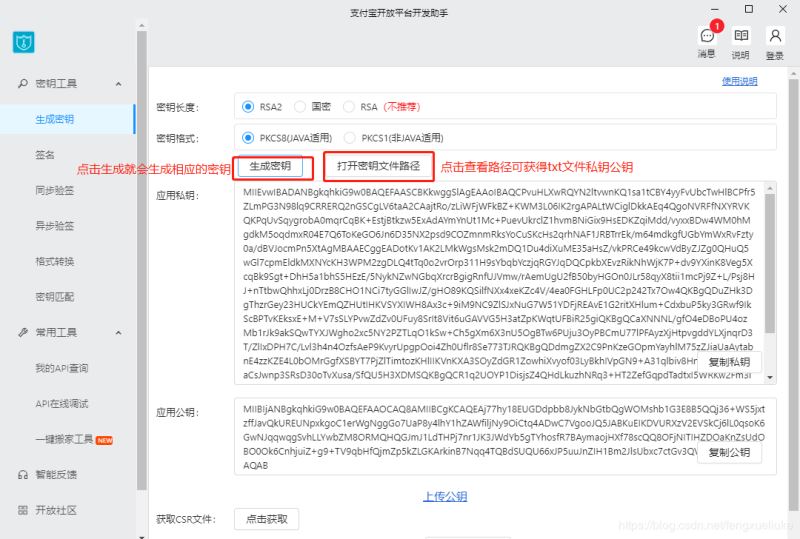
4、点击下载对应版本的RSA公钥生成器:

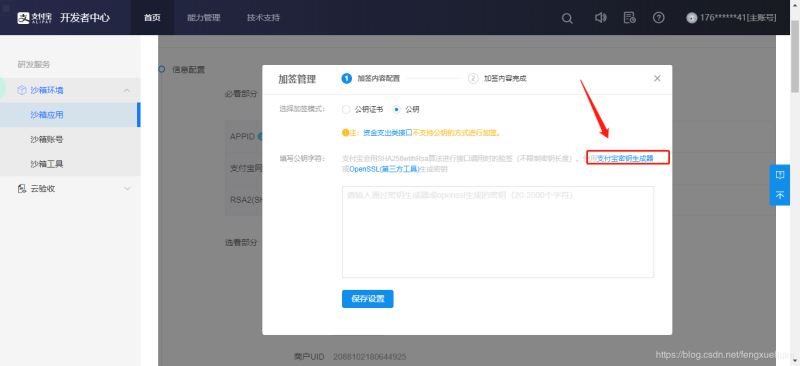
5、生成公钥密钥(记录你的应用私钥):
6、在支付宝配置公钥(点击保存):

二、搭建demo
1、引入jia包:
<dependency> <groupId>com.alipay.sdk</groupId> <artifactId>alipay-sdk-java</artifactId> <version>4.9.9</version> </dependency>
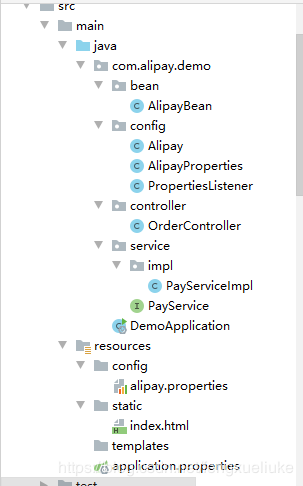
2、搭建工程,目录结构如下:
3、编写alipay.properties配置文件
# 您的APPIDappId = 2016102200738709# 商户私钥privateKey = 您的商户私钥# 支付宝公钥publicKey = 您的支付宝公钥# 服务器异步通知页面路径 ,需要公网能访问到。notifyUrl = http://公网能访问的路径# 页面跳转同步通知页面路径 需要公网能访问到。returnUrl = http://公网能访问的路径# 签名方式signType = RSA2# 字符编码格式charset = utf-8# 支付宝网关gatewayUrl = https://openapi.alipaydev.com/gateway.do# 支付宝网关logPath = 'C:'
4、编写AlipayBean:
public class AlipayBean { /** * 商户订单号,必填 * */ private String out_trade_no; /** * 订单名称,必填 */ private String subject; /** * 付款金额,必填 * 根据支付宝接口协议,必须使用下划线 */ private String total_amount; /** * 商品描述,可空 */ private String body; /** * 超时时间参数 */ private String timeout_express= '10m'; /** * 产品编号 */ private String product_code= 'FAST_INSTANT_TRADE_PAY'; /** * 省略get set 方法 */}
5、编写Alipay:
/** * 支付宝支付接口 */@Componentpublic class Alipay { /** * 支付接口 * @param alipayBean * @return * @throws AlipayApiException */ public String pay(AlipayBean alipayBean) throws AlipayApiException { // 1、获得初始化的AlipayClient String serverUrl = AlipayProperties.getGatewayUrl(); String appId = AlipayProperties.getAppId(); String privateKey = AlipayProperties.getPrivateKey(); String format = 'json'; String charset = AlipayProperties.getCharset(); String alipayPublicKey = AlipayProperties.getPublicKey(); String signType = AlipayProperties.getSignType(); String returnUrl = AlipayProperties.getReturnUrl(); String notifyUrl = AlipayProperties.getNotifyUrl(); AlipayClient alipayClient = new DefaultAlipayClient(serverUrl, appId, privateKey, format, charset, alipayPublicKey, signType); // 2、设置请求参数 AlipayTradePagePayRequest alipayRequest = new AlipayTradePagePayRequest(); // 页面跳转同步通知页面路径 alipayRequest.setReturnUrl(returnUrl); // 服务器异步通知页面路径 alipayRequest.setNotifyUrl(notifyUrl); // 封装参数 alipayRequest.setBizContent(JSON.toJSONString(alipayBean)); // 3、请求支付宝进行付款,并获取支付结果 String result = alipayClient.pageExecute(alipayRequest).getBody(); // 返回付款信息 return result; }}
6、编写AlipayProperties:
/** * 应用启动加载文件 */@Componentpublic class AlipayProperties { public static final String APP_ID = 'appId'; public static final String PRIVARY_KEY = 'privateKey'; public static final String PUBLIC_KEY = 'publicKey'; public static final String NOTIFY_URL = 'notifyUrl'; public static final String RETURN_URL = 'returnUrl'; public static final String SIGN_TYPE = 'signType'; public static final String CHARSET = 'charset'; public static final String GATEWAY_URL = 'gatewayUrl'; public static final String LOG_PATH = 'logPath'; /** * 保存加载配置参数 */ private static Map<String, String> propertiesMap = new HashMap<String, String>(); /** * 加载属性 */ public static void loadProperties() { // 获得PathMatchingResourcePatternResolver对象 PathMatchingResourcePatternResolver resolver = new PathMatchingResourcePatternResolver(); try { // 加载resource文件(也可以加载resources) Resource resources = resolver.getResource('classpath:你的alipay.properties文件路径'); PropertiesFactoryBean config = new PropertiesFactoryBean(); config.setLocation(resources); config.afterPropertiesSet(); Properties prop = config.getObject(); // 循环遍历所有得键值对并且存入集合 for (String key : prop.stringPropertyNames()) { propertiesMap.put(key, (String) prop.get(key)); } } catch (Exception e) { new Exception('配置文件加载失败'); } } /** * 获取配置参数值 * @param key * @return */ public static String getKey(String key) { return propertiesMap.get(key); } public static String getAppId() { return propertiesMap.get(APP_ID); } public static String getPrivateKey() { return propertiesMap.get(PRIVARY_KEY); } public static String getPublicKey() { return propertiesMap.get(PUBLIC_KEY); } public static String getNotifyUrl() { return propertiesMap.get(NOTIFY_URL); } public static String getReturnUrl() { return propertiesMap.get(RETURN_URL); } public static String getSignType() { return propertiesMap.get(SIGN_TYPE); } public static String getCharset() { return propertiesMap.get(CHARSET); } public static String getGatewayUrl() { return propertiesMap.get(GATEWAY_URL); } public static String getLogPath() { return propertiesMap.get(LOG_PATH); }}
7、编写PropertiesListener:
/** * 配置文件监听器,用来加载自定义配置文件 */@Componentpublic class PropertiesListener implements ApplicationListener<ApplicationStartedEvent> { @Override public void onApplicationEvent(ApplicationStartedEvent event) { AlipayProperties.loadProperties(); }}
8、编写PayService:
/** * 支付服务 */public interface PayService { /** * 支付宝支付接口 * @param alipayBean * @return * @throws AlipayApiException */ String aliPay(AlipayBean alipayBean) throws AlipayApiException;}
9、编写PayServiceImpl:
@Servicepublic class PayServiceImpl implements PayService { @Autowired private Alipay alipay; @Override public String aliPay(AlipayBean alipayBean) throws AlipayApiException { return alipay.pay(alipayBean); }}
10、编写OrderController:
/** * 订单接口 * * @author Louis * @date Dec 12, 2018 */@RestController()@RequestMapping('order')public class OrderController { @Autowired private PayService payService; @RequestMapping(value = 'alipay') public String alipay(String outTradeNo, String subject, String totalAmount, String body) throws AlipayApiException { AlipayBean alipayBean = new AlipayBean(); alipayBean.setOut_trade_no(outTradeNo); alipayBean.setSubject(subject); alipayBean.setTotal_amount(totalAmount); alipayBean.setBody(body); return payService.aliPay(alipayBean); }//支付成功支付宝调用方法: @RequestMapping(value = 'ok') public void ok(){ System.out.println('付款成功!'); }}
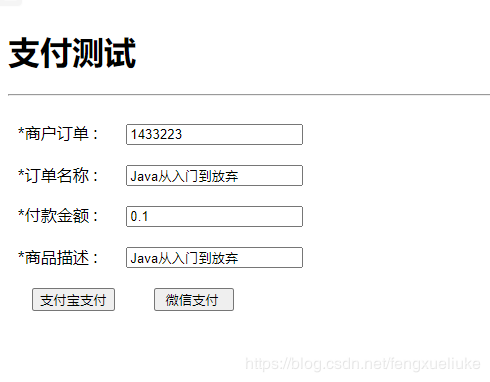
11、访问页面,输入信息进入支付页面:
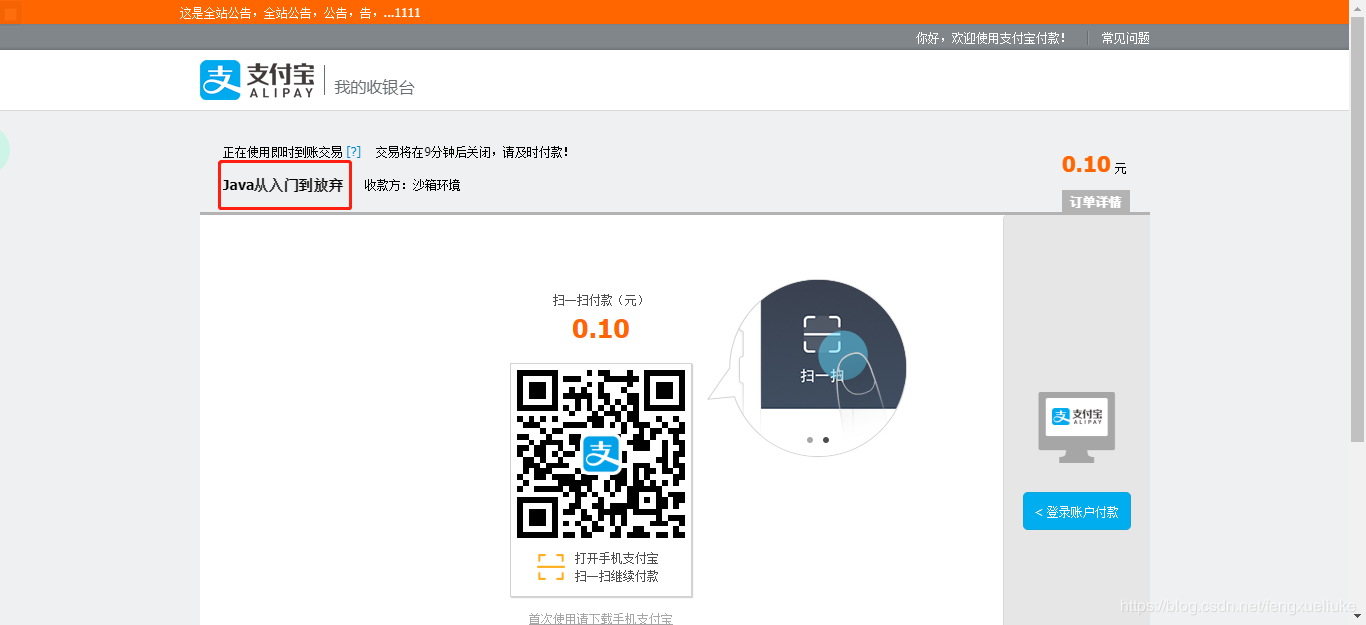
12、点击支付宝支付,页面跳转,成功!
总结
到此这篇关于Java spring boot 实现支付宝支付功能的示例代码的文章就介绍到这了,更多相关spring boot 支付宝支付内容请搜索好吧啦网以前的文章或继续浏览下面的相关文章希望大家以后多多支持好吧啦网!
相关文章:

 网公网安备
网公网安备